I’ve had a handful of people asking me for a good set of intstruction on how to install the Sega Saturn mod chips
I’m not responsible for any damage you may do to your Saturn by performing this modification. There isn’t much to worry about, but I just don’t want anybody mad at me 🙂
Thanks to Jess Ragan for his help in creating this guide!
What You Need
A model 2 (32-pin – usually round-buttoned) Saturn
Phillips head screwdriver with a long thin neck that can reach the Saturn’s case screws.
A copy of a Saturn game for testing purposes.
A nail file or something similar (may only need this if chip does not fit snugly)
Step 1 – Preparation
Keep your chip safe by leaving it in the anti-static bag that I ship them in.
Unplug your Saturn
Turn your Saturn upside down on a table
Remove the Saturn’s case screws
Put the screws in a safe place
Turn the Saturn right side up.
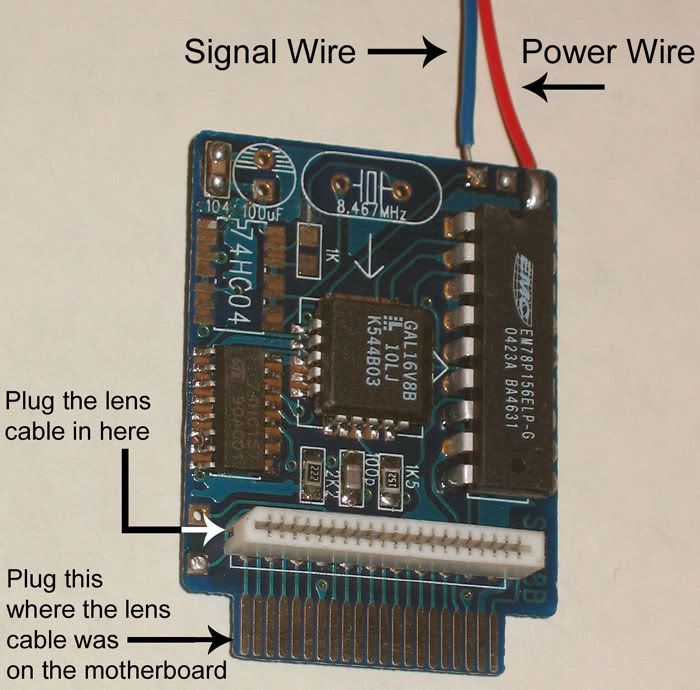
Step 2 – Install Chip and Hook-up Lens Cable
Look at the twisted white ribbon cable running from the center of the system to the shiny metal box on the right hand side.
Part of the ribbon will be taped to this metal box.
First peel the tape off the metal box, then gently unplug the right end of the ribbon cable.
Take this end of the cable and plug it into the connector on the modchip as pointed out below.
Plug the chip itself into the plug where the lens cable was.
If the chip does not plug in easily, you may need to file down the side edges of the plug in order to give it a better fit. However, you shouldn’t put too much pressure on the chip because it can crack easily. And a very gentle side-to-side wiggle can help insert it into the socket.
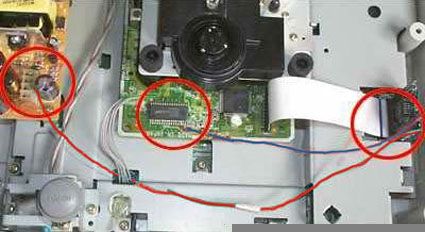
Step 3 – Getting Link Cables Layed Out
Below you can see the linking (soldering) points of the two cables from the IC chip towards the motherboad.
You can also see how the lens cable is to hooked up to the chip.
A close-up shot of both solder points follows in the next steps.
You may need to add some extra wire to extend the link cables’ reach across the machine.
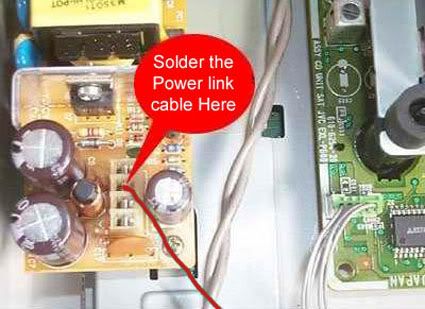
Step 4 – Connect the Power Link Cable
The small wire soldered into the left side of the mod chip is called a jumper cable
Attach this jumper cable to the Saturn to power the chip
On the left side of the Saturn, there are four metal pins in a vertical row
Take the end of the jumper cable and plug it into the second pin from the top (on the back of the unit) even if you see 5 pins instead of 4. (It’s the one marked 5VA — if one does not work, try the other).
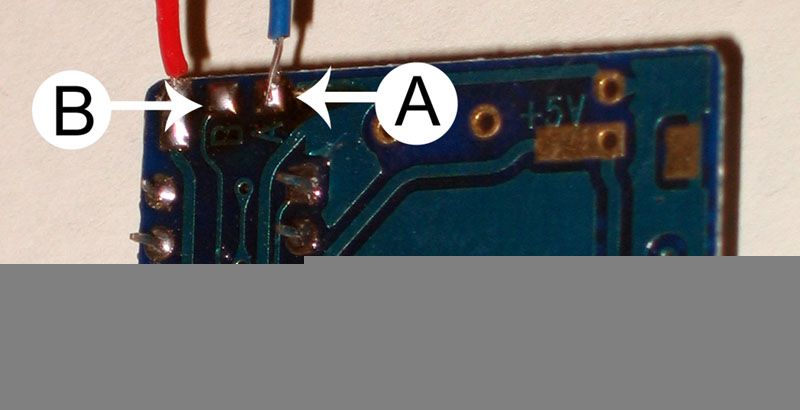
Below is a close-up of where to solder the power cable (red)
Please note the power wire MUST solder to the power socket directly!
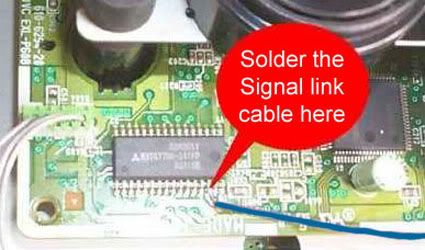
Step 5 – Connect the Signal Link Cable
There are two ways to do this step:
The original way was to solder the signal (blue) wire to pin 14 of the 32-pin chip.
To make this easier, put 2 pieces of thin cardboard surrounding and isolated the 14th pin
Then you soldered to the 14th pin very easily, ignoring the other pins
Below is close-up of where to solder the Signal cable (blue)
OR
You can get rid of the signal cable altogether and link the signal point to point B with a bit of solder instead of linking to pin 14 of the 32-pin chip.
Stick to good brand name CD-Rs and do not use CD-RWs
Burn at the slowest speed that your burner and media will allow
Check the region of the image before burning and make sure it matches the target console (use Saturn Region Patcher.)
If a burned game fails to boot but the Saturn displays the “Game disc is unsuitable for this console†message, then the burn and mod chip are working correctly but the region of the image is set to something different than the console’s region. If the console only displays audio tracks, the then the problem could be a bad image, bad burn, and/or mod chip installation issues.
When you click on links to various merchants on this site and make a purchase, this can result in this site earning a commission.
Affiliate programs and affiliations include, but are not limited to, the eBay Partner Network or Amazon Associates.
Need some help with troubleshooting. I Installed a mod chip a while ago but now my Saturn has stopped working. It goes straight to the Bios(?) screen and says “checking disc format…” but the laser does not move. On startup rather than beginning with the black screen where the many pieces fly together to form the Saturn symbol, it
loads right into the silver Saturn screen with the date at the bottom. I’d like to know if there is something wrong with the chip, ie loose wire or something non-chip related…
thank you Racketboy i bought my modchip from you and installed it on my Japanese Sega Saturn. I installed it right however i did have trouble pushing the chip into the saturns cd pin out. It didn’t work at all until i did that. But now its working and it feels damn good coz i got a load of backups that i had to use swap trick with in the past
Howdy, Man!
The modchip arrived OK here in Brazil!
Just a tip: the A<->B jumper to substitute the “blue” connection to pin 14 have not worked in TecToy’s brazilian Saturn. All Sega products are reassembled and sold here by TecToy. It’s a “model 2”, with a 21 way flat, 32 pins chip and round buttons, but needed the wire from “A” to “pin 14” to work. No happy A-B jumper here.
Thank You for sending it so quickly!
seeya!
Great job this little modchip.
I’ve just received it (7 days for transatlantic shipment), installed it and unleashed the Saturn’s capabilities to read CD-R.
One thing that may help some of the future modders : the chip needs to be deeply input in the slot. Failure to ensure it’s gone all the way down into the slot will prevent any game from working. (message “verifying disk format” will display and disappear)
First and foremost I wanted to say thanks to Racketboy for a VERY fast shipping turnaround.. Also When I got my mod chip I couldnt get it to work at all,.. Cd’s Would not spin (originals + Cdrs). I thought it might be the A – B connection so I tried the pin connection.. Same result. So I emailed Racketboy and gave em the low down on the problem.. (BTW – the chip was in all the way) He then told me send the chip back and he’d send me a new one.. Sure enough I did, he did, and it works like a charm.. Although I didnt get to try the A – B method again because I clipped the wires from the chip so I didn’t have to solder them to the board again.. Anyways thanks for the fast, customer satisfatory service!
i bought some chips from racketboy and a cartidge, i have to say the shipping is extremely fast, four days to arrive to belgium!
i modded the chip in order to make it work in my jap grey saturn, guess what, it works 😀 , it’s a six years of wait that’s over.
thanks to you for selling those chips.
You should advertise more the fact they can be modded to run on 20 pins saturn, you should even as the mod is not for begginer sell already modded chips.
these instructions are a bit dated.. It’s been found that you can just bridge A and B on the modchip with solder, and just connect the red wire to the 5V and you’re done.
There’s no need for a signal wire.
Hi! I just got a white, round-buttoned JP Sega Saturn, and I was wondering if the mod-chip and above installation instructions would work on my machine. Thanks!
Can i bridge points A>B instead on a PAL system? As someone mentioned to me that it does’nt always work??? I was gonna bridge em’ to make it a bit neater in my saturn.
Finally … our houseguests left and I was able to install my Saturn chip this morning. First in the slot was TEMPEST 2000. It was great playing this old favorite without the cheesy old Atari Jaguar.
Installation notes:
1. This was EASY!
2. Soldering is a good idea, but if you don’t have the confidence or just don’t want to hassle with it, you can get away with sticky tape!
3. The signal wire can be looped right back into the B slot and taped in place.
4. The power line can be stuck into the power supply without solder if you’re going to be gentle with your system or don’t mind opening it up again if it comes loose.
5. Filing down the sides of the chip to loosen the fit into the motherboard slot was key for me.
Thanks to Racketboy for making this so painless and fun!
I installed a modchip without much hassle, using the A+B method.
Thanks to racketboy for selling them at a good price and providing the excellent guide and troubleshooting (although I haven’t required that)
As I didn’t know how to solder I had a friend supervising me. I’ll just like to highlight the tricky parts of the process as far as I was concerned
1. soldering the power cable can be a bit tricky, as the contact is in the plastic square which is harder to reach with the soldering iron (for someone inexperienced, at least)
2. fitting the chip was hard. I guess this is why there is the advice of “filing” the edges for an easier fit. I wasn’t sure of where I was supposed to be able to file without damaging anything (maybe that part could be clearer in the guide?) so I just plugged it in eventually. It had to be pushed in with some force, and if you don’t do it properly (with care not to bend it) I can imagine one could snap it in this part of the fitting process, so be careful.
installation was pretty easy, i didnt even sodder, i used the A to B method and just inserted the wire from point A into the hole in the circuit board at point B and wrapped a little (1/4 inch) of the wire over board to keep it in place, and the power wire i simply wedge it in nice and secure to soldering at all, only difference i notice is that it takes slightly longer for games to boot. thanks racketboy.
For some strange reason, the mod in mine has to be mounted backwards, so that the laser cable faces towards the outside of the case, and the cable needs to mounted upside down. Its the only setup where the laser will actually move. And the Saturn still goes straight to the audio screen. It won’t play any games, CD-R or proper Saturn games. Any thoughts anyone?
i bought the chip from racketboy
and it took a week to get to me
in the uk scotland.packaging was
good and the chip works great tho
i did have problems with my saturn to begin with.i bought a model 2 saturn but the power supply and cd drive were the same as a model1 saturn but i found a good tutorial
on my version of saturn and followed it and also done the a+b
wire setup and all works perfect.
thank you racketboy
ps.here’s the link for my saturn version wich is 64pin version.
Mod chip and memory card showed up today installed the chip (no soldering yet) and started testing it. It runs great and the memory card now lets me play my X-men vs street fighter game. Super fast shipping bought the chip on Friday had it by Monday.
Instructions have been re-worded and organized in order to be clearer and more unique, as requested.
Need some help with troubleshooting. I Installed a mod chip a while ago but now my Saturn has stopped working. It goes straight to the Bios(?) screen and says “checking disc format…” but the laser does not move. On startup rather than beginning with the black screen where the many pieces fly together to form the Saturn symbol, it
loads right into the silver Saturn screen with the date at the bottom. I’d like to know if there is something wrong with the chip, ie loose wire or something non-chip related…
Any help is greatly appreciated.
Try taking a look at my new Troubleshooting page
Hopefully that will be a help to you 🙂
thank you Racketboy i bought my modchip from you and installed it on my Japanese Sega Saturn. I installed it right however i did have trouble pushing the chip into the saturns cd pin out. It didn’t work at all until i did that. But now its working and it feels damn good coz i got a load of backups that i had to use swap trick with in the past
Howdy, Man!
The modchip arrived OK here in Brazil!
Just a tip: the A<->B jumper to substitute the “blue” connection to pin 14 have not worked in TecToy’s brazilian Saturn. All Sega products are reassembled and sold here by TecToy. It’s a “model 2”, with a 21 way flat, 32 pins chip and round buttons, but needed the wire from “A” to “pin 14” to work. No happy A-B jumper here.
Thank You for sending it so quickly!
seeya!
Hi Racketboy,
Great job this little modchip.
I’ve just received it (7 days for transatlantic shipment), installed it and unleashed the Saturn’s capabilities to read CD-R.
One thing that may help some of the future modders : the chip needs to be deeply input in the slot. Failure to ensure it’s gone all the way down into the slot will prevent any game from working. (message “verifying disk format” will display and disappear)
Do I need to solder the power link cable or can I just place it where it belongs?
It’s possible to just wedge it in place, but it will be more secure and reliable if you solder it.
First and foremost I wanted to say thanks to Racketboy for a VERY fast shipping turnaround.. Also When I got my mod chip I couldnt get it to work at all,.. Cd’s Would not spin (originals + Cdrs). I thought it might be the A – B connection so I tried the pin connection.. Same result. So I emailed Racketboy and gave em the low down on the problem.. (BTW – the chip was in all the way) He then told me send the chip back and he’d send me a new one.. Sure enough I did, he did, and it works like a charm.. Although I didnt get to try the A – B method again because I clipped the wires from the chip so I didn’t have to solder them to the board again.. Anyways thanks for the fast, customer satisfatory service!
– Highly Recommended
i bought some chips from racketboy and a cartidge, i have to say the shipping is extremely fast, four days to arrive to belgium!
i modded the chip in order to make it work in my jap grey saturn, guess what, it works 😀 , it’s a six years of wait that’s over.
thanks to you for selling those chips.
You should advertise more the fact they can be modded to run on 20 pins saturn, you should even as the mod is not for begginer sell already modded chips.
that’s my thoughts.
keep up the good work
these instructions are a bit dated.. It’s been found that you can just bridge A and B on the modchip with solder, and just connect the red wire to the 5V and you’re done.
There’s no need for a signal wire.
Hi! I just got a white, round-buttoned JP Sega Saturn, and I was wondering if the mod-chip and above installation instructions would work on my machine. Thanks!
If the insides looks like the one in the picture, you’re all set. The region/color of the Saturn doesn’t make a difference.
Thanks!
Alright
Extremely fast postage, thanks.
Can i bridge points A>B instead on a PAL system? As someone mentioned to me that it does’nt always work??? I was gonna bridge em’ to make it a bit neater in my saturn.
Thanks Racketboy
the region shouldn’t matter, but yes.
In most cases the A+B method will work
Hi racketboy!modchip is arrived!just 7 days and it’s in italy!wonderful transation
Finally … our houseguests left and I was able to install my Saturn chip this morning. First in the slot was TEMPEST 2000. It was great playing this old favorite without the cheesy old Atari Jaguar.
Installation notes:
1. This was EASY!
2. Soldering is a good idea, but if you don’t have the confidence or just don’t want to hassle with it, you can get away with sticky tape!
3. The signal wire can be looped right back into the B slot and taped in place.
4. The power line can be stuck into the power supply without solder if you’re going to be gentle with your system or don’t mind opening it up again if it comes loose.
5. Filing down the sides of the chip to loosen the fit into the motherboard slot was key for me.
Thanks to Racketboy for making this so painless and fun!
I installed a modchip without much hassle, using the A+B method.
Thanks to racketboy for selling them at a good price and providing the excellent guide and troubleshooting (although I haven’t required that)
As I didn’t know how to solder I had a friend supervising me. I’ll just like to highlight the tricky parts of the process as far as I was concerned
1. soldering the power cable can be a bit tricky, as the contact is in the plastic square which is harder to reach with the soldering iron (for someone inexperienced, at least)
2. fitting the chip was hard. I guess this is why there is the advice of “filing” the edges for an easier fit. I wasn’t sure of where I was supposed to be able to file without damaging anything (maybe that part could be clearer in the guide?) so I just plugged it in eventually. It had to be pushed in with some force, and if you don’t do it properly (with care not to bend it) I can imagine one could snap it in this part of the fitting process, so be careful.
installation was pretty easy, i didnt even sodder, i used the A to B method and just inserted the wire from point A into the hole in the circuit board at point B and wrapped a little (1/4 inch) of the wire over board to keep it in place, and the power wire i simply wedge it in nice and secure to soldering at all, only difference i notice is that it takes slightly longer for games to boot. thanks racketboy.
hey, i had a quick question.
my power link cable came loose from the modchip, i was wondering how to reattach it. Do i need to solder it back on?
thanks
yup, just solder it back into place.
best of luck.
BTW, feel free to join the forums and post in the technical help section for quicker help
For some strange reason, the mod in mine has to be mounted backwards, so that the laser cable faces towards the outside of the case, and the cable needs to mounted upside down. Its the only setup where the laser will actually move. And the Saturn still goes straight to the audio screen. It won’t play any games, CD-R or proper Saturn games. Any thoughts anyone?
i bought the chip from racketboy
and it took a week to get to me
in the uk scotland.packaging was
good and the chip works great tho
i did have problems with my saturn to begin with.i bought a model 2 saturn but the power supply and cd drive were the same as a model1 saturn but i found a good tutorial
on my version of saturn and followed it and also done the a+b
wire setup and all works perfect.
thank you racketboy
ps.here’s the link for my saturn version wich is 64pin version.
http://www.angelfire.com/pa/Raluminat/model264.html
Just received my modchip in the mail today, very fast shipping. Time to install!
Mod chip and memory card showed up today installed the chip (no soldering yet) and started testing it. It runs great and the memory card now lets me play my X-men vs street fighter game. Super fast shipping bought the chip on Friday had it by Monday.