Jagosaurus wrote: ↑Fri May 17, 2024 3:00 pm
Keep posting project findings & progress

Glad you're getting a kick out of it.

I don't know if anyone else is, but writing these post will help me to retain this info.
I've made some more progress...

I ended up pulling the mod chip out of the 1.0. Now since without the mod chip this was a totally stock console, I needed some way to flash the BIOS. I have the softmodded 1.1, I figured I could use it to set up an exploit to run on the 1.0. I was trying to run the Endgame exploit from an SD card using a controller port USB dongle. The SD card was working to transfer save games, but it was not working for Endgame . I was seriously considering just desoldering the TSOP and flashing it externally. But I got an official Xbox memory card, and I ended up using the softmodded 1.1 to put the Endgame files on it. So long story short, I used the exploit to flash the latest Cerbios to my 1.0.
Now with a hacked BIOS flashed to the TSOP, there was absolutely no reason to keep the stock HDD In there any longer. I installed a Crucial 480GB SSD, using a StarTech SATA adapter and a custom 80-conductor PATA cable. I've actually used these StarTech adapters before in the past, as well as other StarTech stuff, so I would have gotten this one anyway. But this is pretty much the go-to SATA adapter for Xboxes, so that's good. The PATA ribbon cable that Microsoft used in the Xbox is non standard, in terms of the length and orientation of the connectors. But I found someone on eBay that makes custom 80-conductor replacement cables that are identical in size and orientation to the stock cables. So that's what I'm using.
I initially used the OGXbox Installer 2021 disc after installing the SSD. I was able to use that disc to format and set up the new drive, which was pretty much an automated process. This disc sets up a new HDD really well. It installs a ton of dashes and apps and has it's own configuration that's pretty nifty.
After I got the 1.0 console fully running on the new drive, I went ahead and reflahsed the BIOS with UDMA-6 mode activated. I've been running it on this BIOS for a while now and it seems completely stable.
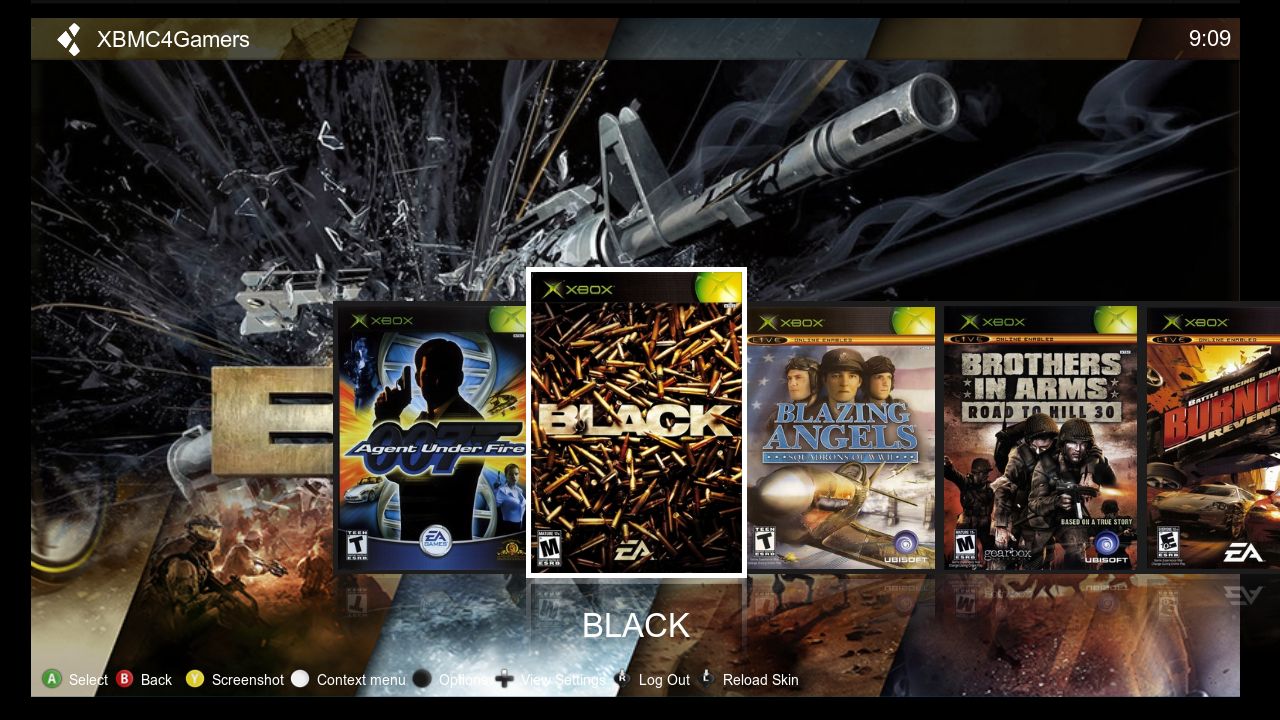
While I like OGXbox Installer, it puts a lot of stuff on the HDD. Some of which I probably wont ever need. The thing is, when you look up how to set up a new HDD, a lot of sources say to just use a disc like this one. But it eventually dawned on me that I could sorta manually set up the drive. So what I did was use the OGXbox installer disc to do a factory reset, which essentially wipes the drive and puts the factory dashboard files back on it. The only reason I did this instead of starting with a totally empty drive is because I'm not sure if any of those factory dash files are needed for anything. After a factory reset, the console would now only boot to the stock dashboard which isn't helpful in any way. But then I again used the OGXbox Installer disc to be able to FTP to the HDD. I uploaded the UnleashX dash to the HDD. Cerbios has an ini file that you put in the root of the C drive, and one of the things you can do with it is specify the location of the dashboard you want to launch. So I just made sure to point it to where I put UnleashX, and it worked!
After that, I uploaded XBMC4Gamers to the HDD, and updated the Cerbios ini file to load that instead. I'm still kinda torn between UnleashX and XBMC4Gamers, but I think I might have to go with XBMC. It's just cleaner and set up better for booting games from the HDD. You can totally do this in UnleashX as well, but just not as good. XBMC4Gamers also has the eye candy for box art and whatnot. I'm thinking I might set up the 1.0 with XBMC4Gamers, and then maybe keep UnleashX on my 1.1 (which is what is currently on there).
(Embedded YouTube videos would be nice for this)
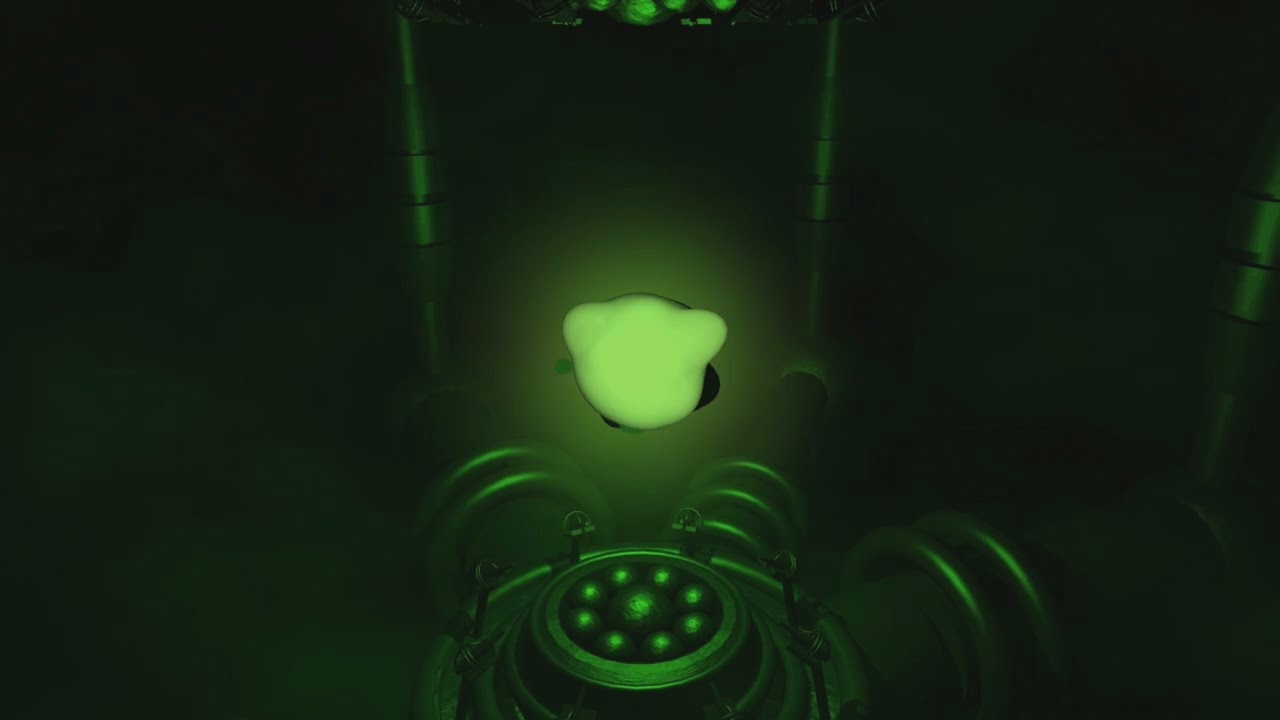
One thing that I've wasted a lot of time with is figuring out how to restore the original green "flubber" boot animation (picture above). With Cerbios, if the boot animation is active, it's all blue and different looking. You're suppose to be able to set it to practically whatever you want. There's something in the ini file that points to the boot animation in another folder, which I have uploaded to the HDD, but no matter what I do it is unaffected and remains blue. The blue animation is kinda neat, but I really want to restore it to the stock green one. It's just that the classic Xbox green branding feel right, ya know? I'll mess around with it some more at some point, because I really want that original intro, but I'm kinda annoyed with it for now.
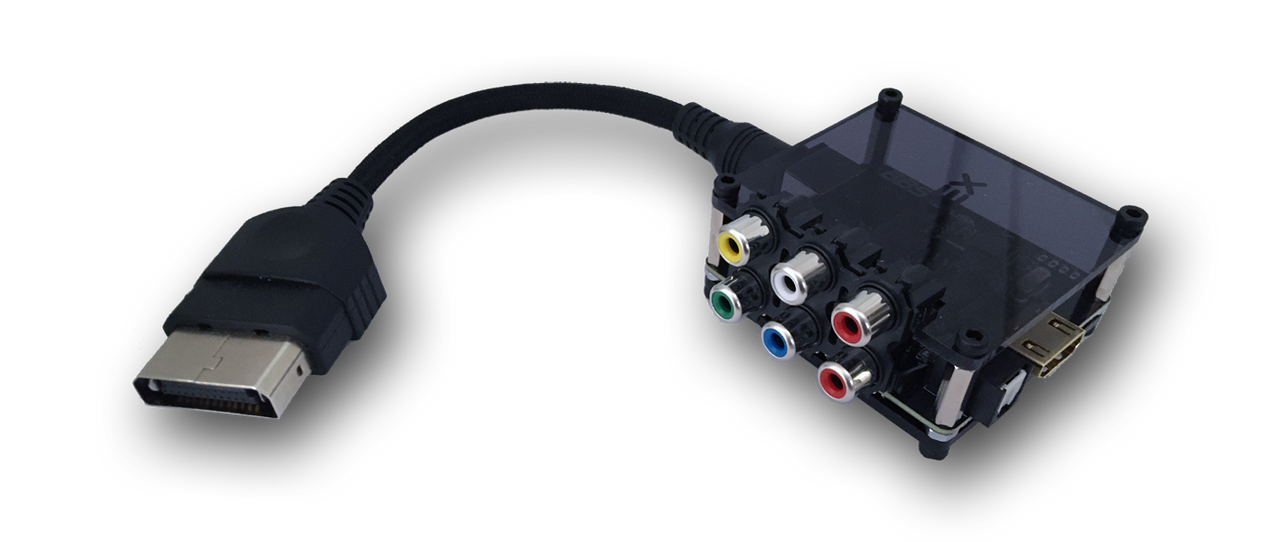 https://www.beharbros.com/product-page/xedusa-plus
I ended up getting the above adapter. The reason I went with this one is because it outputs HDMI as well as component. HDMI will be a lot easier for me to use the digital audio output with, but I was concerned that if I ended up wanting to use the RetroTINK 5X I would need component cables. The Xedusa does both, so I thought that would be my best bet. I first tested it out with my 1.1 Xbox and the picture looks FANTASTIC! I turned out the digital audio output options and loaded up Medal of Honor Frontline. Just play testing it for a few minutes, the upgrade to surround sound was really nice. The problem though is that the Xedusa will not output audio over HDMI when I used it on my 1.0 Xbox. To be fair, there is a disclaimer that says that audio "might" not work with the 1.0. But it totally doesn't work! So that kinda sucks. The picture quality is amazing. It does have optical and coaxial digital audio output, that I could plug into my AVR, but then I would have to switch audio settings on my AVR constantly since this is a shared input and that's exactly what I wanted to avoid. So I went ahead and pre-ordered the ElectronXout, which is suppose to ship by the end of this month. The ElectronXout doesn't have any audio issues, but it is HDMI only which is why I went with the Xedusa. So I figured, whatever, I have two Xboxes and now I have two AV adapters. The Xedusa works 100% with my 1.1 and can also do component video if I ever need it. The ElectronXout I'm hoping looks just as good as the Xedusa, and from what I'm reading the audio output has no issues.
Oh, right, and I've actually been playing Xbox games too! LOL. I'll have to talk about games at some point, and not just the modding and tinkering.
I mentioned I picked up an official Xbox memory card. I actually wanted it to transfer game saves. I'm thinking after I get both consoles set up the way I want them, I will have one hooked up to my HDTV and the other I might put in the basement and use with my CRT. If I want to share game save between them, I could use FTP for that. But using a memory card would actually be a lot faster and easier.
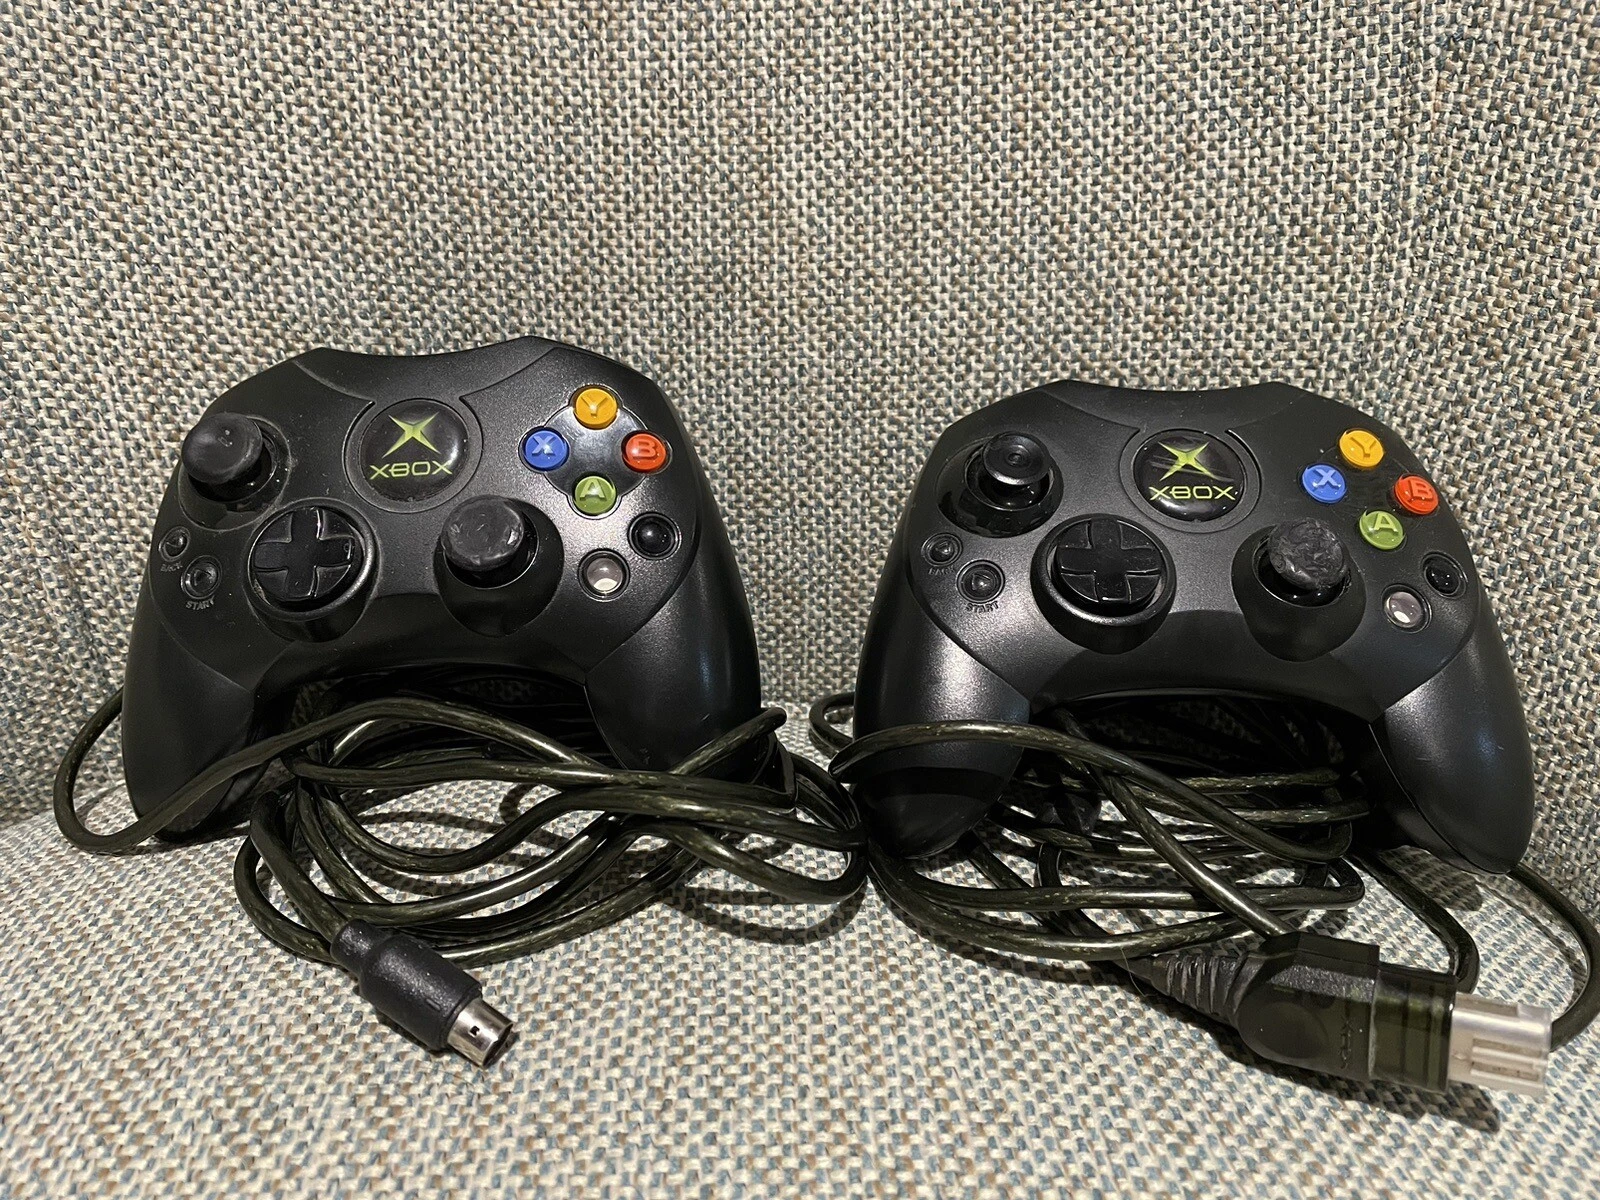
I scored two more S controllers for pretty cheap, $13 shipped! The catch is that they're not in perfect condition. In fact, they look a little ratty. But I figured overall the are in decent condition and I could fix them up fairly easily. They're not really scratched up much, the worst thing about them is the joysticks. The rubber is very worn on all of them, and completely missing from one stick. They're missing one break away cable. And one of the controller has a torn strain relief. But for the price, I was willing to take the gamble. I was able to test them out today. There's a very nice controller test app for the Xbox. The first controller works perfectly fine. The one with the torn strain relief will need a new cable, but I was able to pinch the cable in a way to get it work long enough to test the functions and it works great. A replacement cable will be cheap. And I actually already have a few of those stretch on thumb grips I could use, or I may purchase replacement caps if I find something better looking (suggestions welcomed).