Chimp Method by Jagosaurus in the first Reply below
This is for the original Xbox, a larger hard drive upgrade replacement for the purpose of installing disc games and homebrew utilities. Note that the Xbox will either need a Soft Mod or a Mod Chip in order to install the replacement hard drive boot configuration disc. Any game saves that are not locked can be backed up to the memory card. A second Xbox console or extra memory cards come in handy to backup all the game saves. See the References at the bottom that detail the mod chip.
I also posted a Guide for the Game Cube and PS2; running installed disc games.
Gamcube SD Card / PS2 Fat Hard Drive - viewtopic.php?p=322332#p322332
Tools and Parts
Only a few specialized tools are needed.
T10 Torx Driver
T15 Torx Driver
T20 Torx Driver
Slotted Screwdriver or Putty Knife
Pata (IDE) Hard Drive
Hard Drive Configuration Disc (Slayers EvoX Auto Installer 2.7)
Modded Xbox Console without Thomson Drive
Do not to use a Thomson drive due to reliability and read issues.
Original Xbox Revision Guide
http://www.racketboy.com/forum/viewtopic.php?p=755098#p755098
Guess what disc drive is in each Xbox. Hint; the Xbox below does not have a Thomson drive.
Disassemble
Unplug the Xbox, press the eject and power buttons a few time to discharge some of the internal capacitors. The hard drive change over can easily be done under an hour.
http://xbox.douglasstridsberg.com/2009/ ... your-xbox/
Before you unplug the power out of your XBOX, make sure you are able to do all the steps required within 4-5 hours. If the XBOX is without power for more than that time, its internal clock will lose power and you won’t be able to boot off a DVD until you’ve reinserted the old hard-drive and started the XBOX once.
Turn console upside down. Use a slotted or putty knife to peel the four rubber feet from the outer corners. You do not have to completely remove them, just bend the rubber pad back to allow removing the screws.
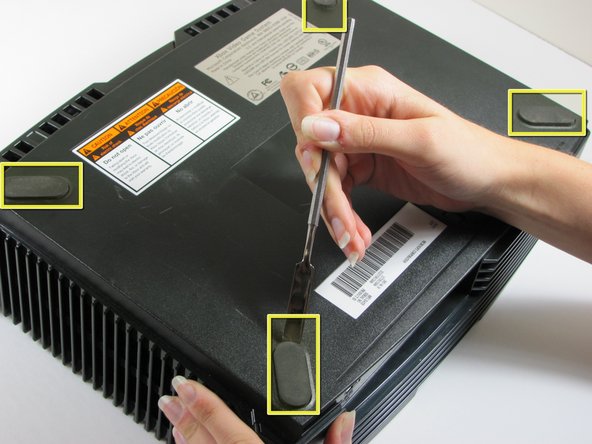
There is a screw hidden under the bottom silver description sticker and another screw under the white bar code left side of sticker. Both screws are to the left of each sticker when read right side up, use your finger to push in the labels to locate. Either peel stickers back or just poke a hole. The holes will not ruin any of the text on the stickers.
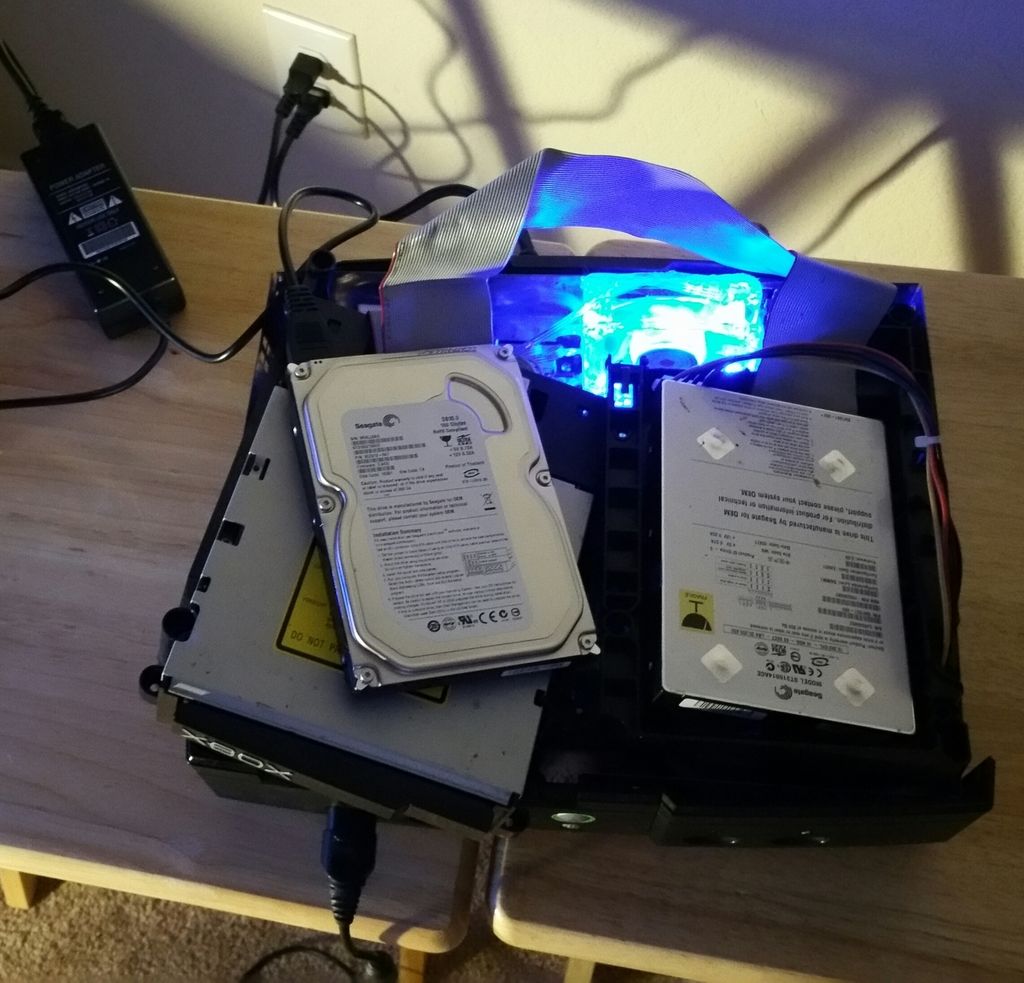
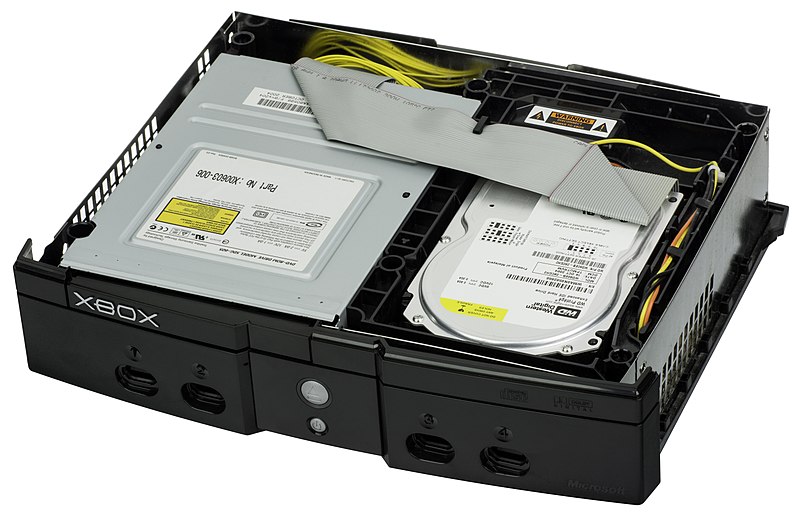
Remove the bottom six T20 Screws. Turn Xbox console right side up and lift the top cover. The Disc drive and the 10gb hard drive can now be seen.

Pull the hard drive IDE cable clear of its hook near the back of the hard drive to expose the mounting screw. Unplug the IDE cable, but leave the power cable plugged in for the moment. Remove the one T10 Screw from the plastic frame securing the hard drive assembly. Unhook the power cable all the way around the frame to give slack. Gently lift the hard drive frame assembly; pulling the power cable free of the plastic hook where it feeds down to the main board.
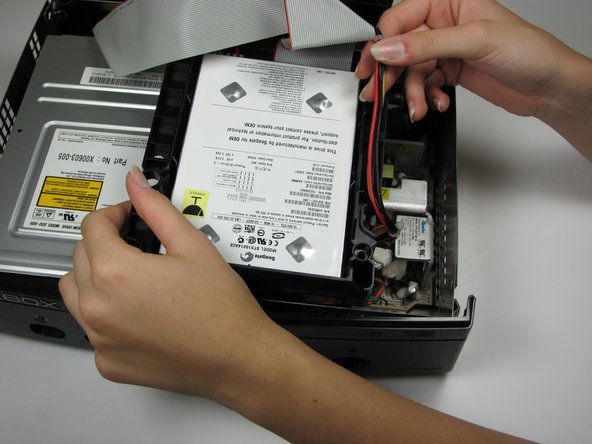
Remove four T15 screws holding the hard drive to the plastic frame. Lift the hard drive clear, remove the power cable. To pull the disc drive, a long T10 driver is needed. Remove two T10 Screws buried at each front corner, remove IDE and power cables before lifting out disc drive assembly.
Be sure the replacement hard drive jumper is set to Master or Cable Select. I could not get my replacement to get recognized in Master, but it worked fine moving the Jumper to Cable Select. Plug in the replacement drive and reinstall into frame.
CRTGAMER wrote:Do not modify the original Xbox Hard Drive. Place it in a safe place in case you have problems getting the replacement drive to boot. The console internal battery might be worn and lose memory before the swap is completed. The original drive can be used to initially get the Xbox up and running before attempting the swap again.
Original Xbox Seagate hard drive is only 10gb, replacement Maxtor is 320gb.
- Xbox Hard Drive Upgrade 01.jpg (255.51 KiB) Viewed 67641 times
Do not reinstall the console top cover until after the new drive is configured. There is a chance the old drive may need temporarily swapped in to get everything working right.
Install Hard Drive Boot Disc
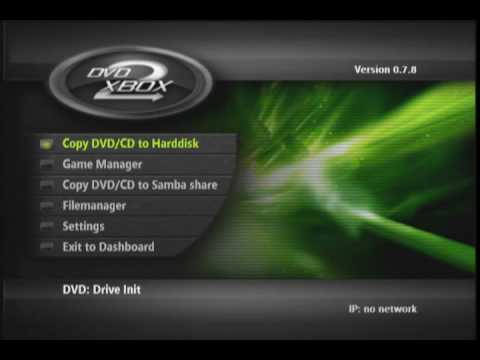
Google download whatever hard drive configuration boot disc to set up the new hard drive. Be sure to burn the ISO to a DVDR, sometimes Xbox disc drives cannot boot CDRs. I used Slayers EvoX Auto Install 2.7 which also includes a nice round of utilities including DVD2Xbox used for installing disc games to the internal hard drive.
If for some reason the boot disc does not work, the console internal battery might have lost memory. Remove the boot disc, temporarily swap back the original hard drive, boot up normally and then swap back again to the replace drive. It is important not to install or change anything in the original Xbox hard drive since it might be needed to reboot the Xbox console.
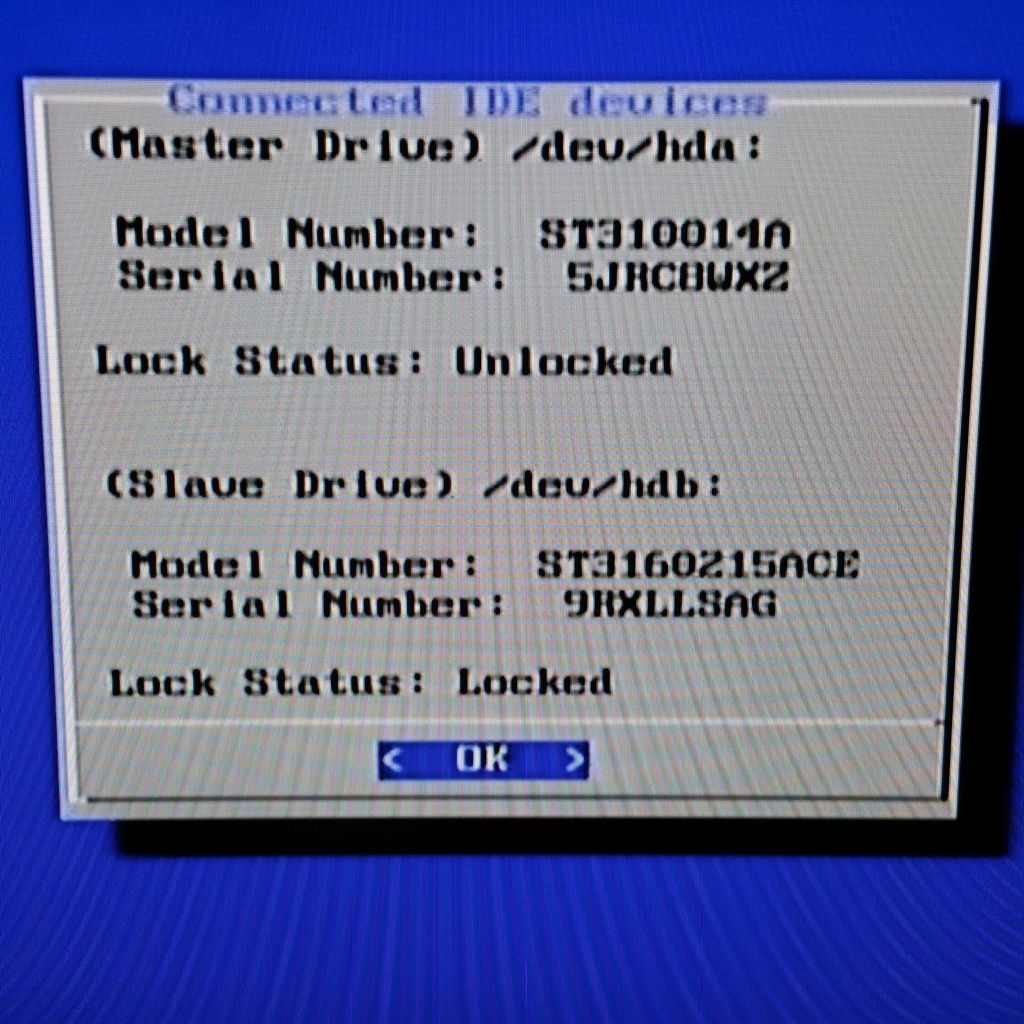
Right Click for a larger view
Note the disc reader drive, a very uncommon Hitachi drive for the original Xbox!
- Xbox Hard Drive Upgrade 02.jpg (244.61 KiB) Viewed 67641 times
Testing
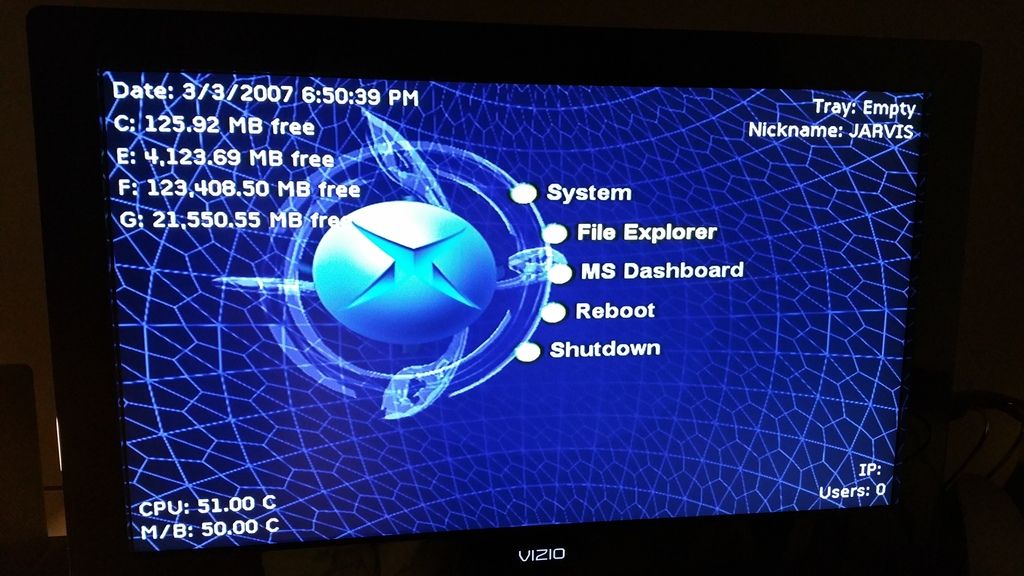
The hard drive should boot to its custom Dashboard without any disc in the disc drive. From there look in Applications to find the Game Installers. The original Xbox Dashboard is also included to manage the memory cards.

Under Applications, DVD2Xbox is so easy to use. Simply insert a game disc and choose the copy option to install to the hard drive. Once the game installs it can be ran without the disc directly from DVD2Xbox.
Some games that I have tried are certain unique imports including Metal Wolf Chaos, N.U.D.E, Petit Copter and Taito Legends 2. Not only the hard drive menu driven convenience, but an opportunity to install rare imports. Unfortunately PAL Taito 2 does not seem hard drive compatible, but at least it can run on a NTSC Xbox once the region can be circumvented with the Mod Chip.

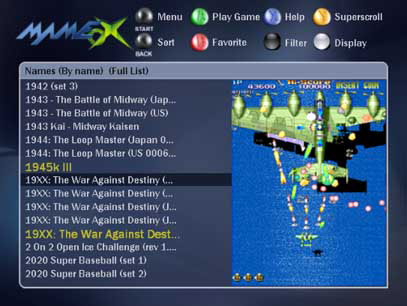
There are also some Emulators that work very well, the Xbox console is a very good Mame console!
I prefer a Mod Chip over the Soft Mod. I was fortunate to buy this console with an Aladdin Mod Chip already installed. This also allows ease of running any import disc directly such as PAL Taito Legends 2.
- Xbox Hard Drive Upgrade 03.jpg (215.21 KiB) Viewed 67641 times
01toubib wrote:http://www.racketboy.com/forum/viewtopic.php?p=910841#p910841
So after much trial and error, I've finally found a winning combination of disks to successfully Soft Mod a Japanese Xbox. So for those of you with really cool Japanese Xboxs looking to turn them region free without opening them, here is your ticket.
Here is the final trial and error list list:
Softmodable Disks:
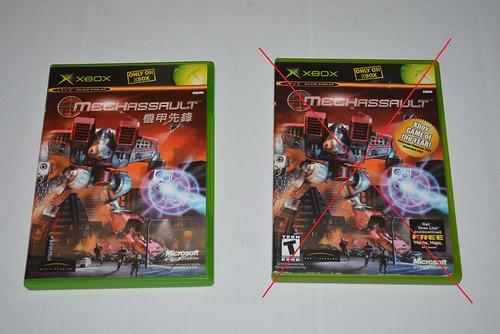
MechAssault (Asian Version, Not Japan Version!) Part Number X09-24634 (Front of Disk)
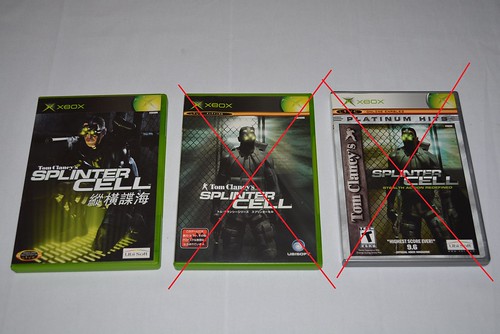
Splinter Cell (Asian Version, Not Japan Version!) U78-00001 US012A01 (Front of Disk)
Unable to Softmod: (at least in the traditional way)
MechAssault (USA Version) Does Not work, cannot get past region lock
(Unknown/Untested) MechAssault (Japan Version)
Splinter Cell (USA Version) Does not work, cannot get past region lock
Splinter Cell (Japan Version) Does not work, Freezes at save menu
Here are pictures for reference:
Proof:
Splinter Cell Softmodded Kasumi Chan NTSC-J Xbox
MechAssault Softmodded Skeleton Edition NTSC-J Xbox
References
Xbox Drive Compatibility List - http://xboxdrives.x-pec.com/?p=list
Aladdin Advance XT Mod Chip Install - http://xbox.bula.nu/aladdin/xt/
Xbox Tweaks and Mods - http://xbox.douglasstridsberg.com/
Crack Open That Xbox - http://www.llamma.com/xbox/Repairs/crac ... t_xbox.htm
Xbox Hard Drive Replacement - http://www.ifixit.com/Guide/Xbox+Hard+D ... ement/1450
XBOX Hard Drive Upgrade - http://www.instructables.com/id/Origina ... /?ALLSTEPS
Slayers EvoX PDF File - http://www.elgen.net/evoxinstall.pdf
fumanchu wrote: http://www.epforums.org/showthread.php? ... L-DISC%29*
Well, here we go again, several years after coining the word "Auto-Installer" we have the latest version 2.7
Before you expect the world, please know that v2.7 is in essence a cleaned-up update from v2.6 and not a new product. It runs on the same good old EvoX but has the latest STABLE apps and scripts. There is ONE cool new feature that has been asked a lot so read on...
NEW! SlaYer's EvoX Auto-Installer v2.7:
* Ability to easely change the default dash between EvoX / XBMC / Ava / UnleashX(info) on any kind of HDD
* 137GB HD's and the G: Drive
* XBOX v1.0 - V1.6 Support through new v1.6 Bioses (possible future versions too)
* Ability to restore the retail Xbox HD to retail mode
* Ability to Format the C: E: F: G: or X:,Y:,Z: partitions independently
* Latest Stable Media Center XBMC Custom Configured with ShoutCast Radio and lots of cool Scripts
* Ability to flash virtually ANY v1.0-v1.6 XBOX MOD chip & some TSOPs with 256K or 1MB
* Ability to restore the latest v1.0-v1.6 compatible M$ dash
* Comprehensive Step-by-Step Instalation and troubleshooting manual, released as locked & encrypted PDF 5.0 for better compatibility
Software Included (some new, some cleaned up and updated versions from v2.6):
* boXplorer 0.96 G: Patched
* M$ Dash Live v5960 ( v1.0 - v1.6 compatible )
* dvd2xbox(info) v0.7.7 (with cool Project Mayhem III skin)
* EvoX Dash v1.8.3935
* XBMC 2.0.0 (10-26-2006 CVS T3CH build) w/ PMIII, X360 & Blackbolt Classic 2.0 Skins
* Avalaunch(info) 0.49.3.142 (auto-updatable on-line & can download the Qwix(info) PC ISO Manager)
* DVDX v2.0 Region Free
* UnleashX Dash V0.37.1218 Build 543
* Xboxdash dvd region free patch disc v1.03 (to be used on the older 4920 dash only!
Chimp Method in the next Reply