Sega Saturn Light Gun Mod

Guides to jumpstart your Retrogaming lifestyle
skate323k137
Next-Gen
Posts: 1271
Joined: Sun Sep 16, 2007 11:26 am
Location: Lansing, MI

Sega Saturn Light Gun Mod

Post by skate323k137 »

This post explains how to easily install an arcade quality switch into a Sega Saturn light gun. I made a couple of these in the past and figured some other people might enjoy having arcade quality trigger response at home. Honestly, if you know anyone that works at your local arcade, they'll probably give you a few microswitches for next to nothing, if not free.

(background for modification)
Even a brand new un-modified saturn gun will miss a decent percentage of your trigger pulls. I know this because I was actually able to acquire and test several previously un-opened light guns over the past few years. Sometimes the new ones were even worse than used ones (!). Once you install a "real" switch, the end result is a much more consistent response from the gun, and the possibility of a much higher rate of fire. So, now that I can play all my games, I dug out a couple of my spare light guns and went to town installing Cherry brand microswitches (the same switches under the buttons at your local arcade, AKA the ones from HAPP controls).

NOTE: This is really a simple mod, but i've tried to spell it out so that anyone can follow these instructions. Honestly, a picture of the finished product is all most people would probably need. Obviously, I accept NO RESPONSIBILITY if you screw this up.

YOU NEED:

Image

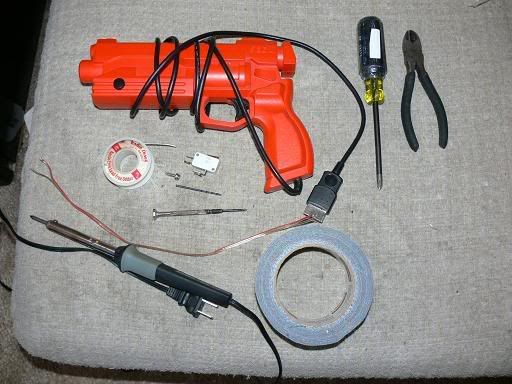
(1) Sega Saturn stunner brand name light gun
(1) small phillips head screw driver to dis-assemble the gun, and a bigger phillips screw driver to mount the switch.
(1) diagonal cutters (wire cutter)
(1) 25W (recommended) Soldering Iron, Solder, and basic soldering skills
(1) cherry brand (recommended) microswitch, with metal actuator piece
(1) Piece of speaker wire, approx 3-4 inches in length
(1) Sheet metal screw with a 1/4" head (5/8" long, usually also slotted for screw drivers. I used some that came with a cable TV splitter) OPTIONAL BUT HIGHLY RECOMMENDED
(1) roll duct tape (you'll see, especially if you can't find a suitable screw)
(1) small drill bit to pilot the screw hole, i used a 5/64".
and of course a drill with which to use said bit.

THE MOD:

Image

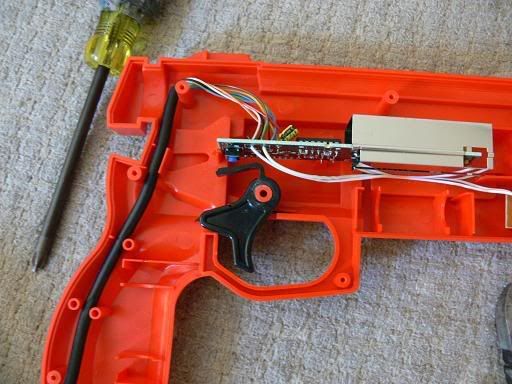
1. Lay the gun on its side, screws facing up. Remove the screws, and open the gun. If the screws give you a hard time, use one hand to push down on the screw driver and your free hand to grasp the driver with a pliers and turn it. BE SURE TO SET ASIDE THE LENS THAT FITS IN THE END OF THE "BARREL". (I always lose that &*$@in thing) Also, be cautious not to lose the parts for the "start" button.

Image

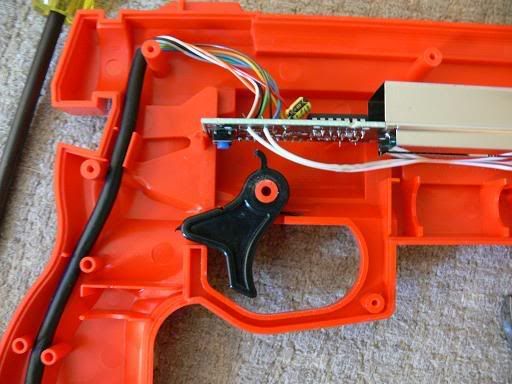
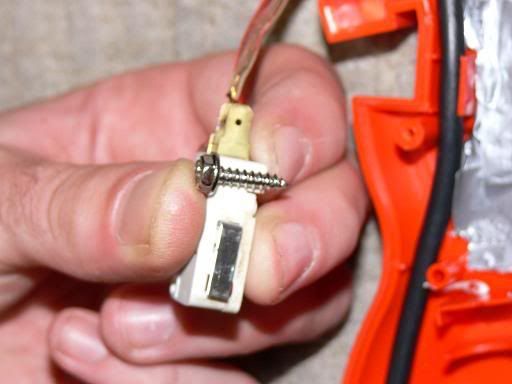
2. Use your diagonal cutters to cut the trigger (you can remove the trigger to do this), so it no longer actuates the stock switch. (Not pictured: Trim the metal actuator on the end of the microswitch you're installing to be flush with the end of the switch)

Image

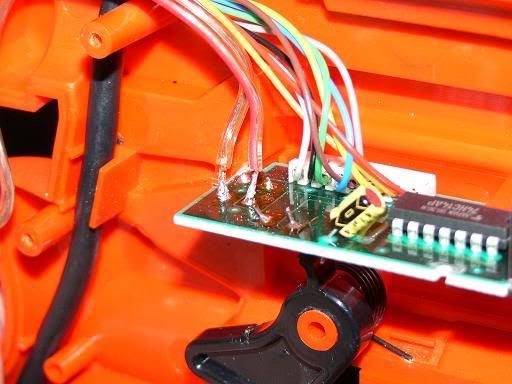
3. Fire up your soldering iron, and solder one end of the speaker wire to the PCB as shown. You can remove the PCB from the gun while doing this. I just lift it out of the slots, and tilt the top of the board toward me so I can solder to it. For some reason, there are four solder points for the switch, but you only need to use two. (If you were pointing the gun toward something, it would be the two right hand solder points on the switch.)

Image

4. Solder to the Microswitch. since we're simply shorting a circuit here, the only thing that matters is that you use the NO (normally open) side of the switch, and the ground. You can see where the switch will end up here

Image

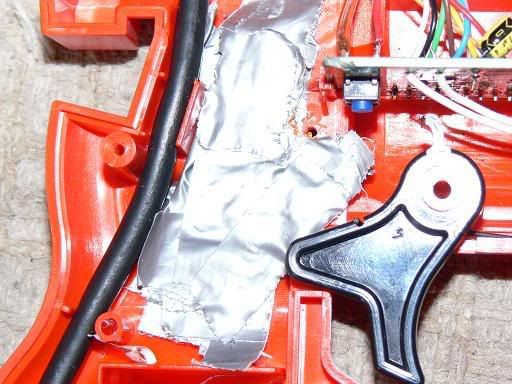
5. lay some duct tape under the switch. I suppose if you had thin window insulation that it may work. the idea here is to line the metal flipper on the switch up with the trigger. It sits too far into the gun without some help. you can see the spot to drill for a screw here too.

Image
Image

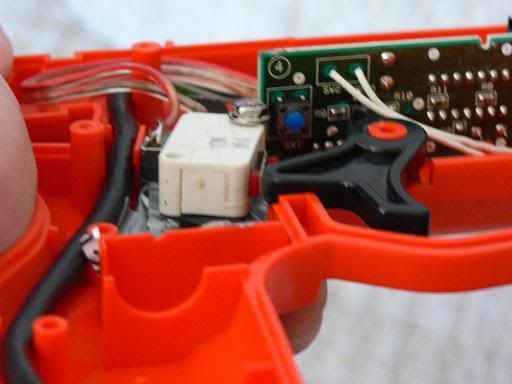
6. Put in a screw. or, put in some padding on the other side of the switch. be warned your switch may go out of line if it's not snug, so i recommend securing it as best you can. The ground post of the switch should be braced against a piece of plastic (in relation to trigger pull) as shown. Also see picture for screw length reference.

Image

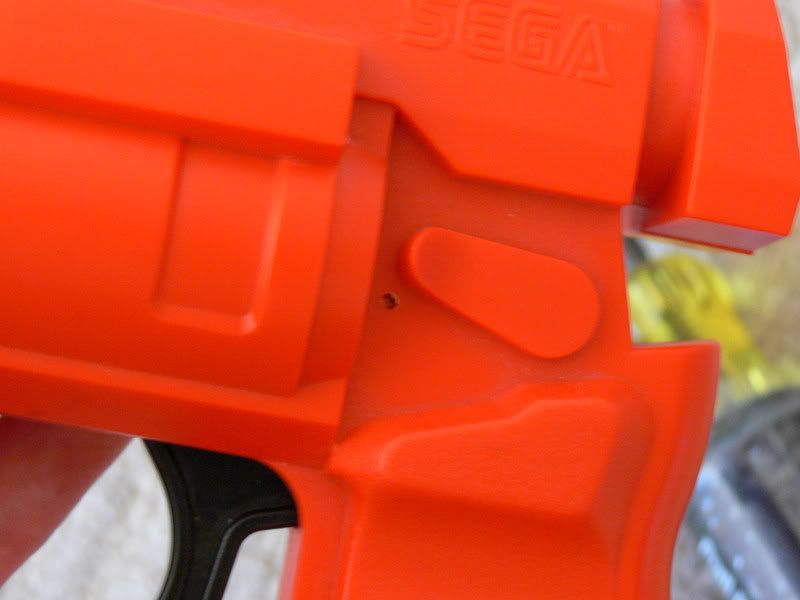
7. Make sure everything is in place, the PCB is in the slots, lens and trigger in place, start button in place, wires are out of the way of screw holes, etc. When you're done, all you should see on the outside of the gun is the very tip of the screw, in a pretty safe location.

8. Plug that bad boy in, fire up your favorite shooter, and destroy your old high scores!
Last edited by skate323k137 on Tue Sep 18, 2007 10:42 pm, edited 2 times in total.
turkey
24-bit
Posts: 104
Joined: Wed Apr 19, 2006 2:16 pm
Location: UK :)

Post by turkey »

this not only looks like a very nice mod, but a even better first post. Welcome to the forum skate323k137.

Personally I would probably hot glue the switch in or something so I didnt have to screw to the outside case, but as you say its hardly visible and my boxing glove mits would never be able to get into that tiny gap even if I wanted them to :)
User avatar
abeisgreat
128-bit
Posts: 528
Joined: Fri Jul 27, 2007 1:55 am
Location: Wisconsin
Contact:

Post by abeisgreat »

wow very nice mod
Beep beep Beep
Adderall
32-bit
Posts: 269
Joined: Wed Aug 15, 2007 5:08 pm
Location: West Michigan

Post by Adderall »

I just bought a few microswitches... going to do this mod. Thanks for the great instructions!!
skate323k137
Next-Gen
Posts: 1271
Joined: Sun Sep 16, 2007 11:26 am
Location: Lansing, MI

Post by skate323k137 »

you're quite welcome, let me know how it works out for you.
fastbilly1
Site Admin
Posts: 13775
Joined: Tue Apr 17, 2007 7:08 pm

Post by fastbilly1 »

Hmm, great idea, but I am more intrigued with your shots of the stunners inside. I want to mount a gutted wiimote inside of one.
Adderall
32-bit
Posts: 269
Joined: Wed Aug 15, 2007 5:08 pm
Location: West Michigan

Post by Adderall »

thanks again for the mod...

I just finished it up and tested... works great!!! a noticeable difference from a new stunner. I bought 2 of them (in case I screwed up real bad) and was able to do tests before and after.

The only difference with mine is that my cherry switches did not have the metal actuator piece over the button :(

also, I couldn't find a screw to keep it in place, so I actually duck taped the switch down to keep it from going anywhere.

Anyways.. I might buy a few more guns and put the switches in them if anyone wants to buy them pre-modded. Fun project !
User avatar
racketboy
Site Admin
Posts: 9687
Joined: Thu Dec 01, 2005 8:28 pm
Location: Michigan
Contact:

Post by racketboy »

Awesome guide! --- how well does this adapt to other console guns?
skate323k137
Next-Gen
Posts: 1271
Joined: Sun Sep 16, 2007 11:26 am
Location: Lansing, MI

Post by skate323k137 »

thanks, I couldn't think of a better site to post it on. I haven't really tried it on any other guns, allthough it would be a fun project to tackle. I'm sure I'll probably try a dreamcast gun or two sometime in the future. If you're creative enough, you can probably figure out a way to make it happen. It would be sweet to do this to a NES zapper and SMS light phaser. I might have a SMS gun I can sacrifice If i didn't toss it when the switch died.

The first time I did this, I opened up the saturn gun, and knew immediately what needed to be done. It was really dumb luck that it worked out that easily. when I saw the 4 solder points on the switch, I hooked up the PCB to a saturn that was booted up, and took a paper clip "jumper" and connected 2 solder points at a time until I figured out which ones "pull the trigger". A similar procedure could possibly be followed on other guns, so long as there isn't a PCB in the handle. It would really depend on how much space was available in the immediate vicinity of the trigger, and if the trigger is shaped in a way that it can be modified to activate the new switch and not the old one.
User avatar
racketboy
Site Admin
Posts: 9687
Joined: Thu Dec 01, 2005 8:28 pm
Location: Michigan
Contact:

Post by racketboy »

skate323k137 wrote:thanks, I couldn't think of a better site to post it on. I haven't really tried it on any other guns, allthough it would be a fun project to tackle. I'm sure I'll probably try a dreamcast gun or two sometime in the future. If you're creative enough, you can probably figure out a way to make it happen. It would be sweet to do this to a NES zapper and SMS light phaser. I might have a SMS gun I can sacrifice If i didn't toss it when the switch died.

The first time I did this, I opened up the saturn gun, and knew immediately what needed to be done. It was really dumb luck that it worked out that easily. when I saw the 4 solder points on the switch, I hooked up the PCB to a saturn that was booted up, and took a paper clip "jumper" and connected 2 solder points at a time until I figured out which ones "pull the trigger". A similar procedure could possibly be followed on other guns, so long as there isn't a PCB in the handle. It would really depend on how much space was available in the immediate vicinity of the trigger, and if the trigger is shaped in a way that it can be modified to activate the new switch and not the old one.


Cool -- If we could turn this into a multi-platform type guide it would be a great feature on the main blog and we'd have a couple thousand other people read it :)
Post Reply