Portable PlugPlay - Atari 7800 Video Cart Slot Mod Audio Fix

Guides to jumpstart your Retrogaming lifestyle
User avatar
CRTGAMER
Next-Gen
Posts: 11933
Joined: Tue Jan 05, 2010 11:59 am
Location: Southern California

Portable Game Guide - Atari Flashback - Simon - Microvision

Post by CRTGAMER »

Milton Bradley Microvision - 1979

Image

The first interchangeable game cart portable system, Milton Bradley released the Microvision in 1979. To put this into perspective the Nintendo Game & Watch did not appear until 1980 and the first Gameboy came out ten years later.
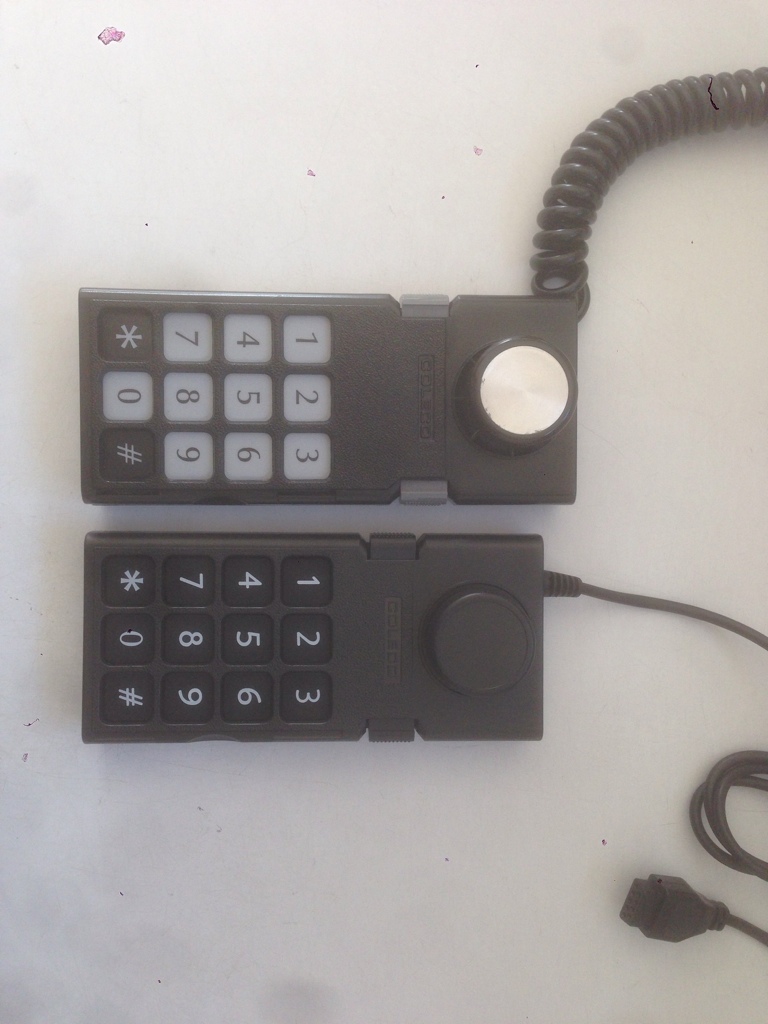
Main Unit
The Microvision has a 16x16 LCD and uses a Paddle Knob as the main controller. The Paddle has stops so not a true Spinner. In addition there are twelve button keypads for controlling various in game functions. There is a basic speaker which emits beep sounds and the screen is a little on the dim side. The video and sound are passable, just not as powerful as newer portables. The Liquid Crystal LCD is in its infancy when the Microvision was released for the home market, which makes this a high collectable.

Microvision 4952-17 1 (Copper) and 4952-17 2 (Silver).jpg
Microvision 4952-17 1 (Copper) and 4952-17 2 (Silver).jpg (119.1 KiB) Viewed 39838 times

Model: 4952
Release date: November 1979
Original Price: US $39.97
Batteries: (1 or 2) 9v batteries depending on revision
Dimensions: 3-1/2"W (89mm) x 9-1/2"L (241mm) x 1-3/8"D (35mm)
Screen Type: 16x16 Pixel LCD
Screen Size: 1-1/2"W (38mm) x 1-1/2"H (38mm)
CPU: Texas Instruments TMS1100 4bit 100kHz or Intel 8021/TI TMS1100
Processor speed: 100 kHz
Register width: 4 bit (TMS1100), 8 bit (8021)
RAM (integrated into CPU): 64 bits (TMS1100), 8 bytes (8021) 32 nibbles
ROM: 2K (TMS100), 1K (8021)
Cartridge ROM: 2K (TMS 1100), 1K (8021) masked (integrated into CPU; each game's CPU was different)
Video Display Processor: LCD Custom Driver (made by Hughes)
Sound: Piezo Beeper
Input: Twelve Button Keypad, one Paddle

Earlier units used two 9 volt batteries, although only one battery is needed. There was a slight risk of damage if one battery had its polarity accidently put in backwards when mismatched to the paired 9v battery. Later units had the contacts removed off the second battery location and it became a spare storage compartment. A strange seemingly not cost affective design, the CPU is not in the base unit; each game cart has its own CPU.


Game Carts

ImageImage

The game cart is more of a module which covered the top half of the base unit. In addition to the game and separate CPU per game, each module has templates denoting which buttons are use in a particular game.

The carts need to lifted up slightly on each side at the bottom. The module is then slid downwards to clear the contacts. The contacts as fragile so care must be taken by ensuring the power is off, avoiding any static discharge from the hands and how the module is removed and installed.

The Microvision only has a total of only thirteen games, I have five, two of which are the same that came with each base unit. I was fortunate to purchase two base units along with the games from Onyxthecat

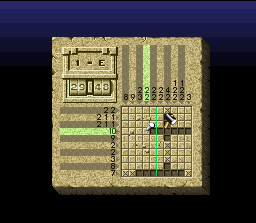
Microvision Baseball
Image
Control the batter by rotating the Paddle which swings the bat. Two "large pixel" blocks representing the bat is rudimentary, but it works. Depending on the angle of the bat when the ball contacts determines "Pong Style" where the ball goes. Runs are controlled by the Microvision, based on where the ball is hit.

Microvision Blockbuster
Image
This comes with every Microvision main unit. Plays similar to Atari Breakout and Taito Arkanoid of knocking out the bricks at the top. Keep the ball in play by moving a paddle at the bottom using the Spinner Knob. A somewhat hard game due to two factors. The ball is not launched from the Paddle, but starts by randomly dropping from the top. This is compounded by the difficulty in positioning the paddle movement. It has to be controlled precisely due to the only 16 positions on the screen. Luckily a paddle knob is used, a DPad would never have worked. A little bit of jump between each of the 16 spaces for a three block wide paddle. Its not bad once learned, though it is harder then Breakout or Arkanoid.

Microvision Bowling
Image
The bowling ball drops down and begins scrolling from side to side at the bottom. Press Speed before strting a game to set how fast the side to side movement. Press the keypad to launch the ball into the pins above. A timing affect of hitting the buttopn once the ball is positioned. Too bad the Paddle could not be used to provide "English" to the ball. Only the "at bat" side is displayed and controlled. If two human players, each take their turn when at bat.

Microvision Connect Four
Image
Based on the board tray of dropping plastic chips. Since Milton Bradley owns the board game only natural to include an electronic version. Take turns with either the computer or a second human player. dropping pieces to get four in a row including Horizontal, Vertical and Diagonal. Pressing the COMP button switches sides with the computer. Continually using this button in affect makes the Microvision play against itself. This game works well since it is more of a controlled strategy game.

Collectable with high fail rate
The Microvision does have reliability issues, some have failed even when not in use. This is a double edged sword. Is it worthy to collect due to the failure rate? Maybe more valuable if one is found in working order?
http://en.wikipedia.org/wiki/Microvision#Problems

Microvision units and cartridges are now somewhat rare. Those that are still in existence are susceptible to three main problems: "screen rot," ESD damage, and keypad destruction.

Screen rot
The manufacturing process used to create the Microvision's LCD was primitive by today's standards. Poor sealing and impurities introduced during manufacture has resulted in the condition known as screen rot. The liquid crystal spontaneously leaks and permanently darkens, resulting in a game unit that still plays but is unable to properly draw the screen. While extreme heat (such as resulting from leaving the unit in the sun) can instantly destroy the screen, there is nothing that can be done to prevent screen rot in most Microvisions.

ESD damage
A major design problem involves the fact that the microprocessor (which is inside the top of each cartridge) lacks ESD protection and is directly connected to the copper pins which normally connect the cartridge to the Microvision unit. If the user opens the protective sliding door that covers the pins, the processor can be exposed to any electric charge the user has built up. If the user has built up a substantial charge, the discharge can jump around the door's edge or pass through the door itself (dielectric breakdown). The low-voltage integrated circuit inside the cartridge is extremely ESD sensitive, and can be destroyed by an event of only a few dozen volts which cannot even be felt by the person, delivering a fatal shock to the game unit. This phenomenon was described in detail by John Elder Robison (a former Milton Bradley engineer) in his book Look Me in the Eye.

Keypad destruction
Instead of having buttons on a separate controller, the Microvision unit had a twelve-button keypad, with the switches buried under a thick layer of flexible plastic. To align the user's fingers with the hidden buttons, the cartridges had cutouts in their bottom (over the keypad). As different games required different button functions, the cutouts were covered with a thin printed piece of plastic, which identified the buttons' functions in that game. The problem with this design is that pressing on the buttons stretched the printed plastic, resulting in the thin material stretching and eventually tearing. Having fingernails exacerbated the condition. Many of the initial games were programmed to give feedback of the keypress when the key was released instead of when the key was pressed. As a result, users may press on the keypad harder because they are not being provided with any feedback that the key has been pressed. This resulted from a keypad used for prototyping being different from the production keypad; the prototyping keypad had tactile feedback upon key pressing that the production units lacked.

Conclusion
With only a 16x16 LCD screen and simple blocks for game characters, the Microvision is basic in graphic presentation. Movement is not by smooth, but in only 16 positions. The screen is not backlit and not as bright of even the first Gameboy. The dim screen could also be due to the age of the units, one of mine has a slight grey wash in the background. The Spinner works reasonably well, just not the smooth transition limited by the 16 position movement on the screen. It is best when used for controlled strategy games, though I would like to try other action games to get a better assessment.

The Microvision is the very portable that features interchangeable game carts. This makes for a unique Handheld to own for the Historical value. Many units have failed over the years, finding a working unit makes it very collectable. Buy it for mainly owning as a collection aspect since the games are not that good and the screen is hard to see. Still an interesting perspective to experience the gameplay from the very early days of portable electronic gaming. :idea:

http://www.erikschubach.com/vintage/microvision-paper-model.php

Microvision Game System Papercraft Paper Model

I wanted to do something fun for fans of the Microvision iterchangeable game system, so I took a couple of hours to create this paper model of my favorite vintage game system for you to print and assemble. I had my son build the first papercraft prototype so I could include some pictures of the finished product... and this this is the result.

Image ImageImage

So get out a sharp pair of scissors and some glue to assemble this whimsical paper model that you can show off to your friends and own a piece of computing history... or build a few to make your own army of mini papercraft Microvision Game Systems.

References
Wiki Milton Bradley - http://en.wikipedia.org/wiki/Milton_Bradley
Wiki Microvision- http://en.wikipedia.org/wiki/Microvision
Handheld Museum - http://www.handheldmuseum.com/MB/uVUS.htm
Geek Vintage - http://www.geekvintage.com/milton-bradl ... rdware.php

Right Click to view a larger pic

Microvision - Baseball - Block Buster - Bowling - Connect Four.jpg
Microvision - Baseball - Block Buster - Bowling - Connect Four.jpg (255.59 KiB) Viewed 39838 times
Image
CRT vs LCD - Hardware Mods - HDAdvance - Custom Controllers - Game Storage - Wii Gamecube and other Guides:
CRTGAMER Guides in Board Guides Index: http://www.racketboy.com/forum/viewtopic.php?p=1109425#p1109425

Image
Image
User avatar
CRTGAMER
Next-Gen
Posts: 11933
Joined: Tue Jan 05, 2010 11:59 am
Location: Southern California

Re: Portable Game Guide - Atari Flashback - Simon - Microvis

Post by CRTGAMER »

Coleco VFD Table Top Games

Image

Coleco made a series of table top mini Arcade games in 1982 and 1983. The VFD Vacuum Fluorescent Display) games stood out with bright multiple colors compared to the black and white Nintendo Game Watch and red LED Mattel series of the day. Only six different VFD cabs were made which are Donkey Kong, Frogger, Galaxian, MS Pacman, Pacman and Zaxxon. Two VFD screens were used in Zaxxon giving it a 3D effect and probably the most collectable of the series.

http://www.geekvintage.com/coleco-tabletop-donkey-kong-jr.php

Coleco came out with a line of miniaturized versions of popular arcade hits in the early 1980s. Donkey Kong Jr was one of the planned games to put it into one of these sleek tabletop arcade cabinets with a VFD screen. But after making two mockups for marketing pictures... one for catalog and promotional pictures and the TV commercial and the other to the division responsible for the marketing material for the Perma Power AC adapter... Coleco instead came to the decision to use the existing Nintendo LCD model with a totally different body style than the rest of the units in the line.

So this design for the Donkey Kong Junior game was never brought into production. The cohesiveness of the lineup of Coleco mini arcade cabinet tabletop games is shattered with the Nintendo case and the use of an LCD screen instead of a luminescent VFD screen as was intended by the original design. Having an original design Donkey Kong Jr mockup is the crown jewel or holy grail of any Coleco tabletop arcade game collection.

Sales would have been much better if they had stayed with the original design instead of the Nintendo Game and Watch design and the omission of the Berzerk and Omega Race units, which were cancelled as well, hurt the sales of the collection as a whole.

Image

Today the obscure VFD screen is not used in games but seen everywhere as the lit up front indicator panel on VCRs, DVD and BluRay players. Note the clarity of the prerendered text in the VFD screen. "Cutout panels" lit up offering "high resolution" of the images.

Image

I was fortunate to purchase a working Coleco Pacman VFD Table Top at the Swap Meet for twenty dollars. The only issue was that the left joystick would sometimes not work unless bumped multiple times in a given direction. The contacts must be dirty from years of use, but first a look at the features of the game.

Image

Pacman VFD Display
A very bright four color display. Similiar to LEDs there are "light bulbs" for each line and character. The mazes, power pills and ghosts are in red while pacman, dots and ghost eyes are in yellow. The score is a bright turquoise and the pacman symbol life indicator is blue. All the lights are prerendered images. Movement is obtained by turning on and off an adjacent "light bulb" of pacman and ghosts. Movement is not smooth compared to a regular modern screen, but in segments limited by the amount of lights placed on the PCB.

Image

Table Top Cabinet
Built to resemble an Arcade Cab, takes four C batteries underneath. Audio is handled by a simple piezo buzzer speaker, sound is adequate and loud. So loud that the ghost gauntlet will get to be grating encouraging grabbing a power pill. The Pacman Tabletop has a two skill level power slide switch and two miniature joysticks. The left stick is used for selecting one of four different games:

Demo Game
A non interactive demo run of pacman showing off the single player mode.

Pac-Man Game
Traditional pacman, eat the dots while avoiding the ghosts. Eat one of the four power pills to temporarily weaken the ghosts so they can be eaten. A nice waku sound while the ghosts are weakened.

Head To Head Game
Here is the reason for the second Joystick. Simultaneous two player game play in eating the dots while avoiding the ghosts. Team play by eating the power pills to keep the other player alive to clear a board quicker. If a player gets eaten, the other player keeps going alone even in following levels. The other player joins back in once the remaining player gets eaten by a ghost.

Wii U Nintendo Land Animal Crossing offers a two stick control of two characters. The same can be done in this 1982 table top cabinet. :idea:

Eat and Run Game
A new take on the pacman game. There are only four power pills to collect to clear the maze, but the ghosts do not weaken and can still eat the player. Eat all four red power pills while avoiding the ghosts to clear a board.
Image
Disassembly
Remove the five screws underneath, but before pryng apart, remove two additional screws under the control panel at the top corners under the decal.
http://www.handheldmuseum.com/Coleco/ColecoRepair/index.html

First of all you just have to get the game open, and this has proved to be a challenge for people not familiar with opening the Coleco games. Do NOT attempt to un-snap the cover from the apparent clips on the back of the game. There are two screws holding down the top hood of the game, and they are located under the upper left and right corners of the control panel sticker. Fortunately, this sticker is made of heavy plastic, so it's easy to peel back without damaging it.

Image Image

Note the screw position, I should have pulled the decal back some more to prevent the creases.
Image

After removing the top, remove the upper control panel assembly, be very careful of the wires inside going to the speaker and battery compartment.

Over the years dust tends to build up inside, easily fixed with a soft brush.
Coleco Pacman Repair 01.jpg
Coleco Pacman Repair 01.jpg (137.66 KiB) Viewed 39705 times

Flip the control panel over to get a look at the under side oif the PCB. While supporting the control panel, remove the three screws holding the PCB. Separate the Control Panel which exposes the bubble switches for each joystick direction.

Image

Cleaning the Joystick Contacts
Alcohol works fine here, the problem is a cotton swab is too thick. The metal bubble switch gap is very narrow. Use a thin strip of unfolded computer or copy paper cut to less then the width of the switch assembly. pour a little bit of alcohol into the cap and dip one side of the paper strip. Insert the paper under the metal bubble switch. Drag the paper thru while pressing lightly on the switch plate. Repeat a few times with the dry side of the paper strip.

Cut sheet of copy paper fits just fine under the bubble switch contact.
Coleco Pacman Repair 02.jpg
Coleco Pacman Repair 02.jpg (153.25 KiB) Viewed 39705 times

You can test the switches before reassembling, but be very careful not to short out anything. Static electricity can ruin the electronics so only press the bubble with the plastic joystick. After the cleaning, the joysticks are more sensitive with only a light touch needed. However, a strange thing happen after the cleaning. The left joystick would respond in all directions, yet after a while the right direction would only work intermittently.

Hidden Crack - Easy Solder Fix
I was getting ready to desolder the offending contact to see if the pad underneath was worn out. Closer inspection revealed the contact pushed down slightly underneath which broke thru the solder connection. Take a look at the picture below BEFORE the repair, the CENTER solder pad. A very slight round crack can be seen in the center of one of the solder pads. Perhaps due to dirty contacts over the years the joystick was pushed too hard causing the break at the solder pad.

An easy fix, a pretinned solder tip to remelt the middle contact solder connection
Coleco Pacman Repair 03.jpg
Coleco Pacman Repair 03.jpg (168.55 KiB) Viewed 39705 times

The PCB is very dirty prior to cleaning as evidenced from a closeup. Other then a dust off with a small brush, I will not wipe off the stains and risk damage to the traces or components.

CRTGAMER wrote:The alcohol cleaning in the joystick contact temporarily bridged the break in the solder connection deep down the PCB. Even though the PCB was dry, deep inside the breakage, the wet alcohol completed the circuit which allowed the joystick to work for a while. Eventually the stick quit working once all the alcohol evaporated. This confirms why one must never use corrosion supporting water to clean electronics. Even a can of air could not have dried out a circuit completely in the tight crevices.

After verifying that everything works, reassemble the PCB to the control panel ensuring all the screws are treaded in before tightening any down. Replace the bottom screws followed by the top cover control pane screws. Again start all before tightening any down. Play Pacman and enjoy a more responsive joystick movement. :mrgreen:

Panel Stickers
The cabinet stickers tend to peel off over time. This is easily fixed with double sided tape. Peel the sticker back just enough to place the tape on each side, then stick back down. If the decal peels up again, then remove and replace with new tape. Any grime stuck in there gets cleaned off by the first tape application. My Tabletop is missing some of the stickers, so I need to keep an eye out for a good scan online.

Not the photo tape but the double sided permenant sticky Duck brand tape.
http://www.amazon.com/Duck-Brand-670398 ... B000NHU2Y4


Image

SinNombre wrote: http://www.nintendoage.com/forum/messag ... adid=66808

So I got a Coleco Tabletop Pacman, I'm sure lots of people will know what I am referring to. Anyway, it is missing a decal on one side and the rest are in rather miserable condition. It's also missing the battery cover but I think I can make one out of plexiglass. I searched around for a bit and didn't find anything except a manual available for download. So I'm just curious to know if anyone has seen a site where there are scans of these decals that are available for download.. If not, I will take pictures of the current decals and try to photo edit them and then print them out. Any info would be appreciated, thanks.

Since I never did get an answer I just made my own.....
I also have a black template of this if anyone wants it.

Image

References
Coleco History - http://en.wikipedia.org/wiki/Coleco
VFD Screen - http://en.wikipedia.org/wiki/Vacuum_fluorescent_display
Logbook - http://www.thelogbook.com/phosphor/1981/pac-man-mini-arcade/
Geek Village Collection - http://www.geekvintage.com/index.php
Handheld Museum - http://www.handheldmuseum.com/Coleco/index.html
Replacement Decals - http://www.handheldmuseum.com/Coleco/ColecoRestore/
Pacman Tabletop Manual - http://www.handheldmuseum.com/Manuals/Coleco-PacMan.pdf
Pacman Disassembly - http://www.handheldmuseum.com/Coleco/ColecoRepair/index.html


Image

Image

Image
Last edited by CRTGAMER on Sun Aug 27, 2017 1:52 pm, edited 4 times in total.
Image
CRT vs LCD - Hardware Mods - HDAdvance - Custom Controllers - Game Storage - Wii Gamecube and other Guides:
CRTGAMER Guides in Board Guides Index: http://www.racketboy.com/forum/viewtopic.php?p=1109425#p1109425

Image
Image
User avatar
CRTGAMER
Next-Gen
Posts: 11933
Joined: Tue Jan 05, 2010 11:59 am
Location: Southern California

Re: Portable Game Guide - Atari Flashback - Simon - Microvis

Post by CRTGAMER »

I purchased an Atari Flashback 4 to keep my Flashback collection complete. and also finally see how 2600 Tempest plays. Updated the Atari Flashback post with more pics and information. :D

http://www.racketboy.com/forum/viewtopic.php?f=52&p=561423#p561423

Atari Flashback 4.jpg
Atari Flashback 4.jpg (251.86 KiB) Viewed 39241 times
Image
CRT vs LCD - Hardware Mods - HDAdvance - Custom Controllers - Game Storage - Wii Gamecube and other Guides:
CRTGAMER Guides in Board Guides Index: http://www.racketboy.com/forum/viewtopic.php?p=1109425#p1109425

Image
Image
User avatar
CRTGAMER
Next-Gen
Posts: 11933
Joined: Tue Jan 05, 2010 11:59 am
Location: Southern California

Re: Portable Game Guide - Atari Flashback - Simon - Microvis

Post by CRTGAMER »

Genesis 80 Game Console PlugnPlay
There are a few different versions of Genesis PlugnPlays available. I was intrigued by this particular model made by ATGames due to having a couple of unique features. ATGames built a few different models including a couple of handheld PlugnPlays, a portable LCD unit and the newest Atari Flashback consoles. The emulation is handled through a Firecore Chip, though not perfect, it is more then adequate.

Image

Mini Console
The console is small, just slightly wider then a Genesis game cart. It has a LED power on light, a power switch and a reset switch. It uses a 9 volt 500ma DC power supply which also has a LED power indicator light. The console has standard RCA jacks for mono audio and composite video.

Controller Options
Two wireless controllers are included which have built in Game Select and Menu buttons. The wireless controllers use Infra Light line of sight, so must be pointed in the direction of the console. Somewhat awkward and requires a bit of a learned technique in keep the game controller "aimed" at the console. As long as the controllers are held somewhat facing the console, they work very well. Even though the wireless are a little smaller then a Genesis controller, the Dpad and buttons all respond nicely with a solid feel.

The Sega Genesis came with a really near perfect Gamepad. The buttons are just right.

ImageImage

As an alternative, the front of console has 9 pin controller ports which can accept any Genesis controller. Both original Sega 3 button and six button Genesis Gamepads work but the plugs fit loosely in the console gamepad ports. Sometimes the console reset button has to be pressed to detect the controller plugged in. I slightly bent a couple pins in the console gamepad ports so they now "grab" better at the gamepad plug pins. The wireless and wired gamepads cannot be combined, only one style or the other can be used at a given time.

Image

I also tested out a 3rd party controller, the Interact High Frequency GamePad. All the action buttons can be individually set to rapid fire. They also can each be set continuous auto fire which does not require holding the fire button. Unfortunately the gamepad does not quite work 100% with the 80 game Genesis, The C button acts as Start and C Button combined. Unsure if a bad controller, I suspect it is just not fully compatible with the 80 game Genisis PlugnPlay? I really wanted Rapid Fire for the built in Vectorman series.

Image

Game Cart Slot
The best feature for a PlugnPlay system is including a means of playing additional games and even better if in their original format. The 80 Games Genesis console detects and auto runs any original Genesis game cart plugged in. If no cart is inserted, the console displays a Menu listing the 80 games built in, all easily selected by either then wired or wireless gamepads. it will be interesting if the Sonic Expansion Cart, Master System and 32X modules would work. I'll update this post if I obtain any of the expanders.

Image
Image

Though it can pop in the cart slot, the 32x Module will not work with the AT games 80 game Genesis console. This is due to the module requiring the specialized video input cable from a Genesis console. Unclear if a modded audio video cable might work, it could be possible since the 32x module does all the processing for the 32 bit cartridges. 32x games will not plug directly in the AT console; as in the Genesis console the wider 32x carts will not fit the cart slot.

Image

Emulation Quality
Most Genesis PlugnPlays have been reviewed as not achieving great emulation, especially in the sound department. I have a real Genesis to do a side by side comparison and confirmed the PlugnPlay is near though not quite up there in sound quality of the original Hi Def Genesis console. The sound is really not bad taken into account the Genesis is from the midi sound era, so I wouldn't expect the system to thunder as in a disc based game. In the opening of the Sega logo in starting various games, the different voice calls can be heard clearly, though muted. However, the laser blasts of Vectorman bang out with good repercussion. The sounds really can be brought out when the HDTV is hooked up to a stereo setup.

Graphic draw and game speed look fine. Maybe not 100% for quick movement games such as Sonic, but more then adequate for enjoying the games. The PlugnPlay does have an advantage of a clean picture, translating nicely to any big screen. All the colors are sharp and vibrant with no frame skip detected.

40 Genesis and 40 Original Games
The game box is misleading, one assumes the console would be 80 Genesis games. Turns out half of the games are not Genesis, but "Homebrew" games. The new games are similar to Flash games offering a simpler style of gameplay. Not really a bad thing, a good variety of games to try out. A few of the games can be recognized from playing similar video and board games of the past. Some of the "Homebrews" start up with a DEVWORKS Game Technology logo. The Sega Genesis was popular in Brazil, with various clones made by TecToy. Both Devworks and TecToy companies are located in Brazil.
Image
40 Unique Games (Click Show Button)
AIR HOCKEY - Slightly different Air Hockey, each side has two goal drop chutes
BLACK SHEEP - Match the Sheep direction
BOMBER - Bomberman clone
BOTTLE TAPS RACE - Turn based set direction and power to move puck thru course
BRAIN SWITCH - Timed decide if vowel or even number is shown
BULLS AND COWS - Guess the hidden combination of numbers
CANNON - Artillery Duel clone
CHECKER - Checker board game
CHESS - Chess board game
COLOR PUZZLE - Timed match color to meaning
CROSS THE ROAD - Frogger clone
CURLING 2010 - Get rid of balls as opponent dumps them back to you
DOMINANT COLOR - Timed decide which color is dominant on the field
FIGHT OR LOSE - Use only chess knight capture all pawns before reaching other side
FIREFLY GLOW - Simon follow the light pattern
FISH STORY - Eat smaller fish, grow and eat bigger fish
FLASH MEMORY - Memorize order of numbers hidden behind stars
FORMULA CHALLENGE - Math decide if two number answers are less, greater or equal
HEXAGONOS - Hex board game
JACKS PEA - Jump moving platforms to the top
JEWEL MAGIC - Tetris Worlds clone
LOGIC DIAL - Similar to 15 number slide rotate numbers to correct order
MAHJONG SOLITAIRE - Match pairs of tiles
MATCH ELEVEN - Timed add up playing cards totaling to eleven
MEGA BRAIN SWITCH - Identify if vowel consonant letter or odd even number
MEMORY - Flip the tiles to find all the pairs underneath
MEMORY MATCH - Memorize animal silhouettes
MIRROR MIRROR - Find selected letters on mirrored board
MR BALLS - Rubics Clock unlock cages, adjacent cages reverse their lock pattern
NAVAL POWER - Battleship board game
PANIC LIFT - Memorize floors for different customers in elevator
REACTION MATCH - Timed memorize geometric symbols
SNAKE - The earlier version of Tron Light cycles
SPACE HUNTER - Remember numbers fill in math problem
SPIDER - Kill all dropping spiders
SUDOKU QUIZ - Its Soduku on the Genesis
TABLE MAGIC - Follow the boxes shell thimblerig game
TREASURE HUNT - Navigate ship thru grid to treasure
WAREHOUSE KEEPER - Sokobaun clone
WHACK A WOLF - Wac A Mole cloneclone
ImageImage

There are also 40 Genesis games, many memorable games included. The mandatory Eccos, Sonics, and even all three Golden Axe games as well as Ristar are in the console. A few rarities and exclusives that are difficult to find on a game cart.

40 Genesis Games (Click Show Button)
ALEX KIDD IN ENCHANTED CASTLE
ALIEN STORM
ALTERED BEAST
ARROW FLASH
BONANZA BROS
CHAKAN: THE FOREVER MAN
COLUMNS
COLUMNS III
COMIX ZONE - Fighting and Explore game inside unique style utilizing comic book frames
CRACK DOWN
DECAP ATTACK
DR ROBOTNIKS MEAN BEAN MACHINE - Puyo Puyo clone
ECCO - Dolphin Simulator
ECCO 2: THE TIDES OF TIME - Dolphin Simulator
ECCO JR - More obscure of the Dolphin Sims
ESWAT: CITY UNDER SEIGE
ETERNAL CHAMPIONS
FATAL LABYRINTH
FLICKY - Good console version of Arcade, catch birds while avoiding the cats
GAIN GROUND
GOLDEN AXE - Arcade home version, Hack and slash side scroller
GOLDEN AXE II - Arcade home version II
GOLDEN AXE III - Japan only cart and US Sega channel exclusive
JEWEL MASTER - Match the colors in Jewels, popularized years later in Bejeweled.
KID CHAMELEON
RISTAR - Great platformer, this is a pricey game if bought on cart
SHADOW DANCER: THE SECRET OF SHINOBI
SHINOBI III: RETURN OF THE NINJA MASTER
STREETS OF RAGE
STREETS OF RAGE 2
STREETS Of RAGE 3
SONIC & KNUCKLES - Original cart had an expansion with other Sonics
SONIC SPINBALL - Pinball using Sonic
SONIC THE HEDGEHOG - The game character that Genesis is famous for.
SONIC THE HEDGEHOG II
SONIC 3D BLAST - FLIKIE'S ISLAND - 3d explore with Sonic finding Flicky birds
THE OOZE - Character moves around like an Amoeba enveloping objects
VECTORMAN - Very well done platformer explore and shooter.
VECTORMAN II - Followup to Vectorman. A shame there was never a part III released.
VIRTUA FIGHTER 2
Every game console has great exclusive games. For example, I never knew about a game called The Ooze, exclusive to the Genesis and pretty unique with its amoeba affect enveloping objects while squirming around the scrolling game screen. Thankfully, the two Vectorman games are also included in this PlugnPlay Genesis. Playing the games with an actual Genesis controller, the emulation is well done.

Image

Wiki wrote:http://en.wikipedia.org/wiki/Vectorman

Although BlueSky Software, the original developer of both Vectorman games, closed in 2001, a Vectorman game for the PlayStation 2 was announced in 2003 but was soon cancelled. Initial reports criticized the game for heavily deviating from the creativity and lightheartedness of the Genesis titles and seemingly turning the sequel into another generic, overly serious third-person shooter. In another change, the new Vectorman had a tinny and mechanical voice in early footage of the sequel, whereas in the original game, he had a more organic voice. Vectorman's line "Chicken, fight like a robot!" is a reference to the arcade classic Berzerk, where those words appeared. Character art for the redesigned Vectorman looked very similar to Halo's Master Chief. It is believed that these criticisms contributed to its cancellation.

Testing the Cart Slot
I really like the added capability of popping in a Genesis game cart. There are import Famicom PlugnPlays that can also do this with Famicom game carts such as the Powerjoy series. This proves how well the emulation is done, to be able to run the original game carts.

Image

I tested three Genesis games that I really like which are not built in. All play just fine using the wireless or real Genesis controllers with great sounds and smooth crystal clear screen draw.

Gunstar Heroes
The very first game released by Treasure whose games are highly desirable to collectors. This in itself makes the game a must have collectable in addition of a very good "Metal Slug" style of gameplay with crazy rapid fire.

Image

Red Zone
Somewhat unknown game, a Helicopter game with both SHMUP and Strategy built in. The opening description describes some graphic firsts for the Genesis. A different take on the helicopter flying games of the day and exclusive to only the Genesis. This game really is impressive and belongs in any Genesis library.

Image

Hardcore Gaming 101 wrote:http://www.hardcoregaming101.net/zyrinx/zyrinx.htm

Piloting your chopper is much like in Electronic Arts' popular Desert/Jungle/Urban Strike series, except instead of being an isometric perspective, the top-down camera actually rotates with your chopper, which not only looks insanely cool, but also makes it much easier to aim than in the Strike games. The intro even brags about all of the insane effects they're implemented, in addition to the scaling and rotation, which were previously only thought possible on the SNES. There's tons of pseudo-3D effects on things like trees, towers, and walls; and there's even a form of full-motion video in the introduction and game over screens, which features angry dictators and all kinds of vehicles of war like tanks, submarines, jets and missiles.

Toe Jam Earl
I get hints of a Rouge style play in this game evidenced when the Map is viewed and moving thru the level to collect things. Cult classic of a game that got a followup on the original Xbox.

Image

Game Save
The Genesis PlugnPlay console does not support save for the games that have this feature. Any internal game that originally has a save option will have to be played all the way thru to see its ending. Game carts that are plugged in also cannot be saved. However, any save already on a game cart can be loaded just fine. Only certain games have the save option thru a battery or flash chip inside the cart. The games that will be basically be unplayable are non password option RPGs since a single session would take too long.

Video Game Critic wrote:http://videogamecritic.com/vgc_genclassic.htm

Sega Genesis Classic Game Console does for the Genesis what the Flashback series did for the Atari 2600. It resurrects a classic console with a compact design, excellent controllers, and a slew of built-in games. The system itself is tiny with two buttons (power and reset), two controller ports, and a cartridge slot. That's right - this thing can play real Genesis cartridges! The games play well, and the composite output looks so sharp you'll think you're playing the arcade versions. The original Genesis had a very "fuzzy" video quality, so this is a major step up. When playing Streets of Rage on my HDTV I found myself noticing subtle details in the scenery I could never see back in the day.

Unfortunately since the games are emulated they do not play 100% like the originals (this goes for using real cartridges as well). Sonic never quite reaches the speeds he reached on the real Genesis - although he does come close. Also, some of the music is a little off-key. You can't have everything right? Those who still play Genesis games on a regular basis will notice slight discrepancies here and there, but most casual gamers will not. Overall Genesis Classic Game Console packs a substantial amount of 16-bit joy into one convenient package. Timeless games like Sonic the Hedgehog and Streets of Rage will appeal to everybody, and the more obscure titles will attract classic gaming enthusiasts.

Conclusion
The 80 Game Genesis PlugnPlay is a great inexpensive and convenient alternative for playing retro games. Though not 100 percent perfect in emulation, the low price and saving on storage of a library of game carts has an advantage. Hooked up to a decent sound system helps to overcome the few sound issues the console has. Disappointing about the no save option, but luckily many games use passwords instead of a save file.

It is great to have an option of using the included wireless or original Genesis controllers. The wireless controllers line of sight do not have to be exact pointed to the console, but lose the signal if held too far an angle. A very nice feature of the wireless is the instantaneous reset back to the game select menu. No need to go to the console to switch games and no need to swap carts for the 80 games built in. The capability of using original game carts to increase the selection keeps this Genesis PlugnPlay worthwhile to remain plugged in. :mrgreen:

CRTGAMER wrote:PlugnPlays are also a great way to discover expensive and rare games and sometimes unreleased betas. I have come across 2600 TEMPEST, 7800 METEORITES, GENESIS GOLDEN AXE III and NES TENGEN TETRIS among other unique games buried inside different PlugnPlay units. :idea:

References
AT Games - http://www.atgames.net/front/bin/ptdeta ... ory=100718
AT Console Portable Review - http://digthatbox.com/sega_genesis_cons ... eview.html
AT Console Review - http://www.maxconsole.com/news/REVIEWS/ ... 17149.html
DEV Works Game Reviews - http://www.smspower.org/forums/viewtopic.php?t=11078
Genesis Controller List - http://webspace.webring.com/people/ld/d ... llers.html
Genesis Battery RAM Carts - http://www.mobygames.com/attribute/shee ... ,175/p,16/

PDF
80 Game Genesis Console Manual - http://red022.redmedia.com.tw/ezcatfile ... Manual.pdf
Attachments
Sega Genesis 80 Game PlugnPlay FB8200R-80 AT Games.jpg
Sega Genesis 80 Game PlugnPlay FB8200R-80 AT Games.jpg (243.82 KiB) Viewed 39147 times
Last edited by CRTGAMER on Thu May 28, 2015 10:58 am, edited 6 times in total.
Image
CRT vs LCD - Hardware Mods - HDAdvance - Custom Controllers - Game Storage - Wii Gamecube and other Guides:
CRTGAMER Guides in Board Guides Index: http://www.racketboy.com/forum/viewtopic.php?p=1109425#p1109425

Image
Image
Teh Lurv
24-bit
Posts: 135
Joined: Thu Jan 31, 2013 2:09 pm
Location: Boston

Re: Portable Game Guide - Atari Flashback - Simon - Microvis

Post by Teh Lurv »

Nice write-up on the Atgames Genesis. One thing I can add is that the S&N lock-on cart functionality does work. Virtua racing doesn't work with the clone. A 32x won't work with the clone console as it can't output RGB.
User avatar
CRTGAMER
Next-Gen
Posts: 11933
Joined: Tue Jan 05, 2010 11:59 am
Location: Southern California

Re: Portable Game Guide - Atari Flashback - Simon - Microvis

Post by CRTGAMER »

Image

Hyperkin SupaBoy SNES/SFC Mobile Version 2.0
Hyperkin is a company that produces Retcon clones of the NES and SNES consoles. The clones are not 100% exact compatible, but do work with most games and offer a new altenative over the original decades old consoles. The company also built portables of the NES and SNES. I reviewed the Hyperkin NES FC Mobile earlier in this guide, now to look at the SNES version.

Older 1.0 Version
Image

Portability
The SupaBoy contains an internal Lithium rechargeable battery that is easily replaceable. Battery life is rated at five hours on the 2.0 model which comes in a black box. The first model was in a white box with only a two hour battery. The included AC charger is a small power brick with a mini USB connection on the end. This invites using regular USB cables to charge or power the unit from other devices such as a Laptop.
Image
The large size has an advantage of large buttons with spacious placement, but does restrict carrying the unit on the go. Throw in a SNES or Famicolm cart and it does tend to be a bit laughable bulky system over a GBA SP or Cell Phone. On the other hand (make that both hands to grasp), you are certainly to attract curiosity on what you are playing. The SupaBoy includes a soft bag to protect the unit, but the mobile will not fit in it if a game cart is plugged in.

Controls
I found the large DPad and buttons an easy control with good response. The Start and Select buttons are an easy reach with the thumb right above the DPad. There is also a Reset button above the action buttons. I have read other review sites that mention the DPad as unresponsive, but I see no fault in it. Perhaps on intense fighter games that need combo moves, the pad might have an issue? This is not a great concern since there are standard SNES controller ports built in.

Image

Tanooki wrote:The response isn't the problem, it's a design flaw internally that causes it not to work right in many games. The inside of the d-pad has 4 pegs (each direction) about a centimeter long or so. Problem is there's no restriction in the middle like a legit d-pad so it will mostly click in more than one direction at a time. Fighting games, anything that has free movement (gradius, secret of mana, pocky and rocky) end up going all over the place. Even Super Mario World will keep running or squatting when it shouldn't if you're not precise. I had to fix mine tearing it down and making a restriction peg in the center so my unit uniquely plays correctly. I used to have pictures and text describing the fix, but simply I found an electrical wire twist cap that fit between the pins snuggly and then sanded the tip to the right height.

Image

Image

Screen
Very bright, the 3.5" screen is best when viewed straight on. This may not seem to be an issue since it is a portable. I found at a couple of times during a heavy gaming session that I would have to readjust the angle on how the SupaBoy is held. Its not bad if viewed a little off center, just have to hold the SupaBoy steady and at the 90 degree angle for the best brightest picture.

Sound
The speakers sound clear though slightly "tinny", this is expected due to their small size. Compared to a regular Gameboy the sound does not quite have the same quality bass in it. I thought it might have been a limitation of the amp. When the mobile is plugged into a regular TV, the sound is so much richer with a nice dynamic range. The onboard speakers get muted whenever the TV output is used. There is also a headphone jack and a volume control at the bottom.

Image

TV or Composite Monitor Output
A very straight forward hookup. A standard 1/8" plug goes into the mobile and three RCA cords to the TV or an older composite monitor; Yellow Composite, White and Red Stereo Audio leads. Whenever the video output cable is plugged in, the on board controls are disabled.

As a replacement for the SNES console it is space saving, but of course nothing beats the original. There are a few games reported to not work with the Supraboy. At least the plastic will not yellow compared to consoles from that era.

Game Compatibility US SNES and Japan SFC
The cart slot has a spring loaded dust cover door. Both SNES and SFC game carts easily plug in. There is even a slide lock on the SupaBoy that locks to the slot of the SFC carts. There are reviews that mention some games do not work, I only have a few to try out and so far have seen no issues with clean graphics and sounds.

Image

SNES - Nintendo Mario Kart
The first Mario Kart that has had so many Nintendo incarnations and copied by other game companies. Apogee made a shareware version for the PC, even PC Jazz Jackrabbit bonus running levels look similar. The SNES mode 7 scrolling affect is smooth as your kart goes thru the turns. I like how Mario Kart is forgiving allowing me to catch up with the other karts even though I crashed a couple of times on the turns. For a digital control of a driving game, pretty good.

SNES Mario Kart Split Game and Map Screen years before the DS came out
Image

SFC - Nichibutsu Arcade Classics
An exclusive to the SNES as a Japan only release, a collection of three games from the early days of the Arcade. Includes Moon Cresta which plays a cross between Galaxian and Phoenix. Frisky Tom is a climbing repair the pipes type of game, a bit confusing in repairing the burst water pipes though. The other game is notable as the only official of two Home Releases of the Arcade Crazy Climber. The Atari 2600 is the other version, but with rudimentary graphics and sound. Crazy Climber is a Twinstick game, the DPad is the left stick and the action buttons are the right handed stick. It plays well and sometimes as frustrating difficult as the Arcade version in manipulating the arms and legs. Work the stick up and down in oposite directions as if really climbing up the window ledges. For a real torture and a different way to play, there a two player split the right and left hand movements mode. Puts a new Retro spin on Teamplay. :shock:

Image

SFC - Nintendo Mario Picross
This game plays as a cross between the Windows MineSweeper and Soduko. Another exclusive to the SNES Japan console, though there is a Gameboy US version of it. Match the numbers on the left and top columns to figure out the "Multiplication Chart". Each number represents spaces filled, always an empty spot between them. This is a great portable game due to its style of game play. The 3.5" screen is a bit small, but the numbers can still be seen. A disappointment that the starting levels with their smaller fields do not zoom in to fill up the screen, but maintain the relative size. The numbers are readable comparable to reading small font size on a cell phone. On a regular TV with the larger screen, the game is much easier to see, either way really plays beautiful. To get an idea about this game first hand, look for the Arcade game Logic Pro emulated in Mame. An addicting puzzler the table is figured out. Also just like the Arcade, the action button can be held to rapid scroll fill a set of spaces. :mrgreen:

ImageImage

SFC - Banpresto Super Gussun Oyoyo
Another obscure SNES console game. I first discovered this via emulation and had to get it. An action puzzle style of dropping Tetris blocks to form climbing blocks to the top and also crush enemies so your "Lemmings" character can get to the exit at the top. Drop random appearing bombs to destroy misplaced bricks. Fun way and also a helpful strategy is to drop a bomb a brick make the character run across faster. Meanwhile the water level at the bottom is rising as in Atari 2600 game Save Mary, this different type of Puzzler is so much fun. Now if there were a way to close the flood gates so I can take my time to build the hill of blocks. I really need to get volume two as well as the PS1 versions. Look for the Arcade game Risky Challenge under Mame.

ImageImage

SFC - Banpresto Super Gussun Oyoyo 2
Ah, this game is so much better then the first game. Plays the same, but has better graphics, sounds and is more forgiving on the water rising at the bottom. The levels are more intuitive giving time to learn features introduced as you progress thru the game.

Image

The two Gussen Oyoyo games are exclusive to only the SNES and only as an import SFC cart. A very very good Puzzle Platformer that has not been discovered by that many. There is also a new Puzzle mode that is very addicting that is buried in the Japanese text of the game; discovered only after I Googled a translation guide.

Image Image

Sky Render wrote:http://www.gamefaqs.com/snes/581936-super-gussun-oyoyo-2/faqs/30373

Versus Mode
Press down on the D-pad at the title screen to reach the Versus option.

Puzzle Gussun Mode
To access Puzzle Gussun mode, press down or up on the D-pad TWICE. This fiendish mode was invented specifically for Super Gussun Oyoyo 2. Your basic goal in each puzzle map is to get your player to the exit. Just like in Versus mode, you have the same options (Start, Register, Erase, Data). Data shows your best times for the five puzzle areas instead of wins and losses, though. Press B to return to the title screen.

Options Menu
Press up on the D-pad or down three times at the title screen to reach Options. There are a few choices here:

Idol: Lets you choose Gussun and Oyoyo's idol, either Emily or George. Which you pick decides what intro and ending you'll get.

Difficulty: Default is Normal, can be set to Easy or Hard. Difficulty determines how fast Gussun and Oyoyo walk.

Speakers: Default is Dual, but can also be set to Single.

Sound Test: Lets you listen to music and sound effects from the game.

Press B to return to the title screen.
Aquin wrote:It's not often I come across a co-op puzzle platformer. When I first found Gussun Oyoyo, I spent many fun hours playing alongside a friend. That poor little cartridge got a workout until the wee hours of the next morning. Fully satisfied with this eclectic foreign purchase, I did some research to see if there was more to be had. The wall of Japanese was an easy climb and I was yearning for a sequel.

A quick Google-Fu yielded some baffling results. Gussun Oyoyo is another sad example of a forgotten series that never caught fire beyond the shores of Japan. Honestly, in my line of work, I see this all the time. What I don't see all the time is a screwy licensing mess reminiscent of the Wonder Boy insanity. Thanks to the whoring of Irem, there are three (and a half) takes on the same game done by completely different people. What's more, the franchise burned itself out with nearly a half a dozen entries in just three years. These studios created such similar games literally within weeks of each other. Were they competing? What did this do to their bottom line?

When this quick flurry of activity ended, Gussun Oyoyo would rarely be heard from again. The dust settled and all parties involved quietly went their separate ways. So let's take a look at these rare games, starting at the very beginning. I promise you want to stick around for Zoku Gussun Oyoyo and Gussun Paradise. They are truly excellent titles.

For a small taste of the style of game play looke for Wii Tetris Party Deluxe. There is a level called Field Climber that plays similiar to the obscure SFC Gussen Oyoyo series. :idea:

FX Games, Super GameBoy and Flashcarts
The Digital Press site mentions that FX chipped games as well as the Nintendo Super Gameboy adapter and even the Everdrive Flashcart work just fine. This really shows how well the emulation is, Starfox FX running great in the 2.0 portable.

Image

Tanooki wrote:All FX chip games do not work right. Stunt Race FX(and similar boards including the bootleg starfox 2 using it) will reset after 5min to the title screen, I wish I knew why. FX2 DOOM works perfect, Yoshi's Island is distorted then locks, it's unusable. SDD1 (Star Ocean, SF Alpha 2) just don't work. SA1 games 1/10 times will work, otherwise they fail. UNLESS...you do what I figured out, you can put a normal game in, turn on, HOLD reset(blue screen), swap in a SA1 game, release reset -- it works. CX4 games (mega man x2/x3) work fine.

An interesting way to play older Gameboy Carts with the larger buttons. I have a Super Gameboy buried somewhere, now anxious to find it!

Image

Links
Hyperkin Site - http://hyperkin.com/nintendo.html
Hyperkin NES FC Mobile Review - viewtopic.php?p=578865#p578865
Digital Press SupaBoy Thread http://www.digitpress.com/forum/showthr ... ost1804507
Video Game Museum Hyperkin Developer Interview - http://www.videogamemuseum.com/2011/04/ ... -handheld/
Unholy Knight SupaBoy Review - http://unholyknight.com/2012/05/12/port ... u-covered/
Game Informer SupaBoy Review - http://www.gameinformer.com/blogs/membe ... paboy.aspx
Hardcore Gaming Gussun Oyoyo Review - http://www.hardcoregaming101.net/gussun/gussun.htm
Why a SNES Yellows - http://www.vintagecomputing.com/index.php/archives/189

Right Click for a larger view

Note the size difference of the SNES Mario Kart package compared to the SFC packages.
Hyperkin SupaBoy portable SNES.jpg
Hyperkin SupaBoy portable SNES.jpg (247.55 KiB) Viewed 37554 times
Last edited by CRTGAMER on Sat Mar 21, 2015 2:48 am, edited 10 times in total.
Image
CRT vs LCD - Hardware Mods - HDAdvance - Custom Controllers - Game Storage - Wii Gamecube and other Guides:
CRTGAMER Guides in Board Guides Index: http://www.racketboy.com/forum/viewtopic.php?p=1109425#p1109425

Image
Image
User avatar
CRTGAMER
Next-Gen
Posts: 11933
Joined: Tue Jan 05, 2010 11:59 am
Location: Southern California

Re: Portable Game Guide - Atari Flashback - Simon - Microvis

Post by CRTGAMER »

Repair Portable Game Battery Contacts
An on going problem when buying vintage Retro Portable Games is the corrosion caused by worn out batteries forgotten inside. This can also be an issue with TV remotes, Portable Music Players, Game Controllers and anything else that takes a battery that might have been left inside too long.

Simon Series Review - viewtopic.php?f=52&p=487515#p487515

Simon by Milton Bradley
I recently bough a third Simon at a Thrift Store which did not function. This unit had batteries inside severely corroded and stuck right onto the contacts. The D batteries popped out after spinning them inside the compartment. Unfortunately even after scrubbing the battery holder contacts with a wire brass wire brush, new batteries would not work. I suspected the corrosion might have crept inside so decided to take a look.

Tools and Parts
#2 Phillips Screwdriver
Rosin Core Solder
Solder Iron (Heavy duty for large solder job)
Electrical Wire Stripper
Stranded Electrical Wire


Disassembly
Remove the three slide switch "handles" off the top face. Turn the Simon upside down. Remove battery doors and all batteries.

CRTGAMER wrote:It is very important to discharge any stray electrics still in the capacitors. This is done by unplugging the power cord or removing any batteries. Turn unit on without any power source, press ALL the buttons and then turn the power switch back off.

Remove four #2 Phillips screws located on the outer ring. Turn Simon back over and remove the top. The four color button pads will stay in place. You can switch the individual pads around at this stage if you want a different light up color pattern. Be sure to scrutinize the slide switch location in relation to the top cover for assembly later on.

The D battery contacts are hidden under the PCB, remove the four Phillips screws. Carefully lift up the PCB while feeding the 9 volt battery connector thru the compartment. Note that there are two speaker wires also attached. However, there is enough slack so the speaker can stay in place. Once the PCB is clear, the two D battery contacts can be lifted right out. Both contacts are identical, so they can fit either slot. A nice design, two of the PCB mounting screws also hold the battery contacts underneath making the electrical connection to the PCB.

Right Click for a larger view
Simon Repair 02.jpg
Simon Repair 02.jpg (207.02 KiB) Viewed 37272 times

Solder Repair
The contacts are in really bad shape, the battery acid corroded a hole in each! Luckily no acid worked its way inside. Proprietary replacement parts from a 70s electronic portable would be impossible to find. I could have bought some copper plate, trim and bent to match the original tabs. The replacement may not have the "spring" needed to hold the batteries though. Just filling the rotted hole with solder would not work either, the battery contact has no "flux stick" capability since it is so badly deteriorated and appears a dull iron color. However, the back side of the contact still has its copper finish which offers a good solder surface.

Use spare stranded (not solid) electrical wire, strip off a couple inches of the insulation, but do not cut the excess wire off yet. Wrap the exposed wire completely around the corroded contact, just at the section where the battery contacts. This allows the contact to still have its "bounce" to make a connection to the batteries. Cut off excess wire and solder the wires and contact all the way around.

CRTGAMER wrote:After tinning the solder iron with just a bit of solder, place the tip on the metal contact and not the wire. Melt the solder directly onto the wire. This assures that good penetration of the solder is achieved.

This Simon has seen Military action, evidenced by the green military issue batteries left inside. A warrior retired from the battlefield worthy of repair.
Simon Repair Battery Holders.jpg
Simon Repair Battery Holders.jpg (154.57 KiB) Viewed 37272 times

Reassemble and Retest
For easier aligning of parts, always start all the screws before tightening any. I left the cover off so the lights can be seen better. In the closeup below, you can see a spare light bulb taped under the 9 volt battery compartment. A nice extra and very smart place for storage since usually the original box gets tossed. Every original Simon comes with a spare bulb inside! :idea:

Simon Repair 04.jpg
Simon Repair 04.jpg (123.75 KiB) Viewed 37272 times

Image
Image
CRT vs LCD - Hardware Mods - HDAdvance - Custom Controllers - Game Storage - Wii Gamecube and other Guides:
CRTGAMER Guides in Board Guides Index: http://www.racketboy.com/forum/viewtopic.php?p=1109425#p1109425

Image
Image
User avatar
CRTGAMER
Next-Gen
Posts: 11933
Joined: Tue Jan 05, 2010 11:59 am
Location: Southern California

Portable Game Guide - Colecovision Flashback early review

Post by CRTGAMER »

Image

I'll update this post as I try out the different games and controllers. ToysrUs accidentally merchandised the console out too soon at some locations and is now pulling them back off the shelves. I picked up a the ColecoVision Flashback over a month even before the preorders were sorted out! :shock:

The official release date for ColecoVision Flashback is October 1st 2014 with some stores waiting until Black Friday. Good luck in your hunt! :idea:

Image

ColecoVision Flashback ATGames

Picked up a Colecovision Flashback early at ToysrUs, they mistakenly put the Atari Flashback 5, ColecoVision and Intellivision Flashbacks out before October. This console is made by ATGames, the same company that has put out the Atari Flashback 3 and 4. The PlugnPlay has 60 games inside, a few overlays and two controllers that plug in.

Image

Bill Loguidice wrote:http://www.armchairarcade.com/neo/node/5720

Official Game List for ColecoVision Flashback


ORIGINAL RELEASES
Alphabet Zoo - Aquattack - Artillery Duel - BlackJack/Poker - Blockade Runner - Brain Strainers - Bump 'n' Jump - Choplifter! - Cosmic Avenger - Dragonfire - Evolution - Fathom - Flipper Slipper - Fortune Builder - Frantic Freddy - Frenzy - Gateway to Apshai - Gust Buster - Jumpman Junior - Jungle Hunt - Miner 2049er - Montezuma's Revenge - Moonsweeper - Motocross Racer - Mountain King - Nova Blast - Oil’s Well - Omega Race - Pepper II - Quest for Quintana Roo - Rolloverture - Sammy Lightfoot - Sir Lancelot - Slurpy - Space Fury - Space Panic - Squish ‘Em Featuring Sam - Super Cross Force - Telly Turtle - The Dam Buster - The Heist - Threshold - Tomarc the Barbarian - Tournament Tennis - Venture - War Room - Wing War - Zaxxon

HOMEBREWS
Bankruptcy Builder - Destructor (Original release, Standard Controller Edition) - Mecha-8 - Module Man - Monster Masher - Ms. Space Fury - Princess Quest - Schlange CV - Search for the Stolen Crown Jewels - Search for the Stolen Crown Jewels 2 - Search for the Stolen Crown Jewels 3 - Shunting Puzzle


In addition, a 61st bonus game, Antarctic Adventure, will be available in an exclusive version at Dollar General. Sam's Club will have a version with the standard selection of 60 games, but a handful of additional overlays.

Unfortunately the original ColecoVision console pack in game Donkey Kong is not part of the list. This game is what sold the original console back in the 80s, the idea of an exact from Arcade to home edition game. A battle of the consoles, the Atari 5200 also had Arcade to home games the same year with Centipede and Defender.

It is doubtful the Donkey Kong game will ever be incorporated into future Coleco Flashbacks due to copyrights by Nintendo. Ironic back in the day Atarisoft also had licensed Donkey Kong from Nintendo for various 8 bit computer systems. Other famous ColecoVision game Turbo which needs a driving controller is not included either, but there are quite a few very good games in the list.

Video Audio
As in other ATGames Flashbacks the ColecoVision PlugnPlay has hard wired Composite Video and Mono Audio RC cables. These are easily attached to any TV, a stereo adapter can be added for the audio jack. Video is clear considering it is only Composite. Audio is crisp; even though some sounds are low, no background buzz noise detected.

Controller
Two pack in controllers, both full sized look very similar to the originals even accepting the same overlays. As in the Flashback 2600 joysticks a nice solid feel perhaps even better then the originals. The Coleco Joystick knob is not the best direction controller, but adequate with its short throw. The console has the standard Coleco 9 pin plug which invites an option of plugging in other types of controllers. A tease of utilizing Atari Joysticks and Genesis Gamepads?

Due to different Pin layout in the joy ports, original Colecovision Controllers are not compatible.

Image

ColecoVision Super Action Controller
I have two of the official Coleco "Baseball" controllers, gave a tryout in a few of the games. Unfortunately could not even get past the Menu screen. I really want to try the "Spinner" of this controller hoping it would work for games such as Omega Race. The controller is mainly for Sports games, the spinning roller controlling the speed in a game. Not sure if I want to risk a Genesis gamepad though since they have been known to short out the Commodore computer joyports.

ColecoVision Super Action Controller.jpg
ColecoVision Super Action Controller.jpg (385.2 KiB) Viewed 35711 times

Jumpman Jr
A quick check of one of my favorite Commodore 64 games confirms how well this game has aged. Still fun and hard as ever! A platformer, mix between Loderunner ladders and maybe inspired by the classic Arcade Donkey Kong. This game alone is what convinced me to snag the ColecoVision Flashback! Miner 2049er is also buried in the ColecoVision Flashback game menu.

Image

Pepper II
An Arcade Cab game exclusive to just the Colecovision home console. Despite the number 2 in the game name there is no number 1. This game plays like Amidar going around the maze tracks enclosing boxes in a way like Qix. Not just a single screen but branching out in each direction of five screens. :D

Earl Green wrote:http://www.thelogbook.com/phosphor/1982/pepper-ii-coleco/

More or less ignored by Atari and Mattel in the early days of licensing coin-ops for home play, Exidy was a lucky find for Coleco. Its games were graphically simple, but compelling, and home versions of several Exidy games were among the first round of Colecovision games Pepper II released (see also: Mouse Trap, Venture).

It’s probably not too much of a stretch to say that Coleco’s ports of Exidy’s games have a lot to do with Exidy being remembered today.

The game is still a humorously surreal riff on the basic play mechanics of Pac-Man (swap zipping zippers for eating dots, pitchforks for power pellets, etc.), but it perfectly preserves all the things that made Pepper II unique in the arcade, such as the ability to exit to other levels without completing the entire screen first. Pepper II was one of many early Colecovision games that helped establish that machine’s sterling reputation. Even today, in an era when arcade games can be emulated perfectly, this version of Pepper II still stands up.

Image Image

There is even the 8 bit computer game Artillery Duel; Angry Birds gamers should check out this original which has much more depth.

Small PCB Inside - Inspect the Solder Joints
Opening up the Colecovision Flashback reveals a very small PCB inside, about the fourth of the size of the PlugNPlay shell. Note the video solder connections, the excess wire sticking out. A good idea to cut the excess wire off the solder pad to prevent shorting. I also pulled the video/audio wires further apart undeneath.

Colecovision Flashback Video Solder Pads.jpg
Colecovision Flashback Video Solder Pads.jpg (137.49 KiB) Viewed 34751 times

The Colecovision Flashback is smaller then a Colecovision Superaction controller!
Attachments
ColecoVision 60 Game PlugnPlay - Super Action Controller.jpg
ColecoVision 60 Game PlugnPlay - Super Action Controller.jpg (245.44 KiB) Viewed 35735 times
Last edited by CRTGAMER on Wed Nov 19, 2014 1:20 pm, edited 4 times in total.
Image
CRT vs LCD - Hardware Mods - HDAdvance - Custom Controllers - Game Storage - Wii Gamecube and other Guides:
CRTGAMER Guides in Board Guides Index: http://www.racketboy.com/forum/viewtopic.php?p=1109425#p1109425

Image
Image
User avatar
BoneSnapDeez
Next-Gen
Posts: 20116
Joined: Mon May 02, 2011 1:08 pm
Location: Maine

Re: Portable Game Guide - ColecoVision Flashback early revie

Post by BoneSnapDeez »

Good info CRT. Not sure how I missed this earlier.
User avatar
CRTGAMER
Next-Gen
Posts: 11933
Joined: Tue Jan 05, 2010 11:59 am
Location: Southern California

Re: Portable Game Guide - ColecoVision Flashback Updated Rev

Post by CRTGAMER »

Added more info a few posts above on the SNES SupaBoy. Expanded the Review on an exclusive as SFC cart import and only to the SNES console, the obscure game series Super Gussen Oyoyo 1 and 2. Any SNES owner should really try these games out.
Last edited by CRTGAMER on Thu Jan 29, 2015 2:08 pm, edited 1 time in total.
Image
CRT vs LCD - Hardware Mods - HDAdvance - Custom Controllers - Game Storage - Wii Gamecube and other Guides:
CRTGAMER Guides in Board Guides Index: http://www.racketboy.com/forum/viewtopic.php?p=1109425#p1109425

Image
Image
Post Reply