How to Burn Retro Game Images With All Free Software

Presented by: Ziggy587
Note from racket: It’s been quite a while since I wrote my original burning tutorials.  Since then, we’ve gone through a handful of operating system versions and prefered burning software. This guide originally was posted in the forum by Ziggy587, so thanks to him for letting me republish it here. Also, keep in mind, burning discs of games is not intented to replace purchasing games.  I’m not going to debate the issue here — just take this guide as information to use responsibly.
The purpose of this tutorial is to show you how to burn game images to CD/DVD. This tutorial will break it down to image format rather than console specific. Why? Because burning a BIN/CUE (for example) is exactly the same whether it be for a Saturn, Sega CD, or NeoGeo CD game.
I realize this tutorial is a little lengthy, but please try to read it entirely before posting for help.
Disc Image Types Supported
This tutorial will teach you how to burn game images of the following types:
- BIN/CUE
- ISO + mp3/CUE
- Also applies to ISO’s with other music formats like Ogg
- May not include a CUE
- ISO/MDS
- May or may not include an MDS
- CCD/IMG/SUB/CUE
- May not include a CUE
- CDI
- MDF/MDS
- GCM
- ECM
Game Systems Supports
These images are used for games of the following systems:
- NeoGeo CD
- Sega CD
- Sega Saturn
- Sega Dreamcast
- Playstation 1 & 2
- Xbox (1)
- Gamecube
- And more
What You Need
All of the software used in this tutorial is legally free to download. There is no software used in this tutorial that has to be “pirated” in order to be ‘free’. None of these free programs are trial versions, shareware, etc. They do not have any removed features. We will be using the following programs:
- Is a virtual drive
- Allows you to mount an image and use it as if it were a physical disc
- Use to test your game image before you burn
- Will not waste CD-R’s because of bad images
- Will make CUEs for: Sega CD, Sega Saturn, and NeoGeo CD
- Allows you to detect and change the region of Saturn games.
- Disc burning software
- Best free burning software available
- Quality and ease of use is outstanding
- Can be used to burn CDI images
- Use to extract your game image after you download it
- Common abbreviation is “7z”
- Will allow ImgBurn to read Ogg files
- Super compressed images
Download the software from the links above as you need it. Some of the software you might not need if you already have them or similar programs. For example, if you have Win RAR then you really don’t need 7-Zip. Or if you have Virtual Clone Drive you will not need Daemon Tools Lite. But the programs listed above are what we’ll be using in this guide. Some of the software you might not need at all. For example, you wont need the OGG filter if you don’t have an ISO+ogg image.
This tutorial will not be covering how to obtain game images. This tutorial will not be covering how to play burned games on your system. You are on your own in that department. So, after you have downloaded your game image….
Tips
Try and use quality CD-Rs. The cheapo discs may or may not work. Safe practice is to use a good brand name (I like Sony and Verbatim myself). CD-RWs will not work, do not use them.
Burn at a slow speed. In this guide I recommend 8x as I feel this is a safe speed for everyone. One person might be able to burn at 16x while others will not. You can burn slower than 8x but I’ve personally never had the need to.
Step 1: Extract your game image
When you download your game image it should be a single, compressed file. You will have to decompress (aka extract) this file. Common compressed file types are .zip (WinZip), .rar (WinRAR) and .7z (7-Zip). 7-Zip can decompress any of these three file types, and is free, which is why we’ll be using it.
So, download and install 7-Zip if you haven’t already. To make life easier in the long run you might want to associate all .zip and .rar files with 7-Zip. To do this, right-click on a .zip or .rar file and choose Open With (if Open With is not available, just choose Open). You’ll be presented with the following screen…

Click on Browse (circled in red) and navigate to the 7-Zip folder in the Program Files folder (usually My Computer \ C: drive \ Program Files \ 7-Zip). Click on the file called 7zFM.exe and then click open. Make sure Always use the selected program to open this kind of file is checked off (where the red arrow is pointing) and click OK.
Your compressed file should now have a 7z icon for it. Note that if you do this for a .zip file you will also have to do it for a .rar file and vise versa. This is a one time deal, you wont have to do this again.
Now before we extract the image, let’s check to see if we’re extracting a folder or loose files. Now that we have associated .zip and .rar files with 7-Zip, double-click on the compressed file to launch the 7z File Manager. If you see a single folder, we’re good to go. If you see multiple loose files (no folder) then it will be a good idea to make a folder for them.
If you extract multiple loose files into a directory with other files, this could create a problem especially if you have an ISO + mp3 image. You really want to make sure that all the parts of your image are in the same folder and that nothing else is in that folder.
Example of a folder:

Example of loose files (no folder):

If the compressed file contains a folder, skip to the next paragraph. If there are loose files, create a new folder and name it the name of the game. Move the compressed file into the new folder.
Right-click on the compressed file and you’ll see a new 7-Zip option as seen below. Click on Extract Here to extract the image into the folder that you currently have the compressed file in. If you click on Extract files… you can browse to choose where you wish to extract the files to.

Your game image is now extracted!
Step 2: Use Daemon Tools / Test Image in Emulator
Testing the image in an emulator is entirely optional. The point of testing the image before you burn is to verify that the image is good. Don’t think it’s impossible to download an image that doesn’t work. The worst part about burning a bad image is that when it’s not working on your console you wont know if it’s a bad image or if it’s because you burned it wrong.
We will be using Daemon Tools Lite later in this tutorial, so if you choose not to test your image in an emulator (even though I suggest you do) you should still read how to use Daemon Tools Lite.
So if you haven’t already, download and install Daemon Tools Lite. After you have, you’ll notice a new icon in the System Tray (all those little icons down by the clock). I have circled it in red for you below…

When you left-click on this icon you’ll see these two options:

In the above picture, Unmount All Drives is currently not selectable because there is no image mounted. Likewise, this is why we also see No Media for the second option. Click the option No Media to mount an image to this virtual drive. A window will pop up, browse to the folder that contains your newly extracted image. Select the CUE or MDS file (if there is no CUE or MDS, select any available file type until you can successfully mount the image). Now when you left-click the Daemon Tools icon in the system tray, you’ll see this:
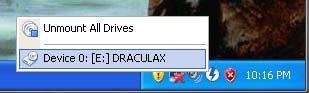
As you can see, Unmount All Drives is now selected, and instead of ‘No Media’ it now says DRACULAX (which is the game I have mounted).
Launch your emulator (this guide will not cover installing and configuring emulators -sorry – but this might have to be done in order to load a game). Some emulators will allow you to play a game from an image in which case you wont even have to mount the image in Daemon Tools. Otherwise, load the drive that your game is mounted on and try to play your game. I recommend getting past all the menus and loading at least the first level in the game.
Another good idea is to set the region in your emulator to the region of the system you’re going to be playing this game on. A lot of emulators have the region set to auto detect. You should manual set the region. Now let’s say you are trying to play a PS1 game and it wont boot in NTSC-U region, you might have a PAL or NTSC-J region game image. Just because you downloaded the image claiming to be a particular regions doesn’t mean that’s what it actually is.
If the game isn’t working use Google to find the official web site for the emulator. There is the possibility that the emulator you’re using does not support the game you’re trying to test. If that be the case, try using another emulator.
Step 2 â…“: Confirm/Change Region on Saturn Disc Image
This step is for Sega Saturn games only. If you are not burning a Saturn game you should skip this step.
Use this step EVERY time you want to burn a Saturn game, and not only when you want to change the region. You’d be surprised how many times you’ll download an apparently NTSC-U game (for example) and find out it’s region has been changed. It takes less than a minute to check, so you might as well.
Launch Sega Region Patcher. If you’re using the newest version (which is 3.0 Gold at the time of writing this tutorial) you’ll get a window that looks like this…

In the top left corner is were you can load your Saturn image. Click the […] button (which I’ve marked with a red colored number 1) to load an image. In this screenshot, you can see that I’ve loaded Panzer Dragoon Saga. After you have loaded your image, look at the right hand side to view which region that game is currently set to (which I’ve marked with a red colored number 2). As you can see in this screenshot, my game’s region is set to U: North America. So let’s say you want to change the region. Uncheck the region that it is set to, which will give you the option to check off any one region. Check off the box to the region you wish to set the game to. Now click on Let’s Patch your Image (which I have marked with a red colored number 3) and you’ll get a message that says “File Patched!”
Tip: You can use Saturn Region Patcher to check the region of a physical disk as well, so if you have a Saturn game disk (official or burned) and you’re not sure of it’s region, put it in your optical drive (that’s new-school talk for CD-ROM drive) and launch Saturn Region Patcher. Just to the right of where you loaded your Saturn image, you see “Select a drive with a Sega Saturn CD inserted” in green text. Select the drive you put your game disc in and then you can check the region of it on the right (the red colored number 2). Of course, you wont be able to change the region (since it’s already on a disk), you can only view it.
Pro Tip: When you burn a Saturn game and it isn’t booting, pay attention to what the menu is displaying. If you get the message “Game disc is unsuitable for this console” then you know that you’ve burned the game correctly but the game is set to a different region than your system. Load the image in Saturn Region Patcher, change the region, and reburn it. But, if the game disc only displays audio tracks, the problem can be a bad burn, a bad image, or your Saturn refusing to play a CD-R.
Step 3: Let’s Look at ImgBurn
If you haven’t already, download and install ImgBurn.
To make life easier, you should associate BIN, CUE, ISO and MDS files with ImgBurn. Remember how we did this with the RAR and ZIP files? Same deal. Right-click on any CUE file and choose Open With. Click browse and navigate to ImgBurn.exe which should be found in C:\Program Files\ImgBurn. Make sure the “Always use the selected program to open this kind of file” box is checked off and click OK.
This section will just be a dry run with ImgBurn. We’re not actually going to burn any discs in this step, we’re just going to get used to the ImgBurn program.
Launch ImgBurn and you’ll be presented with the following window…
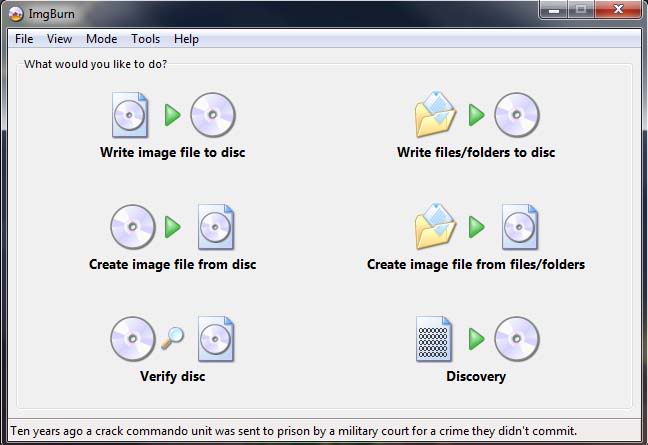
Pretty self explanatory, but we’ll go over it a little. The mode in the top-left corner and the mode just below it are the two we’ll be primarily using. Write image file to disc and Create image file from disc. You can also get to these modes by clicking on Mode from the top menu as see below…

Click Read to create an image from a disc, or click Write to burn an image to a disc. Simple, no? You can also choose Ez-Mode Picker to get back to the screen shown above. Let’s click on Read and look at that screen.
You will use Read mode to create an image from either a physical or virtual disc (which we will be doing later in this tutorial).
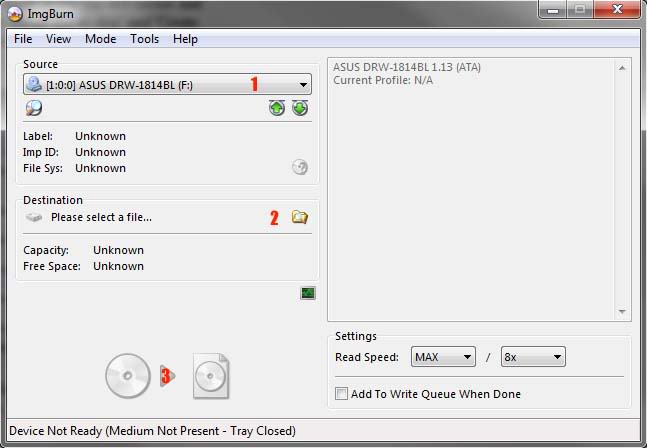
Look in the top-left corner where it says Source. This will be what you’re making your image from, as the name implies. I’ve marked it with a red number 1. Click this bar to select which optical drive (physical or virtual) you want to create an image from.
Now look below where it says Destination, I’ve marked this section with a red number 2. This is where you choose where to save your image file to. Click the icon to the right of the red number 2 to browse to the location you wish to save your image to.
And finally, look at the bottom where I’ve marked a red number 3. Once you have selected the drive you want to use and have chosen the location you want to save to you can click this button to start reading the disc (physical or virtual) to an image file.
So let’s look at the Write screen now. Click on Mode again and select Write this time.
It’s essentially the same thing, only Source and Destination are reversed. Source is now a location on your hard drive (the image file) and Destination is an optical drive (a CD-R or DVD-R). To burn an image to a disc, click the icon in the Source section (red 1) to select an image file such as a CUE or MDS file. Then, in the Destination section (red 2), have your burner selected (which will already be selected if it’s the only burner on your PC).
Note under your drive selection there is an option check off called Verify. When this option is checked off, ImgBurn will verify your disc burned correctly. After the burning process is finished, ImgBurn will read the disc and compare it to the image file you burned it from. Any discrepancies and it will let you know. This option makes the burning process take longer, so if you trust the quality of your burner and the blank discs you’re using, you can uncheck this box.
Pro Tip: If your burned game is not working and you are wishing that you verified it but didn’t, you still can. Click Mode from the top menu and choose Verify. Choose your optical drive under in the ‘Source’ section (with the disc you want to verify in that drive), browse to your image file in the ‘Image File’ section, then click Verify at the bottom. Easy as pie.
Now this is one of the most important steps. Look to the bottom-right where it says ‘Settings’ (red 4) and you’ll see you can select your write speed. Set the speed no higher than 8x. A lot of video game consoles have a hard time reading CD-R’s as it is, a lot of consoles will NOT be able to read CD-R’s if they’re burned too fast. Generally, you shouldn’t be burning discs at max speed anyways (unless you don’t care how long they last).
I recommend 8x. Some people will say to burn slower, I don’t see the need. I’ve been burning my games at 8x for years and have never had a problem (I’m also always using quality CD-R’s). But trust me, do NOT set it any higher than 8x. Look at it this way: Do you want to save an extra minute or two worth of burning time? Or do you want to not waste discs on bad burns.
Worst off, when your game doesn’t load on your console you’ll be left wondering why. Like my other preventive measures, take it out of the equation. You tested your game in an emulator, you know the image is good. You checked your Saturn game’s region, you know the region is set correctly. You burned the disc at 8x, so you can be sure the problem isn’t your game console not being able to read the CD-R because you burned it too fast.
OK, let’s get to burning!
Part 4: Burning an image to a disc
Determine what type of image your game is in and follow the instructions for that image.
Jump to the format/platofrm of your choice:
- BIN/CUE (For Sega CD, Sega Saturn, Neo-Geo CD )
- ISO+MP3/CUE (For Sega CD, Sega Saturn, Neo-Geo CD)
- ISO+OGG/CUE (For Sega CD, Sega Saturn, Neo-Geo CD)
- ISO (For Xbox and PS2 DVDs)
- GCM (Nintendo Gamecube)
- CCD/IMG/SUB/CUE (for Playstation)
- MDF/MDS (for Sega Saturn, PS1)
- CDI (for Dreamcast)
BIN/CUE
(common for Sega CD, Saturn, NeoGeo CD)
If CUE files are associated with ImgBurn (mentioned above) then all you have to do is double click a CUE file and it will automatically load ImgBurn in Write mode with the CUE already selected, but you can also do this manually by launching ImgBurn and choosing Write image file to disc.
We only have to select the CUE, and ImgBurn will know what to do with the BIN file.
So here’s the Write screen again, as you are already familiar with. Click the icon next to the red 1 to select the CUE you want to burn (which you won’t have to do if you double-click a CUE file to open ImgBurn). Select the burner you are using (red 2). Make sure the write speed is set to 8x (red 4). Now click Write (red 3) to start the burning process. It’s that easy.
ISO + MP3 / CUE
- (common for Sega CD, Saturn, NeoGeo CD)
- See below if the CUE is missing or broken
- ISO + mp3 images should include a CUE file
- The mp3’s could be another format such as Ogg (see below)
If you download a game and it turns out to be this type of image you should seriously consider deleting it and searching for another image format, such as BIN/CUE These images are just a hassle and are lower quality. I assume the only reason why people rip to this format is because they are smaller in size which saves bandwidth when being downloaded. ISO should not be used for CD based games. You are a lot more likely to find bad images in this format over any other format. Also, mp3 is a compressed audio format, so it will be lesser quality.
But, sometimes we’re forced to use this type of image when we can’t find a better one. So, when you’re forced to use an ISO + mp3 image, here’s what you do:
If your ISO + mp3 image has a CUE file, you can actually use ImgBurn to burn the game to a disc right now. Normally, as you might have heard, you would have to convert the mp3s to wav before you burn, but ImgBurn will do this for you automatically. Nice, right? Just double-click the CUE file to launch ImgBurn (or open ImgBurn, go to Write mode and browse to select the CUE). Select your burner and 8x as the write speed and click Write (exactly how it was done above for the BIN/CUE) to start burning the image.
ISO + Ogg / CUE
- (not as common as ISO + mp3)
- See below if the CUE is missing or broken
This is essentially the same exact thing as ISO + mp3, it’s just that the audio is in another format. As stated above, ImgBurn will convert mp3’s to wav for you. It can do the same for Ogg files as long as you have a compatible Ogg filter installed on your PC. So how do you tell if you have Ogg filters? Simple.
If your ISO + Ogg image has a CUE, you can load the CUE in ImgBurn and see what happens. If you don’t have Ogg filters installed ImgBurn will give you an error message.

So, if you don’t have Ogg filters installed, download RadLight Ogg filter from the link in the introduction part of this tutorial. After you install the filter, open the CUE up again in ImgBurn and it should load as normal (with no error message). At this point, you can burn the image just as you would an ISO + mp3/CUE image.
*If you’re CUE file is missing or is not working
Sometimes when you load the CUE in ImgBurn you’ll get an error message because the CUE is bad.

This happens a lot. And sometimes, the ISO + mp3 image wont even come with a CUE. Don’t worry, we can make one easily. We have Sega Cue Maker!
How to use Sega Cue Maker
-Sega Cue Maker will make CUE files for ISO + mp3 (or Ogg) images of Sega CD, Saturn or NeoGeo CD games.
-Sega Cue Maker will make CUE files for ISO + mp3 (or Ogg) images only. It is not able to make a CUE for other image types such as BIN/CUE.
-If you try to launch Sega Cue Maker in Windows XP, Vista or 7 and get an error message containing “Comdlg32.ocx” click here for an easy-to-do fix.
-If you have more than one ISO + mp3 image in the same folder, Sega Cue Maker will not be able to make a correct CUE for your game. Make sure the ISO and all the audio tracks are in the same folder, and that nothing else is in this folder.
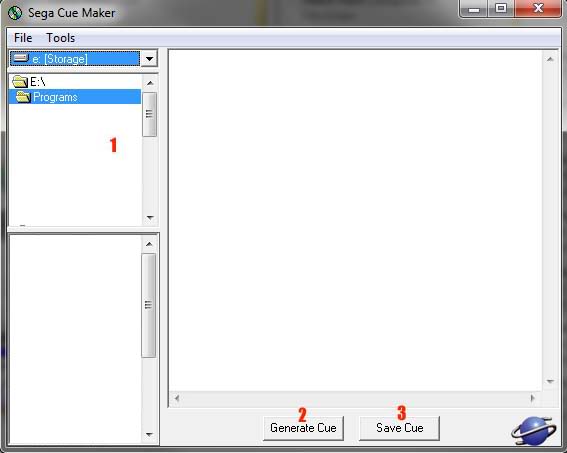
Launch Sega Cue Maker and you’ll be presented with the above screen. I’ve marked the top left section with a red number 1, use this section to browse to the folder that contains your ISO + mp3 image. Now click Generate Cue (which I’ve marked with a red number 2) and then click Save Cue (which I’ve marked with a red number 3). When you click Save Cue, browse to the folder that contains your image and name the it the name of the game then click Save. That’s it, you’re done!
Follow the instructions above to burn the ISO + mp3 or Ogg image.
ISO
- (Standard Xbox and PS2, DVDs)
- Unlike CDs, ISO images are perfectly fine for DVDs
- ISO may or may not have an MDS file
- ISO for DVDs will not contain mp3, ogg, or CUE files
This is not to be confused with the ISO + mp3 image. And unlike when you’re missing the CUE of an ISO +mp3 image, it is not a problem if you’re missing the MDS file (you don’t need it).
- Launch ImgBurn and go to Write Mode
- Browse to select the MDS (select the ISO if there is no MDS)
- Set your write speed to 8x
- Click Write to start burning
GCM
(Gamecube image)
You’ll be surprised how easy this format is to burn. First off, make sure you can see extensions in Windows Explorer.
1) From any Windows Explorer window (such as the folder that contains your image) click Tools from the top menu (you’ll have to press the Alt key on your keyboard to see this menu if you’re using Vista or 7) then click Folder Options as dictated by the red arrows in the image below…

2) Click the view tab and then make sure “Hide extensions for known file types” is NOT checked off. If you have to uncheck this box, click Apply then OK. Again, red arrows in the picture below…

3) Locate your GCM image file. Right-click on it and click Rename. Change the letters GCM to ISO. Don’t just rename your game “GameTitle.ISO.GCM”, actually change the .GCM to .ISO so that it reads “GameTitle.ISO”
Now you’re ready to burn the ISO! Follow the steps above for burning an ISO file. If you didn’t already know, you’ll have to burn a Gamecube image to a mini DVD because a full size DVD will not fit inside the Gamecube. That is, unless your Gamecube was modified to fit full size DVDs.
CCD/IMG/SUB/CUE
(standard for Playsation 1)
This disc image format is the Clone CD image. If you plan on burning a lot of PS1 games of this format, or if you want to back up your original PS1 games, you might consider buying a copy of Cone CD. You can purchase and download it from SlySoft.com, or you can download a 21 day trial version.
But as promised, this tutorial will show you how to burn this image using only free software. There are some drawbacks, however. This tutorial will show you how to rip the image to BIN/CUE so that you can burn it with ImgBurn. But, the reason why CCD is the image of choice for PS1 games is because it is capable of copying the copy protection from a retail disc. Ripping the CCD to BIN/CUE will break the protection, if any exists. I haven’t been able to find a definite answer on whether you might run into a problem with certain games or not. I personally have not as of yet. But if any one has any concrete info on the matter, please share it with me.
In the beginning of this guide I showed you how to mount an image in Daemon Tools Lite. That is what we’ll be doing now. Mount your CCD image with Daemon Tools Lite by selecting the CUE (if the CUE is missing, select the CCD). Now, launch ImgBurn and go to Read mode.
For Source (red 1) select the virtual drive. Now, click on the destination folder (red 2) and the following window will pop up:

Browse to the folder that you wish to save your image to. I suggest creating a folder solely for this one image, and nothing else. See the red arrow in the above screen shot? Obviously, where it says File name, enter the name of the game. Now this is most important, where it says Save as type, make sure you select BIN. After that, click Save and you’ll return to the Read mode screen. Just click on the Read button (red 3) to begin reading the game to a BIN/CUE image. Once it has finished, you can burn the new BIN/CUE to a disc (follow the direction above for the BIN/CUE format).
MDF/MDS
(uncommon for Saturn, PS1)
ImgBurn does not support MDF/MDS. So just like above for CCD, we can rip the MDF into BIN/CUE and burn it that way. Follow the directions above for ripping a CCD image to BIN/CUE, it’s the same for MDF.
CDI
(standard for Dreamcast)
Unfortunately, while ImgBurn supports the CDI image, it does not support multi session CDI images. This means we cannot use ImgBurn to burn a Dreamcast CDI image. If you try to load a Dreamcast CDI in ImgBurn, you’ll see this error message:

ImgBurn is updated fairly frequently, so keep an eye out for multi session CDI support. Maybe one day we’ll be able to use ImgBurn for Dreamcast CDIs, but right now we can’t, so…
Download and install Boot Dreams if you haven’t already. Launch the program and you’ll see the following:
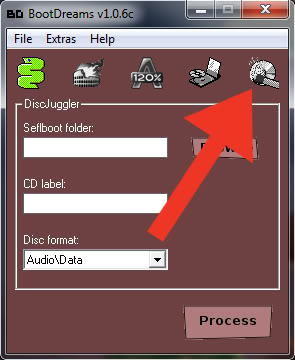
Click the icon that the red arrow in the above screenshot is pointing to. Now you’ll see this:

It’s pretty straight forward since there’s not a lot of options in this window.
- Click Browse to select your CDI image
- Set your burn speed to 8x
- Click Process to start burning the image to disk
If you’re having a problem using Boot Dreams, there are other options. You could rip the CDI into BIN/CUE and burn using ImgBurn. You would do this exactly like how I described to rip a CCD into BIN/CUE above. I’ve read all over the internet that ripping a CDI Dreamcast image into BIN/CUE will break the self boot, but I’ve burned at least half a dozen games this way and they all worked perfectly fine for me.
Your other option is to use DiskJuggler. This program is NOT free, but there’s a demo version that you can download. The demo version isn’t time limited, but it limits other features. It will only allow you to burn at the lowest possible speed (which isn’t a problem at all for us, since we want to burn slow anyway) and you can’t use the overburn feature.
ECM
- ECM (Error Code Modeler) lets you prepare CD image files (such as BIN, CDI, NRG, CCD, or similar) so that they’ll compress far better in programs such as WinRAR.
Some times you’ll download a game and notice a .ECM extension on one of the image files. So for example, let’s say you have a CCD/IMG/SUB/CUE image. The IMG file could have ECM on it, you would see “GameName.IMG.ECM”. For another example, let’s say you have a BIN/CUE image, you would see “GameName.BIN.ECM”. You have to get rid of the ECM before you can burn you image. It’s very easy to do. Download the ECM tool and put extract it into a folder.
You’ll see two .exe files. One is ECM and the other is UNECM. So, if you want to get rid of the .ecm extension from an image, you’ll obviously use UNECM.exe. All you have to do is drag and drop your ECM file on the UNECM.exe file. It will remove the .ecm extension from the image. Once it is done, you’re ready to burn. Follow the directions for the specific format it is.
Need Help
If you need assistance, please see the forum thread associated with this guide — you may not get assistance in the post comments below
Affiliate programs and affiliations include, but are not limited to, the eBay Partner Network or Amazon Associates.
great article! Wish this had been published a lot sooner as it seemed to take me forever to track down free software and figure out how to burn Dreamcast games, but I’m glad this information is easily and readily available, and its explained great.
Great article good job. Now all you need to make it perfect is to do a Mac one..
Great Article my friend! Really glad to see someone finally took the time to do this. I’ve been meaning to do something like this for years… Great work!
-retromangia
Christoph, use boot camp and dual boot with windows XP or whatever OS. I’m a primary PC user, so i wouldnt know the specifics, but i know it exists. Otherwise, its time to brush up on your PC skills, because PC’s dont do everything for you.
😛
The free version of DiskJuggler does allow the use of Overburn; I use it all the time. In my opinion DiskJuggler is the only way to get a decently burned Dreamcast game as well.
So awesome, thanks a lot!
Now this is ridiculous, why is it so important to do illegal/morally wrong things while using legal/morally correct tools? It’s like insisting on using legally bought guns to murder people, instead of using black market guns to do the same.
deathclaw, as stated in the intro, we aren’t debating the legality/morality of this issue.
But as a quick response: there are some legal, fair use situations possible. And additional arguments are that free software is easier, pirating current software hurts developers where pirating some older games would not necessarily.
We’ll leave it at that. Any other comments on the topic will be deleted.
Great guide! There is always some things i need to check when burning games and it always results in me researching the net, witch takes a bit of time. Great to have all the answers in one place. thanks!
Awesome article. I’ve always wondered why people posted games for the Saturn and Sega CD in iso/mp3, its so complicated. And why they even give you a cue file because you can’t even use it after you convert the files. W/E though I guess you can’t complain. Yeah and it’s true if you are new to Saturn, ALWAYS check the region, People love to change it from Japan to PAL when it’s clearly a Japanese Saturn.
great article! have recently been “backing up” PS2 games and found that DVD Decrypter makes the process extremely easy.
@ eSPy: ImgBurn is the burning engine of DVD Decrypter. After the DVD Decrypter software had to be shut down, the author continued working on the burning engine. DVD Decryptor is needed to rip a PS2 DVD, but you’re better off using ImgBurn to burn the image since it’s just an updated version of the same software.
@ Riqz: For what ever reason, the link for Boot Dreams is always going bad. But I just checked, as as of the time of this posting (11/15/2010) the link is good.
Just stumbled on this article, haven’t been on RB for a while now. How I wish I had this about two years ago. Decided to try my hand at backing up my DC games and ended up making about 50 coasters in the process before I figured it out.
I am following these instructions EXACTLY and i can figure out why the games i’m trying to burn go straight to the CD player in my Sega Mega CD 2 and play it as audio rather than booting the game. is there something i’m missing? Please help me as i’m going through a shatload of CD’s trying to get this to work.
@ Benny: There’s a forum thread associated with this guide, the link for it is right in the first paragraph of this guide. Feel free to post in that thread for help. I don’t check the comments on this page regular, but can respond quickly if you post in that forum thread.
Thank you for your tutorial
But I still can’t use my burned CD to play in Saturn successfully
I have just downloaded the CD image for many times from different sources
including .iso // .bin / .cue // .mdf / .mds etc.
I just know my CD image may be multi track, but not simgle track
How can I burn it successfully?
I really want to play this game, and it’s called Sonic Jam
Can anybody help me?
Please!!
@ samson: There’s a forum thread associated with this guide, the link for it is right in the first paragraph of this guide. Feel free to post in that thread for help. I don’t check the comments on this page regular, but can respond quickly if you post in that forum thread.
ImgBurn may now be able to burn Dreamcast CDI images directly as of version 2.5.5.0
Excerpt from the ImgBurn change log:
Added: Proper support for CDI images (including multi-track/session ones) via Padus’s PfcToc.dll file (must be present where ImgBurn.exe is).
I’ve tried two images thus far and both have worked eventhough the verify function reported an error that reads more like a warning. I verified both discs in DiscJuggler and it didn’t report any errors.
I’m hopefull that that it will work 100% as I really like ImgBurn’s batch burning capabilities.
Yes, I’ve heard of that recently. Basically, you put the CDI drivers in the root directly of the ImgBurn install and it adds the support to burn CDIs. I haven’t tried it myself (well, I loaded up a CDI in ImgBurn without the usual error message, but I haven’t tried burning any games yet). I’ll have to mess with it a little and then most definitely update the guide to include this. It’s definitely better being able to use a single program for as many things as possible.
Hello all
Was just wondering whether having a Pro Action Replay for Saturn would mean I could bypass region encoding for burned Saturn titles just as it does with original retail copies. If anyone knows or is still reading this post (its a little old now) I’d really appreciate it
You can use an Action Replay to get around the region lockout of burns just as well as retail copies. However, if you’re playing a burned disc, there’s no point. Use Saturn Region Patcher to change the region of the game BEFORE you burn it to a CD-R. This way, you don’t have to use the Action Replay to get around the region lockout.
I have a standard dvd burning drive that bottoms out at 16x for cd burning, and I cant seem to find ANY drives on the market that burn at 8x or lower. Is there a secret here? Thanks!
Let me answer my own question here- ImgBurn will give you a warning on burn that says this device cannot burn at speed requested. But ignore, my burn was still able to play in original saturn.
Hello to all.
I´m trying to understand how I can burn dreamcast games.
I have IMGBURN with the last update (I think its files from discjuggler).
Most of the games i´ve downloaded are in BIN files, for example The folder extracted contains : 2 files in BIN (multissesion), 1 file in NRG e 1 file in CDI.
My question is : when i choose the option write from file to disc (in IMGBURN), should i choose the first or the second BIN file ? the first one usually has like 1mb and the second one its larger (multissesion?!). If i choose to write the first one, the program writes the two BIN files?
Help me please!