Wii Gamecube Guide - Emio The Edge as Wii Arcade Stick

Guides to jumpstart your Retrogaming lifestyle
User avatar
CRTGAMER
Next-Gen
Posts: 11933
Joined: Tue Jan 05, 2010 11:59 am
Location: Southern California

Wii and Gamecube Thread - NES Gamepad to Wii Remote Mod

Post by CRTGAMER »

2600 Joystick and NES Gamepad to Wiimote Mod

Image

The Wiimote has a layout of the NES Gamepad when turned sideways. This allows a NES Gamepad style of gameplay for games such as Metroid Other M, Bit Trip, Blastworks and select other Wii games as well as Virtual Console NES games. A very well thought out design, however the DPad and Action Fire Buttons are a little small. The Wiimote needs larger buttons akin to the original NES Gamepad.

There is the Wii Boss Plastic Shell that fits around the Wiimote.

Image

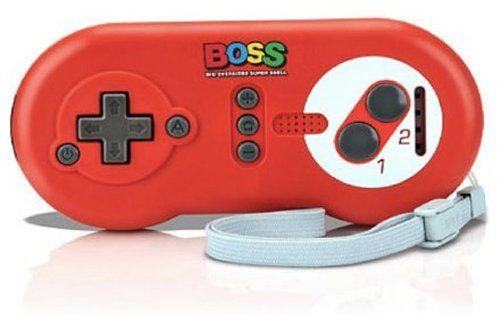
I do not care for plastic shells covering a Wiimote. The mechanical interfaced buttons have a slight delay and wear out the Wiimote button faces. There is a way to incorporate larger buttons and maintain instant response by adding an external controller. I performed a two stage mod to direct connect a NES Gamepad to a Wiimote.

Parts
1. Wiimote - Non Motion Plus which has metal pads and one less item inside.
2. NES Gamepad - This can be any non analog game controller you prefer.
3. D-Sub 9 Pin Male to Female Cable - Prebuilt saves some soldering.

OPTIONAL PARTS - Used for a Future Mod
1. D-Sub 9 Pin Female Connector
2. D-Sub 9 pin Male Connector
3. D-Sub Crimp Female Pins
4. D-Sub Crimp Male Pins
5. Screw lock mounting screw for D-Sub Connectors
6. Two and three pole double on Toggle Switches

Wii Remote Mod Kit.jpg
Wii Remote Mod Kit.jpg (219.03 KiB) Viewed 17555 times

The second list of optional parts are for a future Mod such as adding an Arcade stick. For now, the only part needed besides solder is the D-Sub 9 Pin Male to Female cable assembly. One half will be for the Wiimote, the other half for the add on game controller. Be sure the Male end with exposed pins is used with the Wiimote. The Female end will be the cable for the add on game controller. This will allow an easy hookup to future game controllers later on.

Cut the cable in half, cut away about two to three inches of just the outer thick insulation of each cable, then set both cable halves aside. The individual strands will be stripped later when the wires are sized to fit.

Disassemble the Wiimote
There are four screws underneath, two of which are in the battery compartment. A triwing screwdriver is needed or a small slotted jewelers screwdriver can work if placed at an angle. After removing the screws, use a slotted screwdriver to pry the halves apart.
sicknasty413 wrote:http://diy.sickmods.net/Tutorials/Wii/Disassemble_Wiimote/

How To Disassemble The Wiimote
This part may seem difficult. There are 2 clips in the front of the Wiimote that hold the 2 halves together. You may want to take your flathead screwdriver and use it to assist you. But just keep prying and wiggling. It'll give eventually. Try not to break the clips or else you're gonna need to glue your Wiimote back together.

Image

You'll notice a little circular object with 2 wires (red and blue) laying in a white plastic device. That would be the rumble motor. It pulls right out and the wires come out from their little clip. Then the white plastic thing comes right off the PCB. There are clips on both sides. Just unclip one of them and bam. It's off.

Image

Hold the Wiimote with buttons down so none will drop, removing the top shell. Be careful when removing the PCB from the lower housing, the rumble motor will be hanging by two small wires. Remove the B button plastic clip from the lower part of the PCB. Save all the pieces, everything will be used after the mod.

Wiimote Direct Button Mod
The Wiimote has an unusual Printed Circuit Board. Upon close inspection, the traces seem to be buried in a hidden middle layer. This prevents soldering the jumper wires from underneath, the wires go directly onto the button contact pads of the PCB.

CRTGAMER wrote:Be sure to use the Male D-Sub 9 Pin connector cable, the one with the pins exposed inside the plug. This will make it easier to connect standard nine pin controllers.

Before any soldering is performed, the Wiimote housing needs to be scrutinized. There is very little space for a nine strand wire and a very tight fit getting around the PCB and button contacts. I wanted to keep the Classic Controller hookup available and more importantly the Power, Home, + and - Buttons active. The Power button definitely needs to work, without it the Wiimote will not sync.

Cut a little, test fit, then cut a little more
Determine the wire entry point, clearances needed underneath and the best way for each wire to route around the PCB edges. There are notches on the sides of the PCB designed to clear the mounting screws. I removed two of the screw locations, cutting away the legs to make room for each wire. Use a Dremel to cut away plastic.

Drill a hole to the left of the Classic Controller connection point, the hole should be just large enough for a snug fit of the cable. A miniature zip tie wrapped around the wire assembly prevents it from being pulled back out, it also needs room to fit inside the lower housing. Have care that the Red Sync button does not bind against the added wires. Determine which of the various plastic supports needs trimming under the PCB. Some plastic in the upper housing also needs to trimmed, notably the pegs that go in the side notches of the PCB. After all the cutting is completed, I left the two center shell half mounting screw legs intact, the two that go inside the battery compartment.

Image

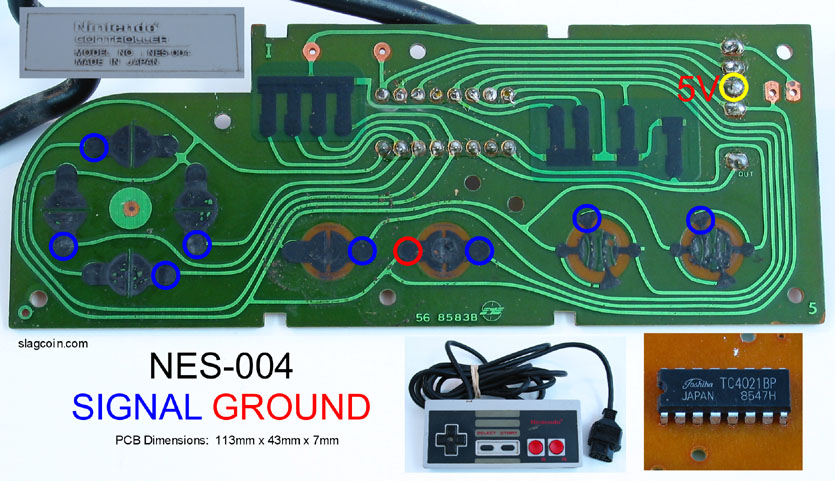
Identify which side of each pad is the common ground
The easiest way is to run a game with the PCB exposed to test or you can use the pic below as a guide. Touch a wire at each side of a button contact pad to verify. Since the Wiimote A button has the largest contact pad I chose it for the common ground. Touching each button location and use the A button for a common ground confirms which side of each contact pad is hot and which are grounded. I could have used a volt meter to do this, but did not want to risk stray voltage of frying a chip. Make a chart after all the pads are worked out, noting each wire color and location back to the 9 Pin connector plug.

B Button side of PCB
Note that the B button trigger underneath has four contact points, two are hot and two are grounds in a cross hatch pattern. The layout below is when looking at the PCB is with the Battery Compartment to the Right.

Right click for a larger pic
Image

Note the small black circular crosshatched B Button contact on the left. The non Motion Plus Wiimote has metal contacts which is easier to solder. Only one of the hot pads is needed for the B button wire, be sure it is not the ground.

Looking from Left to Right
Ground - Hot - Battery Compartment End
Hot - Ground - Battery Compartment End


A Button side of PCB
See the pic below. The Black wire is ground, the rest are hot leads for the various buttons. Starting from the left, the button contact pads are 2, 1, A and then the four Dpad contacts. The A button pad is the largest, ideal for the common black ground wire. An added benefit with both wires soldered on the A button contact pad, the surface is more level which allows the original button to still function. However, avoid using Wiimote buttons that have wires soldered on the contact pads, the button might get stuck to permanent on.

Right click for a larger pic
Image

CRTGAMER wrote:Solder by pre-tinning each wire with a little bit of solder. Pretin the button contact pads as well, important not to use too much solder.

Solder the lower B button contact pad first. Replace the button clip, decide if the button rubber pad will be left out or not. I did not want to take a chance on the B button staying on so I left out the rubber contact center. Route the wires around the PCB notches as in the pic above and cut each wire to align with each button contact pad. This prevents excess wire looped around getting in the way. The wire has to routed in a way that allows the PCB to fully seat in the lower shell. Take one wire at a time and solder it to the hot portion of each button contact pad. The ground wire is best soldered at the A button ground contact pad.

The Atari 2600 and 7800 Joyport schematic
Wiki wrote:http://wiki.arcadecontrols.com/wiki/Atari_Controller_Interfaces

2600 Pinout
1 = Up
2 = Down
3 = Left
4 = Right
5 = empty
6 = Fire Button
7 = empty
8 = Common (Ground)
9 = empty

7800 Pinout
1 = Up
2 = Down
3 = Left
4 = Right
5 = Right Button
6 = Both Buttons
7 = empty +5 Volt
8 = Common (Ground)
9 = Left Button

Image Image Image

In my zeal to ensure the black wire would be ground, I did not take into account of direct hooking up 2600 joysticks. I did not want to resolder the button contact pads for risk of damage. Not a problem, I cut off the molded plug and rewired in a new D-Sub connector rearranging the wires at the plug to conform to the Atari 2600 standard. This allows me to plug in any 2600 compatible joystick without modding, directly into the Wiimote 9 pin plug. Since the Wiimote 2 button is more commonly used for "NES Style" games, it is the best choice for the 2600 Fire button. :idea:

Reassemble the Wiimote
If the solder points are kept low, all the button rubber contacts can be placed back in. Luckily the A button is large so it actually works fine even with the wires soldered onto the contact pads. The other modified buttons may also work, but I would not continually press any modded button due to risk of a permanent on position. The Power, Home, + and - buttons are bubble switches, they should function as before.

The Wiimote is ready for an external controller, note the pins are just like a 2600 console. :idea:
Wii Nine Pin Connection Male.jpg
Wii Nine Pin Connection Male.jpg (161.74 KiB) Viewed 17555 times


NES Gamepad Mod
A while back I posted a Miracle Piano Guide where I hacked off the cable of a NES Gamepad, I saved it specifically for this mod. The NES GamePad has a DPad, Start, Select and two Action Fire Buttons. Eight buttons plus one ground connection, a total of Nine solder points. This is perfect for a standard Atari 2600 Joyport layout.

Disassemble the NES Gamepad. Remove the five wires by heating up with a solder gun. The chip is a little more tricky, I found it easier to cut the legs off first. After the chip is removed, heat up each pad and suck out the solder pad with a desolder wick or desolder suction tool. You can also just blow into the pad holes while the solder is still liquid. Do not attempt pull the chip legs if the solder is not in a liquid state.

Right click for a larger pic
Image

After the chip is removed, cut each trace that leads to a black resistance connection pads. The purpose is to isolate the button contact pads from each other but not from the common ground or the solder points where the chip was removed. The traces are difficult to follow, use an ohm meter to determine the common ground and hot point of each pair of button contact pad.

Right click for a larger pic
I accidently pulled one of the solder pads, fixed with a short white jumper wire. Note the cut traces.
Image

At the wire connection side, use an ohm meter to verify the connections from the button contact pads and PCB traces on the other side. Solder the wires, ensuring the pin layout matches both a 2600 joystick schematic and more importantly matches the modded Wiimote wire layout. Note that the NES Start button makes sense as the Wiimote A button.

Image

NES Button Layout
Pin 1 - NES DPad Up - Wiimote DPad Up
Pin 2 - NES DPad Down - Wiimote DPad Down
Pin 3 - NES DPad Left - Wiimote DPad Left
Pin 4 - NES DPad Right - Wiimote DPad Right
Pin 5 - NES Select - Wiimote B Button
Pin 6 - NES A Button - Wiimote 2 Button
Pin 7 - NES B Button - Wiimote 1 Button
Pin 8 - NES Ground - Wiimote Ground
Pin 9 - NES Start - Wiimote A button


Image Image Image

The NES Pad mod has an identical layout to a 2600 joystick. The DPad duplicates the joystick and the NES A button is the same as an Atari Fire button. Since additional buttons are wired in I do not want to take a chance on direct connecting the NES controller to an Atari or Commodore 64. A simple patch cable or 2600 extension cable with just the five buttons and ground wired up will do the trick.

NES Nine Pin Connection Female.jpg
NES Nine Pin Connection Female.jpg (208.54 KiB) Viewed 17573 times

This mod works beautiful with any sideways "NES Style" controlled game. I maintained the Motion and Shake Sensors as well as the Vibration Motor and Speaker. Games such as Metroid Other M detects the position of the Wiimote during a first person view. In addition, the Classic Controller hookup still works, so I can still plug in any Classic Controller including the Tatsunko Capcom Arcade Stick. :mrgreen:

That Arcade stick is teasing me to add a nine pin cable. :?

Mod References
http://technabob.com/blog/2011/02/28/video-game-controller-alarm-clocks-roger-ibars/
http://pinouts.ru/connector/9_pin_D-SUB_male_connector.shtml
http://wiki.arcadecontrols.com/wiki/Atari_Controller_Interfaces
http://diy.sickmods.net/Tutorials/Wii/Disassemble_Wiimote/
http://www.slagcoin.com/joystick/pcb_wiring.html

Sideways Control Game List
http://www.racketboy.com/forum/viewtopic.php?f=52&t=37984&p=615833#p615833
http://www.giantbomb.com/sideways-wii-remote-gameplay/92-6361/games/

Future Add on controllers

The Wiimote has a nine pin plug ready to accept any modded non analog controller with a matching plug. I can add easily an Arcade stick connection simply by jumping the Arcade button wires to a nine pin plug. No need to mod another Wiimote, the plug makes it more versatile. :D

A huge range of controller possibilities
I chose the standard Atari 2600 layout, this allows more controller options. In addition to the custom NES Gamepad, I can immediately plug in any of the wide range of Atari 2600 Joysticks. By adding a simple custom built nine pin crossover cable, and depending on voltage requirements, I might even be able to incorporate a Sega Genesis gamepad into the Wiimote. As for the modded NES gamepad, adding a custom nine pin crossover cable makes it a two button Atari 7800 controller. 8)

http://www.rogeribars.com/

Image

All 2600 Joysticks direct plug right in, Sideways Wiimote games that use the 2 for fire work great.

Try playing "NES Control" Wii games with a 2600 Wico! 8)

Image
Last edited by CRTGAMER on Mon Dec 12, 2016 11:15 pm, edited 36 times in total.
Image
CRT vs LCD - Hardware Mods - HDAdvance - Custom Controllers - Game Storage - Wii Gamecube and other Guides:
CRTGAMER Guides in Board Guides Index: http://www.racketboy.com/forum/viewtopic.php?p=1109425#p1109425

Image
Image
AppleQueso

Re: Wii and Gamecube Thread - Rayman Origins - Sky Crawlers

Post by AppleQueso »

...you really want to use NES controllers on the Atari, Commodore, Sega Master System and Sega Genesis huh?
User avatar
CRTGAMER
Next-Gen
Posts: 11933
Joined: Tue Jan 05, 2010 11:59 am
Location: Southern California

Re: Wii and Gamecube Thread - Rayman Origins - Sky Crawlers

Post by CRTGAMER »

AppleQueso wrote:...you really want to use NES controllers on the Atari, Commodore, Sega Master System and Sega Genesis huh?

A good guess, but I went the other direction. The NES Gamepad and any 2600 Joystick including Wico, EPYX 500XJ, Video Command and even my Zaxxon Arcade Stick which is 2600 compatible works with the Wii Remote that I modded. 8)

Games that really work well with this include:
Metroid Other M
Blastworks
Bit Trip
Attachments
Wii Nine Pin Connection NES Gamepad.jpg
Wii Nine Pin Connection NES Gamepad.jpg (156.24 KiB) Viewed 17520 times
Last edited by CRTGAMER on Wed Jun 06, 2012 2:34 pm, edited 1 time in total.
Image
CRT vs LCD - Hardware Mods - HDAdvance - Custom Controllers - Game Storage - Wii Gamecube and other Guides:
CRTGAMER Guides in Board Guides Index: http://www.racketboy.com/forum/viewtopic.php?p=1109425#p1109425

Image
Image
User avatar
CRTGAMER
Next-Gen
Posts: 11933
Joined: Tue Jan 05, 2010 11:59 am
Location: Southern California

Wii Laser Replacement Guide - Wii and Gamecube Thread

Post by CRTGAMER »

Wii Laser Assembly Replacement
Image
My Wii Laser Eye died. At first the games would load more slowly, the head would make random tick sounds while accessing the data. Then I did something really stupid and put in a dirty disc without even inspecting it. I posted the full story on this in the Ticked/Smile Thread, its under the Spoiler Show Tag if you missed it.

Ticked 1 - The Damage
I bought Safecracker for the Wii a couple of weeks ago. In my stupidity I put the disc in the Wii without inspecting the disc. Drive did a the spin and then several loud clicks. I popped the disc and it looked like a Hershey bar munching bum put his grubby hands all over it! Crap! Crap! Crap! Gave the disc a good cleaning and tried again which resulted in more clicks. Then tried other games which would boot sometimes and other times cutout halfway thru the load.

Ticked 2 - The Wait
Upon closer inspection, the Safecracker disc has swirls in it, now that does not make sense. The only way the swirls could get there is dragging on the laser or the chocolate eater returning the disc to the case by spinning it on the hub. I exchanged the game for the only other one locally used, but the replacement also has scratches. I really want to play this game based on mjmjr recommendation. Gamestop has a one week refund, but a thirty day exchange so I have a bit of a window to get the Wii replaced or repaired. I even posted the game in the Finds Thread waiting for the console to be fixed.

Ticked 3 - Damn DRM
What is it with the Wii error screen? Eject disc and shut off power? There is no hard shutoff switch so I have to drag the console out and pull the plug. Anyways, at this point the Wii looks to be shot. Even running a laser eye cleaning disc did not help and the "Official" cleaning kit is uncommon and expensive. I did not want to get a replacement and deal with all the downloads of the 52 demo games on the SD Card. Some of the Demos might not even be available. More importantly, I did not want to lose the WiiConnect24 Saves that cannot be backed up to a SD Card. All the Demos and Locked saves are tied to the console.

Smile - The Fix
Suspecting the laser was damaged from the chocolate disc, I ordered a replacement Laser and installed it. The old Laser was clean so it was probably knocked out of alignment. Maybe the CD cleaning kit polished the eye out since I heard it spool up inside the Wii, but I can see that the "Official" cleaning kit would not have helped in this situation. The Wii works beautiful, even my dual layer Smash Brothers runs fine. However, the replacement Safecracker game has issues, the scratches were enough to give the drive a workout, so I quickly ejected it.

I'm going back to Gamestop this morning and see if they can either ship one in or a refund. I'm leaning towards a refund, I'll just buy the stupid game new. I started thinking about why two copies of the same title would be so scratched up. Scratches occur from handling, not sitting in the case or in the console. Maybe the puzzle intensive game is played in small bites and consequently so many disc ejects? A frustration in solving a puzzle, so another game is popped in for a break?

The Laser change out is straight forward though meticulous on the Wii. I am writing a Guide to be posted in my Wii Thread. :idea:

There is a small chance a cleaner might do more harm then good, but an option when a Wii is having read problems. Nintendo actually put out an official Wii cleaner, but to be honest when I disassembled my Wii there was no dust at all inside. Even with the cooling fan, no dust gets inside the drive itself. Unlike a PC that gets dust from air circulation, the Wii is built well in keeping the inside clean. The only way a laser eye can get dirty is if it physically contacts a dirty disc, which it would never do unless it already is damaged or the console is bumped while turned on.

Image

I can get a replacement vertical Gamecube compatible Wii for under a hundred dollars. However, I would have to deal with re-enabling all my downloads to the replacement console. Even downloads backed up to the SD Card will not work on a new console, an issue since some downloads might not be available again. Any game saves under WiiConnect24 are locked to the console and cannot be backed up, these would be lost. :?

A replacement laser is an inexpensive route anyways, under ten dollars shipped online. :idea:

In this Guide, a Vertical Gamecube Compatible Wii is repaired, the screw locations might be slightly different for a horizontal non Gamecube compatible Wii. Read the entire Guide and study the pictures first. In addition, there are links at the bottom for additional information. One of the links has a couple of well made videos that shows in detail the disassemble and replacement of the Laser Assembly.

http://wiki-scene.com/Wii_disassembly

Deactivate WiiConnect24

Before you do anything you should deactivate WiiConnect24. It's impossible to disassemble the Wii without removing the battery and in doing so your console will have it's date and time settings reset. Plugging the console back in after the reset can really screw up your WiiConnect24 channels like the Wii Shop, Wii News, and Wii Forecast.

Image

Tool List
3mm Tri-wing Screwdriver
PH000 Phillips Screwdriver
PH00 Phillips Screwdriver
PH0 Phillips Screwdriver
Small Slotted Screwdriver
Tweezers
Magnifying Glass
De-Solder Wick
25 Watt Pencil Solder Iron


The Tri-Wing screwdriver is crucial and can be found at specialty Electronics suppliers. It is the same driver to remove Gameboy Advance cart screws. The Phillips bits are small, a Jewelers Phillip Screwdriver set normally will have the correct sizes.

Disassemble
Disconnect the Wii Power, Video and Sensor Bar cables. Remove the SDCard and any Gamecube Memory cards. Place the Wii in a well lighted area and remove all the screws listed above. To make it easier for reassembly, keep the screws removed from each side of the Wii in separate containers such as jar or water bottle lids. If the Jewelers Screwdriver case lid has multiple compartments it works great as a temporary storage.

Game Port Panel Screw List
Two Black Short Length Self Tapping Phillips - Black Face Plate
One Black Medium Length Machine Phillips - Black Face Plate and Drive Slot Cover
Two Silver Long Length Self Tapping TriWing - Gamecube Controller Port Side


Image Image

Remove the Controller Port and SD Slot covers, both open 90 degrees and slide straight up. Using the tiny PH000 bit, remove the three black Phillips screws. Remove the black controller port panel. Using the 3mm TriWing bit, remove the two silver TriWing screws on the controller port side. The two silver Phillips screws on the other side do not have to be removed.

Bottom Panel Screw List
Two Black Long Length Self Tapping TriWing - Drive Slot Cover
Two Silver Long Length TriWing - Power Cord End


Image

Using a small slotted screwdriver, peel off the rubber feet at the power cord side. The two rubber feet at the Drive slot end do not have to be removed. Remove the small pieces of white tape at the Drive Slot side next to the rubber feet. Remove two black TriWing screws and two Silver TriWing screws from the bottom panel with the 3mm TriWing Driver.

Fan Panel Screw List
One Black Medium Length Machine Thread Phillips - Front Drive Slot Cover
One Silver Tiny Diameter Machine Thread Phillips - Battery Cover
Two Silver Long Length Self Tapping TriWing - Side Plate (Battery Side)


Image Image

Remove the rubber foot directly across from the Battery Cover. Remove the white tape in the middle across from the Serial Number sticker. Using the small Phillips driver, remove the black screw holding the side of the Drive Slot Cover. Remove the battery cover and tiny Phillips screw. Once the Battery Cover is removed, there is a Silver TriWing screw exposed, remove it along with the other TriWing screw across from the Serial number sticker.

CRTGAMER wrote:With the SD door facing you, lift the Drive Slot Cover up a little. Be careful, it has a two wire plug that needs to be removed. The Red wire is to the left and the black wire is to the right. Remove the plug by prying the corners with a slotted screwdriver.

The two halves of the Wii case can now be split apart. Grab each side and pull apart straight apart. You might have to pull a little on each side, be careful to keep the separation straight to avoid bending or breaking the mounting points.

If only the screws described above are removed, the metal shield will stay in the cover and out of the way. I used a jewelers screwdriver case lid for a screw tray, the separate compartments are for separating each side of the Wii cover screws. The battery holder is also used as a small tray holding its side of the Wii console cover screws. Note the cardboard box that contained the replacement Laser Assembly; the Laser above the box is the old one with the torn ribbon connecter end.
Wii Laser Replacement 01.jpg
Wii Laser Replacement 01.jpg (236.04 KiB) Viewed 17506 times

Remove the Drive
Remove four Silver Phillips screws located at each corner of the drive. Be careful as you lift the drive, each screw location has a rubber grommet that might drop out.

Image

When lifting the drive, swivel it towards the Gamecube controller port as if on a hinge. There are two cables underneath that need to be unplugged. The white bundled cable is under a piece of black plastic, unhook the loop before "hinging" the drive all the way up. After the drive is brought up disconnect the two cables. The wider flat ribbon cable has a lock connector that can be swiveled clear. The smaller cable assembly has a plastic connector that can be pulled off with the aid of a small slotted screwdriver. Carefully disconnect the two drive cables. Remove the drive and set on table with the PCB on top.

Image

Disassemble the Drive
Remove the two Silver TriWing screws holding the PCB to the drive. Carefully remove the black tape holding the copper colored Laser Ribbon wire assembly. Save the tape, it will be needed for the new Laser ribbon. Carefully disconnect the three cables from the PCB. Take it slow you do not want to crush or break any wires.

CRTGAMER wrote:MISTAKE #1
Be very careful in disconnecting the cables from the PCB. Two of the connectors have side locks that need to be pulled out slightly to release the "Pinch" on the cable ends. Study the last picture in this Reply, you can see the black plastic lock tabs holding the wide ribbon connector for the Laser. I failed to release the tabs properly on the Laser and ended up tearing the end of the ribbon connector. I was replacing the Laser anyways, so got lucky here. Before installing the replacement Laser ribbon, I knew now how the Black Tabs have to be pulled clear before plugging the ribbon back in. In the first and 3rd attached pictures you can see the old Laser Assembly with the end of the ribbon cable sheared off.

After disconnecting all three cables, carefully flip the PCB over. You will need to pop the wire assembly harness clear on both sides of the plastic tray. Use tweezers or a small slotted screwdriver to unhook the wires ONE AT A TIME. The metal plate covering the Laser is held by one Silver Phillips screw, remove it. At each corner of the plate is a lock tab securing it to the plastic tray. Use tweezers or a slotted screwdriver to bend them out slightly. Remove the metal shield.

Image

Remove the Laser Assembly
Finally the laser can now be seen! Note that it rides on two rods and is controlled by a grooved rail attached to a small motor. On the rod next to the grooved rail, remove the Silver Phillips screw. Pry the plastic tab up slightly and slide the rod out part of the way out. The rod only has to slide out enough for the laser to swivel clear.

Right Click for a larger pic
Wii Laser Replacement 02.jpg
Wii Laser Replacement 02.jpg (237.05 KiB) Viewed 17506 times

CRTGAMER wrote:Mistake #2
Be careful not to lift the plastic arm too high after removing the screw. I pried up too high and snapped the plastic tab off. After installing the new laser, I improvised by using a short self tapping sheet metal screw thru the end of the rod hole. In the pic above, the screw is to the right of the lower rod attached right at the end. It is above and to the right of the grooved rail motor.

Image

The Laser swivels out and clear after the rod is pulled part of the way out. The white plastic needs to be removed and installed to the new Laser Assembly. Remove the small black Phillips screw and the white plastic.

Image

Remove the new Laser Assembly from the package, be sure the Laser Eye is not touched or brushes against any other parts. There is a antic static solder blob that needs to be taken care AFTER THE LASER IS INSTALLED AND CONNECTED. Install the white plastic from the old Laser Assembly, then drop the new Laser into the track gently. It should be close to the position of the original, the stepper motor will get it aligned later.

Slide the rod back in, scrutinize that if goes into the Laser Assembly smoothly. The black plastic tab will drop down once the rod is pushed all the way in. Replace the Silver Phillips screw to secure the end of the Rod. If you accidentally broke off the tab as I did, a short self tapping sheet metal screw can be threaded into the rod hole to secure the rod.

Replace the metal guard, bend the four corner tabs back in and replace the screw. If the Rod extra screw is used because of a broken tab, the metal shield can be bent to fit over it. Swivel the PCB back over and BE CAREFUL NOT TO PINCH THE LASER RIBBON CABLE, feed the PCB wire harnesses back into their hooks one wire at a time. Install the two PCB screws. Plug back in the three wire connections, ensure the lock tabs are "Open" before sliding in the ribbon wire assemblies. Lock the tabs after installing the ribbons. Replace the black tape over the Laser Ribbon connector as shown in the bottom picture. The location of the black tape is important to prevent the ribbon cable from chaffing.

Remove the Anti Static Solder
This seems daunting at first, the ribbon cable seems so fragile. The blob of solder is connecting two traces to prevent a static charge. The connection needs to be broken for the Laser to function properly.

Image

CRTGAMER wrote:DO NOT REMOVE THE SOLDER UNTIL AFTER THE LASER ASSEMBLY IS INSTALLED AND PLUGGED IN.
Heat up the Pencil Soldering Iron and use the desolder wick to remove solder buildup off the iron tip. This is important, you want the tip clean and ready to suck solder off the ribbon in a quick swipe. Using the magnifying glass for a close look, gently touch the Pencil Iron tip to the Anti Static Solder blob on the Laser Ribbon Connecter. Not deep just a quick light touch.

Since the Pencil Iron tip was cleaned off first, it will suck up solder from the Laser Ribbon connector easily. Be careful to just touch the solder blob, quick melt and remove the heat.

Image

Reassemble the Drive
Plug the wire assemblies from the Wii back into the drive. Note that the larger wire assembly connector needs the lock tab swiveled out before inserting. Hold the wire assembly in place then swivel the lock tab back in. Before dropping the drive all the way in, push the smaller wire assembly bundled loop back under the black plastic hook. Ensure all four grommets are still in place, replace the four drive screws.

CRTGAMER wrote:Always start all screws before tightening any, this allows slight shifting of an assembly for alignment.

Before popping the covers together, use a small clean artist brush to clean the dust buildup off the cooling fan blades. Blow off the dust with a can of air. :idea:

Reassemble the Wii Covers
Slide the two halves together slowly, inspect all prongs and tabs as you push the covers together. Sometimes a very slight push of a tab helps to find its notch or hole. The covers go in easier, if pushed in evenly in all the way around. Reinstall the screws, starting all before tightening any. Use the beginning of this Guide for screw type locations, newer Wii consoles might have different locations.

Test the Wii
Plug in all the cables, SD Card if there is one and turn on the Wii. Insert an inexpensive game just in case the worse might happen. Test run the game to ensure the drive is fully operational. Enjoy the game while doing the Cheshire Cat Grin. :mrgreen:

After the Wii checks out, eject and then insert a Dual Layer game for a final test. There are only a few Wii games that are Dual Layer, I own two which are Super Smash Brothers and Metroid Trilogy. I tested the Dual Layer read with Super Smash Brothers. Because the Metroid Trilogy disc is rare, it will not be inserted until the Wii has a good two week test run period of solid gaming. 8)

ADDENDUM
The Safecracker game that killed my Wii has been refunded and a brand new copy was purchased. Safecracker really gives the Wii drive a workout; every move in the game to go forward in a room causes the drive to load more data. This is one disc that has to be in pristine condition, also a good test disc on a Wii with a marginal drive.

Safe Cracker Game Walkthru: http://www.gameboomers.com/wtcheats/pcS ... utions.htm

CRTGAMER wrote:As an alternate, the drive itself can be swapped out instead of attempting to replace the Laser Assembly. This would cost more, but is easier to do and should be considered even if buying an entire replacement Wii. Since the main board is still used, the locked to console downloads and WiiConnect24 game saves will still work. :idea:

References
Two Very Good Videos - http://www.techdodo.com/?p=706

http://wiki-scene.com/Wii_disassembly
http://www.consolezombie.com/Wii/Wii-Drive-Laser-Replacement.html


Wii Laser Replacement 03.jpg
Wii Laser Replacement 03.jpg (238.47 KiB) Viewed 17506 times
Last edited by CRTGAMER on Tue May 29, 2018 8:39 am, edited 7 times in total.
Image
CRT vs LCD - Hardware Mods - HDAdvance - Custom Controllers - Game Storage - Wii Gamecube and other Guides:
CRTGAMER Guides in Board Guides Index: http://www.racketboy.com/forum/viewtopic.php?p=1109425#p1109425

Image
Image
arromdee
Newbie
Posts: 2
Joined: Wed Jun 20, 2012 1:48 am

Re: Wii Laser Replacement Guide - Wii and Gamecube Thread

Post by arromdee »

Since someone mentioned Gryzor's save file for Blast Works here, is there any chance that anyone here actually has a copy of this file? I need one, but unfortunately I got the game after Megaupload was killed by the feds, and he had put the file on Megaupload.
User avatar
CRTGAMER
Next-Gen
Posts: 11933
Joined: Tue Jan 05, 2010 11:59 am
Location: Southern California

Re: Wii Laser Replacement Guide - Wii and Gamecube Thread

Post by CRTGAMER »

arromdee wrote:Since someone mentioned Gryzor's save file for Blast Works here, is there any chance that anyone here actually has a copy of this file? I need one, but unfortunately I got the game after Megaupload was killed by the feds, and he had put the file on Megaupload.

There are several of Gryzor's custom levels back at the Blastworks Site.
http://blastworksdepot.com/games/blastworks/
Image
CRT vs LCD - Hardware Mods - HDAdvance - Custom Controllers - Game Storage - Wii Gamecube and other Guides:
CRTGAMER Guides in Board Guides Index: http://www.racketboy.com/forum/viewtopic.php?p=1109425#p1109425

Image
Image
arromdee
Newbie
Posts: 2
Joined: Wed Jun 20, 2012 1:48 am

Re: Wii Laser Replacement Guide - Wii and Gamecube Thread

Post by arromdee »

Thanks, but I'm looking for the file with everything unlocked (which also contains the movement editor), not the custom levels.

I really just need any file with everything unlocked.
User avatar
CRTGAMER
Next-Gen
Posts: 11933
Joined: Tue Jan 05, 2010 11:59 am
Location: Southern California

Wii Laser Replacement Guide - Wii Thread - Club Nintendo

Post by CRTGAMER »

Club Nintendo

Image

https://club.nintendo.com/

Initial Survey = 30 COINS
Post Play Survey = 10 COINS
Game Downloads = 5-20 COINS
Wii and DS Systems = 160 COINS
Each Video Streaming = 10 COINS
Disc and Cart Games = 20-100 COINS

:shock: Coin Values will change in July! :shock:
See the list in the 1st Reply on the Next Page.


Even an expensive game such as Metroid Trilogy is only worth 50 coins. The 60 coin games are new ones purchased within ten days of release. 2011 Platinum 600 Coin Members received a nice Pin Button set and Gold 300 Coin Members received a Calendar.

Image

the King wrote:If the registration card looks like one below that's just for club Nintendo, where you can register your games and earn rewards and take survey's to give Nintendo feedback.

Image

I finally got around registering for the Club Nintendo Reward Coins. Took me long enough, never bothered since I did not think I would use any of the freebies. A few gripes:

1. I own a Launch Model Wii, bought it brand new. It did not come with a PIN Insert Brochure so I cannot get the 160 coins for it. Only Wii consoles purchased after MAY 2010 have the PIN card brochure. Nintendo should honor the Serial Number for the older Wii consoles.

2. I bought two copies of Fling Smash to get the bonus bundled Motion Plus Remote. Club Nintendo only allows one of each title for the coins. Even though I paid for a second copy of the same game, the additional unique PIN Reward cannot be used.

3. Only Nintendo produced games have the Rewards PIN Brochure inside. Do all publishers pay a commission back to Nintendo? If true, why don't all games have the Rewards PIN Brochure?

4. Reward Coins earned expire after two "Club Nintendo Years" This is dumb as gift cards that expire.

Club Nintendo Terms and Conditions wrote:http://www.nintendo.com/consumer/club/en/terms.jsp

4. When do my Coins expire?

The length of time that Coins are valid is measured in Club Nintendo years. A Club Nintendo year runs from July 1 to June 30. Coins are valid for at least two Club Nintendo years; they expire on the third June 30th after their issuance. For example, if you are issued Coins on February 14, 2009, they will expire on June 30, 2011.

I buy most of my games used, but still managed to get 480 points by taking the initial survey and registering the few games I bought new and the used games that had a PIN Brochure. For example, Gamestop recently made Kirby's Epic Yarn used only. I got lucky to get a CIB new/used game with the Rewards PIN inside. :D

Image

There is not much at the site I'm interested in. Not going to waste it on a download, but I'll keep an eye out for exclusive Nintendo souvenirs such as a Plush, Pin Button Set, Statue or Pen Set.

Image
Image

Japan gets all the good stuff. I am very tempted to buy a Japanese Wii and register my US games to Japan Club Nintendo if it were possible. Come on Nintendo, release that SNES Classic Controller to all regions!

Anoop Gantayat wrote:http://www.ign.com/articles/2007/11/16/snes-controller-for-wii

SNES Controller for Wii
Only in Japan, only for Club Nintendo members


Still not jealous over all the awesome bonuses Nintendo Japan has been giving its customers as part of the Club Nintendo rewards program? Well, you will be after reading this.

Nintendo has announced the free bonus items that it will be giving to platinum members of the Club Nintendo service this year. Those customers with platinum status, meaning they purchased enough Nintendo product between 10/1/2006 and 9/30/2007 for over 400 Club Nintendo points, will be able to select one of the following items:

1. Wii Super Famicom Classic Controller: A Wii controller attachment that looks exactly like a Super Famicom (the Japanese Super Nintendo) controller. This will be delivered at the end of April 2008.

2. Super Mario Galaxy Soundtrack Platinum Version: Two CDs featuring 81 songs, all fully orchestrated. Delivery at the end of January 2008.

3. Club Nintendo Calendar 2008: A set of two tabletop calendars. Set for delivery at the end of December.
Attachments
Club Nintendo 2007.gif
Club Nintendo 2007.gif (143.78 KiB) Viewed 16187 times
Last edited by CRTGAMER on Sat Jan 19, 2013 7:25 pm, edited 15 times in total.
Image
CRT vs LCD - Hardware Mods - HDAdvance - Custom Controllers - Game Storage - Wii Gamecube and other Guides:
CRTGAMER Guides in Board Guides Index: http://www.racketboy.com/forum/viewtopic.php?p=1109425#p1109425

Image
Image
User avatar
Duane Dibbley
128-bit
Posts: 605
Joined: Thu Mar 04, 2010 12:01 am
Location: Michigan
Contact:

Re: CRTGAMER trying a current console, yes Hell did freeze o

Post by Duane Dibbley »

CRTGAMER wrote:1. I own a Launch Model Wii, bought it brand new. It did not come with a PIN Insert Brochure so I cannot get the 160 points for it. Only Wii consoles purchased after MAY 2010 have the PIN cards. Nintendo should honor the Serial Number for the older Wii consoles.

2. I bought two copies of Fling Smash to get the bonus bundled Motion Plus Remote. Club Nintendo only allows one of each title for the points. Even though I paid for a second copy of the same game, the PIN Reward points cannot be used.

3. Only Nintendo produced games have the Rewards PIN Brochure inside. Do all publishers pay a commission back to Nintendo? If true, why don't all games have the Rewards PIN Brochure?

1. It at least used to let you register any system by serial number. They may have removed this, but I had my GBA, GBA SP, GGN, and Wii registered.

2. Yeah, they only let you register one copy of a game.

3. It's Nintendo's program, so only their games are on it.

If you have enough points at the end of the program year (end of June, I believe), you will get a nice free bonus item. I got a plush Mario hat and a desk calendar the first two years the bonus was offered. Then I used all my saved up points to get the Game & Watch: Ball remake.

Club Nintendo in the US may not be quite as nice as the Japanese version, but it has improved greatly since the My Nintendo days.
My games for sale: Racketboy, Amazon, eBay
My systems: NES, Nintendo 64, GameCube (Game Boy Player), Wii / Game & Watch: Ball, Game Boy Advance, Game Boy Advance SP (x2), Nintendo DSi / Genesis (Sega CD, 32X), Saturn / Game Gear / PlayStation, PlayStation 2 / Xbox / Mac (Windows PC) / iPhone, iPad
User avatar
CRTGAMER
Next-Gen
Posts: 11933
Joined: Tue Jan 05, 2010 11:59 am
Location: Southern California

Wii Laser Replacement Guide - Wii Thread - Club Nintendo

Post by CRTGAMER »

Duane Dibbley wrote:It at least used to let you register any system by serial number. They may have removed this, but I had my GBA, GBA SP, GGN, and Wii registered.

If you have enough points at the end of the program year (end of June, I believe), you will get a nice free bonus item. I got a plush Mario hat and a desk calendar the first two years the bonus was offered. Then I used all my saved up points to get the Game & Watch: Ball remake.

Thanks for the info. Club Nintendo let me enter the console serial number, but I had no PIN for the pop up window since mine is a Launch Wii. Ah well, at least I made Gold with the games I entered, some games are over five years old. :oops:

I could not have timed the entry better, just made it to get calendar freebie coming up. Crap, I really want the buttons with the "Rubics Cube" boxes, if only the console entry would have worked.

Wii Laser Antistatic Solder.jpg
Wii Laser Antistatic Solder.jpg (42.69 KiB) Viewed 7076 times

Wii Laser Desolder.jpg
Wii Laser Desolder.jpg (6.47 KiB) Viewed 7077 times
Last edited by CRTGAMER on Tue May 29, 2018 8:36 am, edited 5 times in total.
Image
CRT vs LCD - Hardware Mods - HDAdvance - Custom Controllers - Game Storage - Wii Gamecube and other Guides:
CRTGAMER Guides in Board Guides Index: http://www.racketboy.com/forum/viewtopic.php?p=1109425#p1109425

Image
Image
Post Reply