Scratch Disc - Sticker Removal - Case and Disc Repair Guide
Posted: Wed Mar 30, 2011 11:00 pm
Polish Scratched Discs
Marker Stickers Removal
Ink Marker Writing Removal
Cart Label Replacement
Case Disc Damage Prevention
Disc Center Crack Repair
A Six Part Guide dealing with polishing scratched discs, removing stubborn price stickers, removing ink marker writing, cart label replacement, preventing damage to game discs from tight jaws of a case and repairing cracked centers of discs.
Related Article: Game Cart Contact Cleaning Guide


Scratches on the game disc. Few locations offer Commercial Polisher Services and the Disc Doctor tends to leave swirl marks. If there are just small scratches, there are other methods that can be done right at home.
Repair Scratched Discs without a Machine
Automotive Convertible Top Rear Window Cleaner or Polish can be found at Automotive or major Hardware stores. For heavy scratches be sure it is not just plastic cleaner or polish, but actual scratch remover. The chemical specifically made to remove scratches from plastic convertible top windows works well on fixing a scratched disc. CD and DVDs have a clear plastic read side, no problem getting rid of scratches unless very deep. Keep in mind the fragile side of a disc is the label side. The read side has a thick layer of clear plastic.


Cleaner or Polish?
Not all plastic cleaners and polishes achieve the same results. I have used a bottle of Megiar's Plastic Cleaner #17 for years. The convertible top window cleaner which I prefer is now hard to come by, automotive stores no longer carry it. The reason is that most newer cars that offer a convertible top have a different material instead of plastic for the windows. In a case of irony, the glass head light are now all made out of plastic! I ended up purchasing Mothers Plastic Polish which I thought it would work just as well since it is advertised to remove scratches from plastic headlight covers. Even the use of the word "Polish" has connotations of a stronger scratch remover over the label "Cleaner" used in that old #17 bottle. No such luck it, the Mothers headlamp polish did not remove scratches from my game disc.
Go with Megiar's #10 or #17, designed to remove scratches from convertible top windows
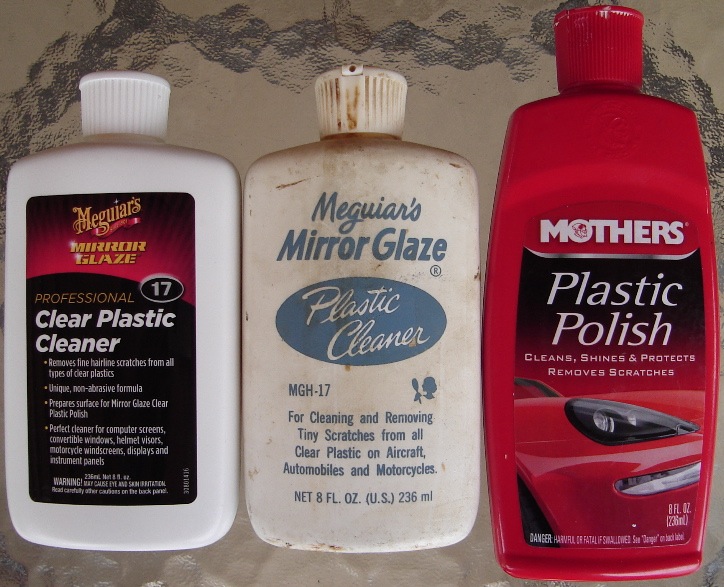
Meguiar's Mirror Glaze Plastic Cleaner M1708 and MGH-17 / Mothers Plastic Polish MO-6208
MEGIAR'S #17 can be found at boat supply stores
Luckily, the private boat and airplane industry has stayed with plastic windows making this bottle easy to purchase at any boat or airplane supply store. The new label of the Megiar's bottle threw me off, spotted the #17 in the corner. Note that there are different number codes for the Megiars, something to do with the scratch removal strength since there is no apparent grittiness in the chemical. In a reverse of sandpaper grit numbering, strange that the higher number of the Megiar's is more aggressive.
Polish the Read Side
Use either a soft kleenex tissue or cotton cloth, do not use paper towels which might cause fine scratches. Add a few drops onto the disc in different spots, spread in a gentle swirling motion. The idea is to spread the liquid all the way around. Before the liquid dries, rub vigorously from edge to the center and back to the outer edge again. Its important when rubbing hard, to only go "against the grain" of the read spin direction. Let the disc fully dry. Finally, buff off the dried chemical with a soft cotton cloth, again going against the grain.
If the scratches are deep, you can first try a Disc Doctor. Follow up with the hand polish method above. I have removed the swirl marks left by a Disc Doctor with Megiar's #17 Plastic Cleaner by hand.
I had one deep scratch swirled out of print DVD that I had bought used from the Swap Meet. The commercial polish machine actually took out the swirl after repeated passes and extra solution. In this extreme case the sanding disc was a must. However, only resort to the heavy treatment for the worst scratches.
I have the hand crank Skip Doctor and it does work well with Plastic Polish for regular scratches that cannot be removed by hand polish alone. Be sure to get the type made for boat windows and car convertible plastic windows. The Skip Doctor would leave the "fish scale" pattern. I follow with a second plastic polish pass WITHOUT the Skip Doctor to mirror out the disc.
A link in removing scratches off a Laser Disc which is the same as a CD and DVD disc.
http://www.instructables.com/id/how_to_polish_out_scratches_on_laser_discs/
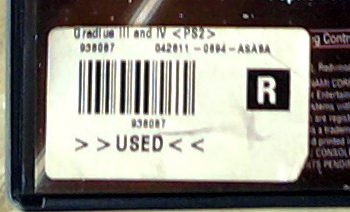
If the back sticker on a Gamestop game has the letter R, the game has been sent out for a refurbish, which might have included a disc polish.
Gamestop Refurbish Center
http://news.gamestop.com/press-kit/gamestops-refurbishment-operations-center
http://www.forbes.com/sites/johngaudios ... deo-games/
http://www.playstationlifestyle.net/2009/04/02/a-peek-inside-gamestops-underworld/

Commercial Polishing
A commercial disc resurface should be the last resort due to the heat and stress on the center plastic where the holder is clamped. If you go the commercial polish route, observe very closely that your disc will not get ruined. Be sure the worker puts some solution on the surface, important that the disc is not polished dry.

The disc polisher machine should not be any more damaging to a Gamecube disc vs any other disc as long as the discs are NOT polished dry. The rubbing compound has to be applied to keep the discs "lubricated" to prevent overheating from high speed motor polishing machines.
The Label side of the disc is actually the fragile side, the data only protected by the "painted" game label
All that is happening in a commercial polisher is a small amount of the clear plastic is being removed to get rid of the scratches. The data is not in the clear plastic, but on the aluminum layer ABOVE the clear plastic. Since the very center of the disc is clamped, the laser read distance height of the data from the plastic removal is not changed either. However any swirl marks left behind from a cheaper hand crank disc "sander" can cause read issues. This can be fixed by following up with Plastic Polish and liberal rubbing with a soft cloth.
Removing Price Stickers
The frustration of all the price stickers. Remember when EB Games used to put a clear plastic round sticker, keeping the used game closed right after a purchase? Or the older hard to remove Gamestop Stickers? Newer Gamestop stickers are now easier to remove if done carefully.
No Chemicals yet
Try to remove the price label without ripping. In the pics, I am removing a price tag off a PS2 case. Be sure to keep the DVD cover insert inside, it helps supporting that flexible plastic from being pushed into the DVD case crevices. Even better, use a piece of cardboard such as a cut cereal box.
Don't bear down too hard while scraping as to damage the plastic, you can always go straight to the chemical method below.

Start by peeling a corner with your fingernail, keep scraping away until you get a corner large enough to grab hold. Here is a trick I found that seems to work. Pull the lifted corner taut while you are peeling. Use your other hand to keep the clear plastic flat. As you are peeling the label keep a tight stretch on the sticker, but not too tight as to rip. If the glue stays on the case , scrape with your fingernail again. Unless an old sticker it should come all the way off without any glue remaining.
In the pic below, I purposely tore one sticker away quickly without stretching. Now the glue is hard to remove without chemicals.
Heavy Artillery
But what of older labels or if another older torn label underneath? Here is where chemicals come in handy. Any petroleum based fluid helps to break down the sticker glue. LiftOff 2 or Goo Gone both work as well, easily obtained from any Hardware store. The sometimes glossy top of the sticker is hard to penetrate. Remove as much of the offending sticker by hand first.
Apply just a little chemical cleaner on the price tag and remaining glue. Let it soak in for a while, you can speed up the chemical breakdown process by rubbing with your finger nail. Don't scrape too hard, the clear plastic can stretch since there is no longer a cover insert support. After the remaining paper and glue is scraped off, rub off any sticky residue with a chemical dampened paper towel.
Note in the pic below, the liquid cleaner penetrating under the clear plastic. That would have killed the cover insert. A piece of cardboard inserted would keep fluid from getting under the plastic and also will prevent the flexible plastic from dimpling into the crevices of the case.
The soaked sticker with top protective surface already removed "LiftOffs" quite easily.
Be sure the case is dried out with a paper towel or cloth. Any moisture remaining will soak into and ruin the cover insert. The insert may also become "glued" inside the liner and tear over time if any liquid is left. With the case cover opened flat, hold the clear plastic away and wipe. Unlike game carts its okay to blow here to quicken the drying. Do not use a hair dryer with heat, it will damage the clear plastic.
You can also close the cover with a single layer unfolded paper towel inside as a temporary "cover insert". Be sure of no folds that might stretch the plastic. Drag the towel back and forth a few times while the case is fully closed. Once no moisture is seen with the cover closed (picture above), replace the cover insert, manual and game disc. You now have a "New" game!
Very old price labels stuck on Game Guides can be removed if done carefully. Sometimes when a sticker is pulled from a book, cart label or game cardboard box, there is a chance of ripping the print underneath. As emwearz pointed out, the key is to let the oil or cleaner soak in for a while. This method works on any paper surface that has a glossy top which prevents the oil from soaking into the paper underneath.
Before pulling sticker, let the oil soak in for a while to do its magic.
I use Liftoff 2 in an aerosol can, works pretty well. Powerful stuff, be sure to go slow on the labels. It also works on glossy covers of game manuals and cover inserts although a chance of the ink fading from too much scrubbing. Again just take it slow and not too much juice, let the chemical work its magic.
Removing Ink Writing
You can also use Lift Off 2 or Goo Gone to clean off marker writing. I have cleaned kids names that were written on my N64 carts.
Sometimes the writing on a plastic game cart is very difficult to remove. I found an ink eraser works well, the stiffer side of a two color eraser block. Do not use this on cart labels, the hard eraser will very likely damage it.
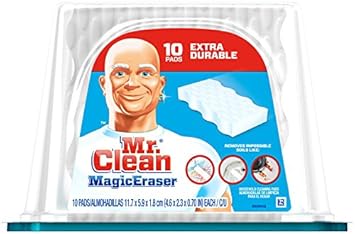
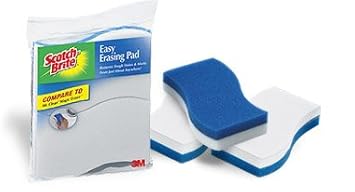
Mr Clean Magic Eraser and Scotch Brite Easy Erasing Pad can also be utilized. Be careful if using either on the cart labels, LiftOff alone might suffice.
Plastic Envelope Protection
Why has this not caught on in the U.S.? Unlike Shrink Wrap, Japanese stores such as BookOff encase their product in plastic cellophane envelopes with built in "3m" tape. The REUSABLE plastic liners protect Books, CDs, Movies and Games. Yes the cellophane envelopes are a tight fit and that 3m tape is a nuisance, but a great way to protect your media. All my cardboard sleeved, tin edition movies and games get the plastic cellophane envelope treatment.
Removing Labels from Discs
Here is where it can be very tricky. You can risk permanent damage to your game discs. Price stickers can be soaked with LiftOff 2 or Goo Gone, but a slight risk of breaking down the paint in the label of the game disc.
Special thanks to flojocabron for this pic.
You should never attempt to remove the clear plastic disc shields.
There is no way to pre-soak a disc shield. Just the peeling the clear protector back puts a lot of stress on the disc. Imagine the flexing of all those microscopic pits under the label of the disc. If a sticker is under a disc shield, such as the bar code pictured above, best not to touch.
Just a layer of lacquer and dye on the top of a CD.

DVD has better protection, but can still get damaged.
Pic below shows why protective shields are needed on rentals. Reflective data layer scratched off before the shield was stuck on. Note how thin the protection is on the reflective layer. Light shines all the way thru.

A very good point, best to keep discs stored in jewel cases, especially music CDs left in the car. Personally, I would not put any risk using the shields to the game disc. The labels do cause a slight balance issue in a spinning disc and too high a risk of damage if attempting to remove the disc shield.
Cart Label Replacement
Sometimes a cart label is too badly damaged to clean. I recently purchased a GBA cart with marker writing covering up most of the label. Since the label was already worn below the glossy protective surface, the black marker had soaked into the paper. When I attempted to clean off the marker ink, the label itself faded.
Find a scan of the cart label, either from a friend or thru Google Images. The trick is to find a pic that is clear and aligned correctly. If the image is slightly rotated, use a Paint or Photo Touchup program to correct the rotation. I just use the standard Paint program which is available for both the PC and and Mac. Zoom in the pic to have a better control of the touchup. Copy and paste a small section of the label to square it off, matching colors as close as possible. Crop the pic to display just the label with a little extra of the edges and save.
To get the label to the correct height and width is a little tricky, but there is an easy way to get it close. Any Jewel or DVD Case program or Word processor can be used. Open a recent saved file, preferably one with a pic or small text that can be matched to. Save the file as a new name, so the originally doesn't accidentally get erased.
Pull the printout of the file you opened and place the cart on top of the paper. Match up the graphics or text to the the screen image of the printout. Insert the pic that you fixed earlier with the paint program. Resize the inserted image to the size compared from the cart lying on the printout. Once the pic of the label looks like a close sized match, delete all the old text and or pics behind it and save the label as the new file name. In the picture below, I matched the color bars and title font of the Bit Trip cover to size up the GBA replacement label.
A very badly damaged GBA cart label. Recent Music CD Label printout used to reference a correct size.
Copy and paste a few different sizes on the paper or to save on ink just print it out. Compare the game cart to the printout, it is likely to be off slightly. A simple matter of resizing saving the file and printing again. It took me three tries, but paper is cheaper then ink so no big deal.
Multiple printouts to get the size correct. Double Sided Tape for the bottom and Packaging Tape for the top.
Before cutting the label out, the top and bottom needs to be prepped. To protect the label, Lamination would be to thick. Use clear glossy packaging tape on the top. For sticking the label, I use double sided tape. Some glues tend to soak into the paper label from underneath and at times leaves a stain. The tape is thin enough to not leave a "bubble" and is easy to apply. Be sure the tape is not temporary photo tape. For larger labels, smooth cord free Carpet Tape works well.

If the old cart label has deep tears it will need to be removed first. However the new label can sit right on top if the old label is smooth. The new label is thin enough to clear the console connector. I accidentally set my label a little low and had to trim off the excess with a razor blade. The label has to be below the indentation of the cart plastic as not to be caught by the console cart connector housing. There is slight bubbling at the bottom of the label from the dull razor blade, I should have used a new blade or XActo Knife.
I now have a correct sized GBA Label saved, it will be the size reference for future GBA Label printouts. Keep in mind a replacement printer might scale the images off slightly, always use the same printer when setting the image size.
The new label is not perfect due the picture source and the printout on plain paper. Photo paper would offer a cleaner printout, but the label would then be too thick. Still, a big improvement over the original damaged label, adequate for identifying a game cart.

Preventing Disc Damage from the Case
There are certain Game Disc Cases and Movie Disc Cases that might damage the disc. This is caused by the fingers in the hub that grip the disc too tightly. A good practice to always press down the center hub while removing or replacing a disc to and from its case. However even doing this might still result in a disc to bend in certain designs. Here are two styles of cases and the solution I came up with for each. There are other designs that will need a different approach in either the technique to remove a disc or a mod to the holder.
Black Game or DVD Case
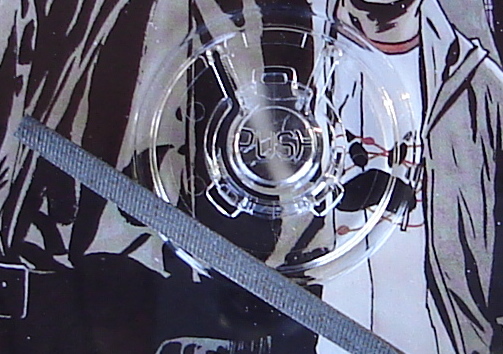
I show a Gamecube Case in the picture below, there are other cases with a similar center hub design problem. The hub really holds onto the disc even when pushed. There is no flexible release unless you can squeeze all the clips inwards, the game disc will bend upon removal. Just as bad is when replacing the disc, it has to clear the tight clips of the hub. This will eventually crack the center of the game disc.
The fix is very simple. Remove the game disc and use a pair of pliers to squeeze in the clips a little all the way around. The jaws of the pliers can also file in the clips by twisting back and forth around the hub. A file can also be utilized to smooth down the plastic clips.
After the repair the game disc should pop in and out with a very soft click.

Clear Movie Case
This is sometimes an issue for compilation movie volumes such as a TV season case. Even when the center is depressed the disc is still hooked by the clips. Upon close inspection, pressing the center only releases the top clip, the two lower clips stay spread out. This will easily break the disc even on the initial removal. Pulling slightly on the bottom edge of the disc freed it from the case disc sized ring inset, allowing the disc to slide down free of the lower hooks. Most consumers will not know this work around and may crack the center of the movie disc.
The pliers trick used earlier would only crack the clear brittle plastic holders. A more careful approach is needed. File down just a little off each lower clip, be sure to leave the top finger intact. The top clip flexes clear, the reason why it does not need to be filed down. Be careful how much plastic you remove. Just take enough material to allow for easy disc removal, but not too much that will not keep a disc secure.
A cracked game disc
Repair A Cracked Disc Center
The game case repair stated above prevents a disc center from cracking. Here is a fix for CD and DVD discs that are already cracked. A decision must be made, do the repair first or make a backup before the repair. Adding tape might throw the disc out of balance, a very improbable risk but needs to be considered. On the other hand, there is a risk of the cracks getting worse and the disc shattering inside a fast disc burner. Even if a backup is done at a slow speed, when the disc is first inserted the drive will spool up rapidly on initializing a disc.
Right Click to see a larger view

Material
Decide of what type of Repair Tape to use. Paper Labels, Centers of "Disc Stomper" print labels, or different styles of tape. The idea is something not too thick or heavy, yet strong enough to help to keep a crack from spreading. My preference is Lamination Sheet Protectors, thicker then tape, not too heavy and stronger then paper labels. The Clear Lamination is also less obscuring in appearance compared to Paper Labels or Solid Tape.
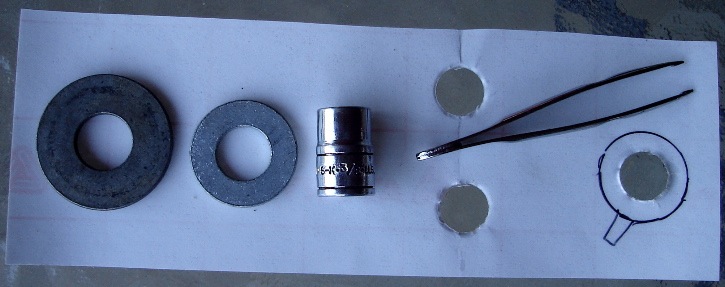
Tools
¼" Drive ⅜" Socket - Aligns the Tape and Template
½" Hole Punch - Used for punching out the center
Steel Washer - Sized up to center hole, Used as a Template
Tweezers - To hold and place the tape
Scissors and Razor Blade or Small Trim Knife
Right Click to see a larger view
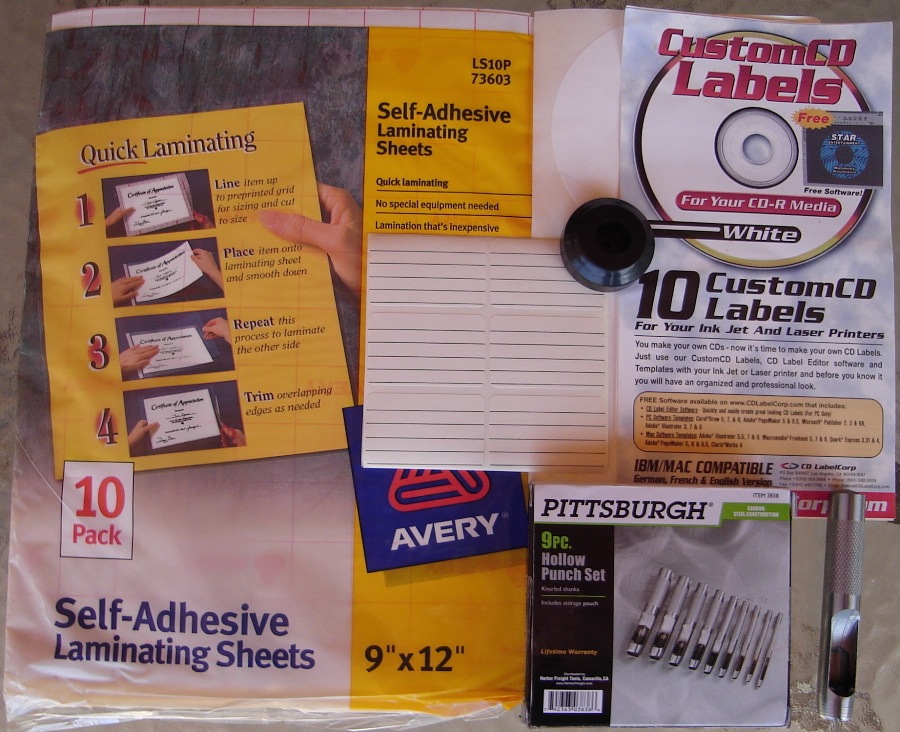
Note that a ¾" hole punch is closer to the center hole size of the CD. However a larger hole punched in the sticker makes it harder to align a correct sized steel washer as a template. In addition, there would be no room for error if the tape was placed slightly off center. Go with the ½" Hole Punch, the excess tape can be trimmed later.
Create The Repair Sticker
Place a piece of wood under the Repair Sticker, then punch out the hole. If the hole is punched at the center of a split backing underneath, the tape will be easier to peel. Punch a couple of extra holes in case of marking errors, leave enough edge around each Repair Tape hole.
Place the socket in the punched hole then drop the steel washer on top. Use a fine point marker, draw a circle around the steel washer. Remove the Washer and Socket then carefully cut out the circle with scissors. You can leave a tab to help peel the backing and hold the tape. The tab can be snipped off right before installing.
Applying The Repair Sticker
Place the disc on a flat clean stable surface, a Gamestop Yellow Disc Envelope works well. Do not use the socket to align the tape to the disc, it is smaller then the disc hole. A larger socket cannot be used either since the Repair Tape hole is smaller then the CD hole. The Clear lamination is easier to see and align vs a solid paper label. If the tape has a tab carefully snip it off before setting the Repair Tape in place.
After the tape is placed, press lightly all the way around to prevent wrinkles. Follow thru by pressing firmly with your fingernail to "laminate" the tape to the disc. Be careful not to scratch the disc label.
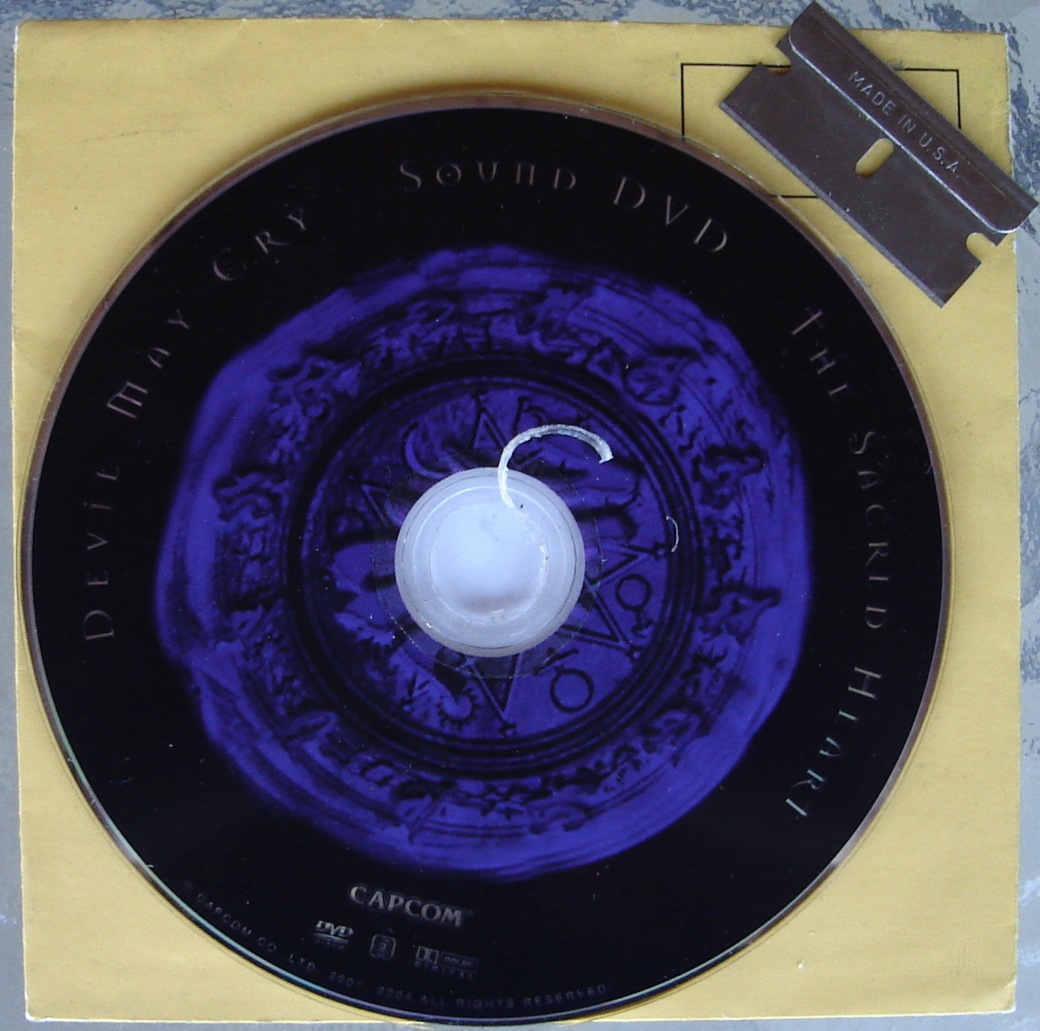
Use the Razor Blade or Small Trim Knife to cut away the excess tape. It is easier to hold the disc in one hand while cutting with the other. Angle the blade to prevent slipping and damaging the disc. The allows for a clean cut of the excess tape. Cut slowly in a slight sawing action. After the excess tape is trimmed, blow off any residue. In the pic below the Repair Tape is sized to just larger then the cracks on the disc. Small and light at the center to avoid any balance issues.
Right Click to see a larger view
Step back and look at the completed job, all done! Immediately backup the disc onto a CDR or DVDR; use the backup and put the original away.
Marker Stickers Removal
Ink Marker Writing Removal
Cart Label Replacement
Case Disc Damage Prevention
Disc Center Crack Repair
A Six Part Guide dealing with polishing scratched discs, removing stubborn price stickers, removing ink marker writing, cart label replacement, preventing damage to game discs from tight jaws of a case and repairing cracked centers of discs.
Related Article: Game Cart Contact Cleaning Guide
Scratches on the game disc. Few locations offer Commercial Polisher Services and the Disc Doctor tends to leave swirl marks. If there are just small scratches, there are other methods that can be done right at home.
CRTGAMER wrote:WARNING! Do not polish BlueRay Discs. No need, already has a hardened coating. If dirty just clean, not polish.
Repair Scratched Discs without a Machine
Automotive Convertible Top Rear Window Cleaner or Polish can be found at Automotive or major Hardware stores. For heavy scratches be sure it is not just plastic cleaner or polish, but actual scratch remover. The chemical specifically made to remove scratches from plastic convertible top windows works well on fixing a scratched disc. CD and DVDs have a clear plastic read side, no problem getting rid of scratches unless very deep. Keep in mind the fragile side of a disc is the label side. The read side has a thick layer of clear plastic.
CRTGAMER wrote:Sometimes used DVDs will skip even when there are no scratches, I suspect the flex of the disc damaging the microscopic read pits when pulled from a tight centered case. At that point all you can do is refund or exchange for another copy.
Cleaner or Polish?
Not all plastic cleaners and polishes achieve the same results. I have used a bottle of Megiar's Plastic Cleaner #17 for years. The convertible top window cleaner which I prefer is now hard to come by, automotive stores no longer carry it. The reason is that most newer cars that offer a convertible top have a different material instead of plastic for the windows. In a case of irony, the glass head light are now all made out of plastic! I ended up purchasing Mothers Plastic Polish which I thought it would work just as well since it is advertised to remove scratches from plastic headlight covers. Even the use of the word "Polish" has connotations of a stronger scratch remover over the label "Cleaner" used in that old #17 bottle. No such luck it, the Mothers headlamp polish did not remove scratches from my game disc.
Go with Megiar's #10 or #17, designed to remove scratches from convertible top windows
Meguiar's Mirror Glaze Plastic Cleaner M1708 and MGH-17 / Mothers Plastic Polish MO-6208
MEGIAR'S #17 can be found at boat supply stores
Luckily, the private boat and airplane industry has stayed with plastic windows making this bottle easy to purchase at any boat or airplane supply store. The new label of the Megiar's bottle threw me off, spotted the #17 in the corner. Note that there are different number codes for the Megiars, something to do with the scratch removal strength since there is no apparent grittiness in the chemical. In a reverse of sandpaper grit numbering, strange that the higher number of the Megiar's is more aggressive.
CRTGAMER wrote:Sometimes the Megiar's #17 Plastic Cleaner bottle is sold paired up with Megiar's #10 Plastic Polish advertised a two step process. The #10 protective coating of the Polish is not necessary since a game or movie disc is not exposed to the weather. The Polish coating may have a detrimental affect of a laser read. Stick with just Megiar's #17, it works very well!
Polish the Read Side
Use either a soft kleenex tissue or cotton cloth, do not use paper towels which might cause fine scratches. Add a few drops onto the disc in different spots, spread in a gentle swirling motion. The idea is to spread the liquid all the way around. Before the liquid dries, rub vigorously from edge to the center and back to the outer edge again. Its important when rubbing hard, to only go "against the grain" of the read spin direction. Let the disc fully dry. Finally, buff off the dried chemical with a soft cotton cloth, again going against the grain.
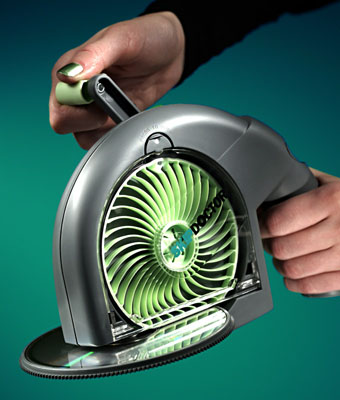
If the scratches are deep, you can first try a Disc Doctor. Follow up with the hand polish method above. I have removed the swirl marks left by a Disc Doctor with Megiar's #17 Plastic Cleaner by hand.
I had one deep scratch swirled out of print DVD that I had bought used from the Swap Meet. The commercial polish machine actually took out the swirl after repeated passes and extra solution. In this extreme case the sanding disc was a must. However, only resort to the heavy treatment for the worst scratches.
I have the hand crank Skip Doctor and it does work well with Plastic Polish for regular scratches that cannot be removed by hand polish alone. Be sure to get the type made for boat windows and car convertible plastic windows. The Skip Doctor would leave the "fish scale" pattern. I follow with a second plastic polish pass WITHOUT the Skip Doctor to mirror out the disc.
A link in removing scratches off a Laser Disc which is the same as a CD and DVD disc.
http://www.instructables.com/id/how_to_polish_out_scratches_on_laser_discs/
If the back sticker on a Gamestop game has the letter R, the game has been sent out for a refurbish, which might have included a disc polish.
Gamestop Refurbish Center
http://news.gamestop.com/press-kit/gamestops-refurbishment-operations-center
http://www.forbes.com/sites/johngaudios ... deo-games/
http://www.playstationlifestyle.net/2009/04/02/a-peek-inside-gamestops-underworld/
Commercial Polishing
A commercial disc resurface should be the last resort due to the heat and stress on the center plastic where the holder is clamped. If you go the commercial polish route, observe very closely that your disc will not get ruined. Be sure the worker puts some solution on the surface, important that the disc is not polished dry.
cookie monster wrote:I have had good luck getting stuff resurfaced to get it working. I have only had one disk get broke cause the asshole tightened the screw till it cracked what sucks is it was my personal disk.
Hobie-wan wrote:There's always a risk any time the disc is being stressed. Heat can also mess up discs as well. At one point I ended up with some DVDs that had been in a flood and I was cleaning them to see if I could save any. I was using water as hot as I could stand and hand washing them to make sure I didn't scratch them and would kill any germs that had hitched a ride. Granted these were cheaper than average DVDs, but on some of the dual layer ones, the layers separated a bit and they were ruined.
The disc polisher machine should not be any more damaging to a Gamecube disc vs any other disc as long as the discs are NOT polished dry. The rubbing compound has to be applied to keep the discs "lubricated" to prevent overheating from high speed motor polishing machines.
The Label side of the disc is actually the fragile side, the data only protected by the "painted" game label
All that is happening in a commercial polisher is a small amount of the clear plastic is being removed to get rid of the scratches. The data is not in the clear plastic, but on the aluminum layer ABOVE the clear plastic. Since the very center of the disc is clamped, the laser read distance height of the data from the plastic removal is not changed either. However any swirl marks left behind from a cheaper hand crank disc "sander" can cause read issues. This can be fixed by following up with Plastic Polish and liberal rubbing with a soft cloth.
Removing Price Stickers
The frustration of all the price stickers. Remember when EB Games used to put a clear plastic round sticker, keeping the used game closed right after a purchase? Or the older hard to remove Gamestop Stickers? Newer Gamestop stickers are now easier to remove if done carefully.
Hobie-wan wrote:Sticker carefully removed from a NES box with hairdryer warming and a little careful magic rub eraser action on the leftover glue:
Before
After
Take it slow!


No Chemicals yet
Try to remove the price label without ripping. In the pics, I am removing a price tag off a PS2 case. Be sure to keep the DVD cover insert inside, it helps supporting that flexible plastic from being pushed into the DVD case crevices. Even better, use a piece of cardboard such as a cut cereal box.
Don't bear down too hard while scraping as to damage the plastic, you can always go straight to the chemical method below.
Hobie-wan wrote:Just take the same precautions of taking the paperwork out and I also suggest sliding in some thin cardboard from a food box when cleaning DVD cases so that you don't 'dent' the plastic when you go over the holes from the book clips or around the disc holder molds.
Start by peeling a corner with your fingernail, keep scraping away until you get a corner large enough to grab hold. Here is a trick I found that seems to work. Pull the lifted corner taut while you are peeling. Use your other hand to keep the clear plastic flat. As you are peeling the label keep a tight stretch on the sticker, but not too tight as to rip. If the glue stays on the case , scrape with your fingernail again. Unless an old sticker it should come all the way off without any glue remaining.
In the pic below, I purposely tore one sticker away quickly without stretching. Now the glue is hard to remove without chemicals.
- Price Sticker Cleaning 01.jpg (108.17 KiB) Viewed 24244 times
CRTGAMER wrote:WARNING! Do not use chemicals on brittle plastic such as some brands of Jewel Cases, certain types of plastic tend to fog up. Best to always test chemicals on an inconspicuous part of the case first.
fastbilly1 wrote:For labels that don't easily come off, I have always used Lighter Fluid and a cloth.
Heavy Artillery
But what of older labels or if another older torn label underneath? Here is where chemicals come in handy. Any petroleum based fluid helps to break down the sticker glue. LiftOff 2 or Goo Gone both work as well, easily obtained from any Hardware store. The sometimes glossy top of the sticker is hard to penetrate. Remove as much of the offending sticker by hand first.
Remove the Game Disc, Instruction Book and Cover Insert, before applying chemicals.
Apply just a little chemical cleaner on the price tag and remaining glue. Let it soak in for a while, you can speed up the chemical breakdown process by rubbing with your finger nail. Don't scrape too hard, the clear plastic can stretch since there is no longer a cover insert support. After the remaining paper and glue is scraped off, rub off any sticky residue with a chemical dampened paper towel.
Note in the pic below, the liquid cleaner penetrating under the clear plastic. That would have killed the cover insert. A piece of cardboard inserted would keep fluid from getting under the plastic and also will prevent the flexible plastic from dimpling into the crevices of the case.
The soaked sticker with top protective surface already removed "LiftOffs" quite easily.
- Price Sticker Cleaning 02.jpg (169.92 KiB) Viewed 24241 times
Be sure the case is dried out with a paper towel or cloth. Any moisture remaining will soak into and ruin the cover insert. The insert may also become "glued" inside the liner and tear over time if any liquid is left. With the case cover opened flat, hold the clear plastic away and wipe. Unlike game carts its okay to blow here to quicken the drying. Do not use a hair dryer with heat, it will damage the clear plastic.
You can also close the cover with a single layer unfolded paper towel inside as a temporary "cover insert". Be sure of no folds that might stretch the plastic. Drag the towel back and forth a few times while the case is fully closed. Once no moisture is seen with the cover closed (picture above), replace the cover insert, manual and game disc. You now have a "New" game!
- Price Sticker Cleaning 03.jpg (96.32 KiB) Viewed 24236 times
emwearz wrote:To remove stickers from game cases I just put a tiny bit of olive oil on my finger and go over the sticker with it, come back in 10 minutes and it comes off with no fuss.
Very old price labels stuck on Game Guides can be removed if done carefully. Sometimes when a sticker is pulled from a book, cart label or game cardboard box, there is a chance of ripping the print underneath. As emwearz pointed out, the key is to let the oil or cleaner soak in for a while. This method works on any paper surface that has a glossy top which prevents the oil from soaking into the paper underneath.
Before pulling sticker, let the oil soak in for a while to do its magic.
I use Liftoff 2 in an aerosol can, works pretty well. Powerful stuff, be sure to go slow on the labels. It also works on glossy covers of game manuals and cover inserts although a chance of the ink fading from too much scrubbing. Again just take it slow and not too much juice, let the chemical work its magic.
Removing Ink Writing
You can also use Lift Off 2 or Goo Gone to clean off marker writing. I have cleaned kids names that were written on my N64 carts.
fuctfuct wrote:http://www.racketboy.com/forum/viewtopic.php?p=233824#p233824
While I never doubted it.. Goo Gone is amazing!
Sometimes the writing on a plastic game cart is very difficult to remove. I found an ink eraser works well, the stiffer side of a two color eraser block. Do not use this on cart labels, the hard eraser will very likely damage it.
Mr Clean Magic Eraser and Scotch Brite Easy Erasing Pad can also be utilized. Be careful if using either on the cart labels, LiftOff alone might suffice.
gamedudemat wrote:http://www.racketboy.com/forum/viewtopic.php?f=30&p=794042#p794042
Have you ever bought a game from a store, yard sale, pawn shop ( etc ) and someone who owned it before you wrote on it!? Sometimes it's the store owners who do it!! Well here is a video that shows you how to remove that annoying permanent marker!Remove permanent marker off of your games
Plastic Envelope Protection
Why has this not caught on in the U.S.? Unlike Shrink Wrap, Japanese stores such as BookOff encase their product in plastic cellophane envelopes with built in "3m" tape. The REUSABLE plastic liners protect Books, CDs, Movies and Games. Yes the cellophane envelopes are a tight fit and that 3m tape is a nuisance, but a great way to protect your media. All my cardboard sleeved, tin edition movies and games get the plastic cellophane envelope treatment.
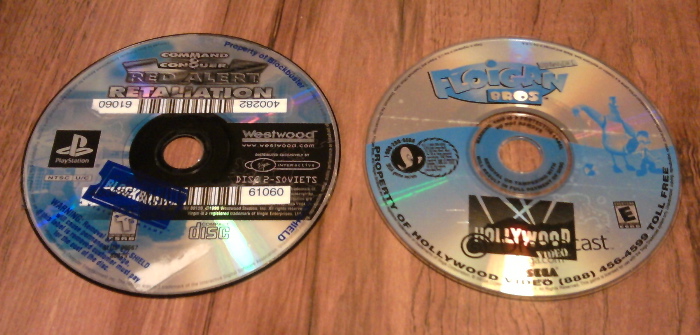
Removing Labels from Discs
Here is where it can be very tricky. You can risk permanent damage to your game discs. Price stickers can be soaked with LiftOff 2 or Goo Gone, but a slight risk of breaking down the paint in the label of the game disc.
Special thanks to flojocabron for this pic.
You should never attempt to remove the clear plastic disc shields.
the.golden.ax wrote:I've broken discs with goo gone. It can harm the disc and bond of the metal to the plastic if it gets between the layers. Your best bet is to try and simply clean the words off with a tissue and some rubbing alcohol. You will still get the benefit of the protective layer leaving the decal on without damaging the discs, and the ugly words will be gone. Works on most Movie Gallery, all GameCrazy / Hollywood video, but not usually blockbuster (they printed on the underside of the decal).
There is no way to pre-soak a disc shield. Just the peeling the clear protector back puts a lot of stress on the disc. Imagine the flexing of all those microscopic pits under the label of the disc. If a sticker is under a disc shield, such as the bar code pictured above, best not to touch.
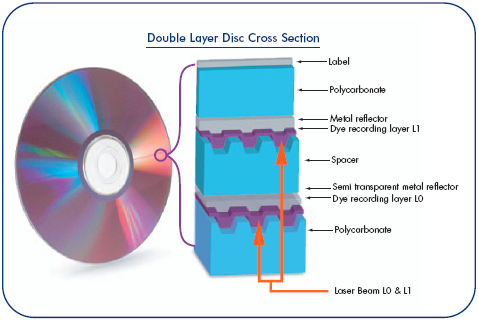
Just a layer of lacquer and dye on the top of a CD.
DVD has better protection, but can still get damaged.
Pic below shows why protective shields are needed on rentals. Reflective data layer scratched off before the shield was stuck on. Note how thin the protection is on the reflective layer. Light shines all the way thru.
Polygon wrote:I've seen pin holes in the silk screen of many audio CDs, but never game discs. I know what caused it on the audio CDs. It was from leaving them in those blasted CD wallets in a hot car. Then you pull out the disc, which is now stuck to the plastic. I've never seen it happen to any disc left in the case but I've seen it happen to countless CDs in those damn wallets.
A very good point, best to keep discs stored in jewel cases, especially music CDs left in the car. Personally, I would not put any risk using the shields to the game disc. The labels do cause a slight balance issue in a spinning disc and too high a risk of damage if attempting to remove the disc shield.
Cart Label Replacement
Sometimes a cart label is too badly damaged to clean. I recently purchased a GBA cart with marker writing covering up most of the label. Since the label was already worn below the glossy protective surface, the black marker had soaked into the paper. When I attempted to clean off the marker ink, the label itself faded.
Find a scan of the cart label, either from a friend or thru Google Images. The trick is to find a pic that is clear and aligned correctly. If the image is slightly rotated, use a Paint or Photo Touchup program to correct the rotation. I just use the standard Paint program which is available for both the PC and and Mac. Zoom in the pic to have a better control of the touchup. Copy and paste a small section of the label to square it off, matching colors as close as possible. Crop the pic to display just the label with a little extra of the edges and save.
To get the label to the correct height and width is a little tricky, but there is an easy way to get it close. Any Jewel or DVD Case program or Word processor can be used. Open a recent saved file, preferably one with a pic or small text that can be matched to. Save the file as a new name, so the originally doesn't accidentally get erased.
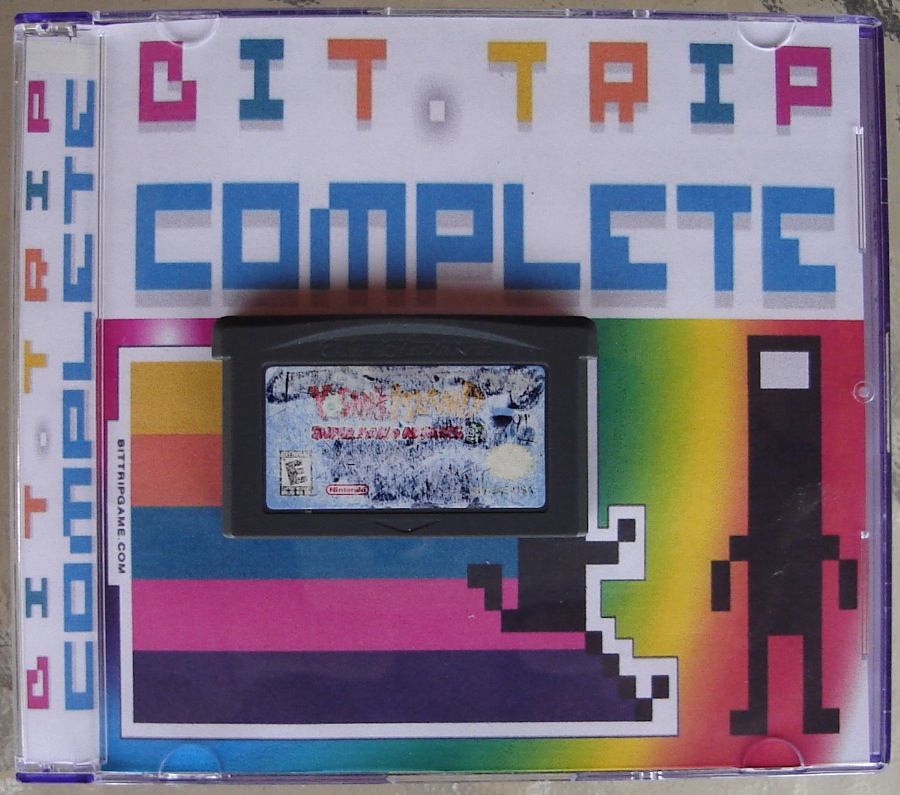
Pull the printout of the file you opened and place the cart on top of the paper. Match up the graphics or text to the the screen image of the printout. Insert the pic that you fixed earlier with the paint program. Resize the inserted image to the size compared from the cart lying on the printout. Once the pic of the label looks like a close sized match, delete all the old text and or pics behind it and save the label as the new file name. In the picture below, I matched the color bars and title font of the Bit Trip cover to size up the GBA replacement label.
A very badly damaged GBA cart label. Recent Music CD Label printout used to reference a correct size.
Copy and paste a few different sizes on the paper or to save on ink just print it out. Compare the game cart to the printout, it is likely to be off slightly. A simple matter of resizing saving the file and printing again. It took me three tries, but paper is cheaper then ink so no big deal.
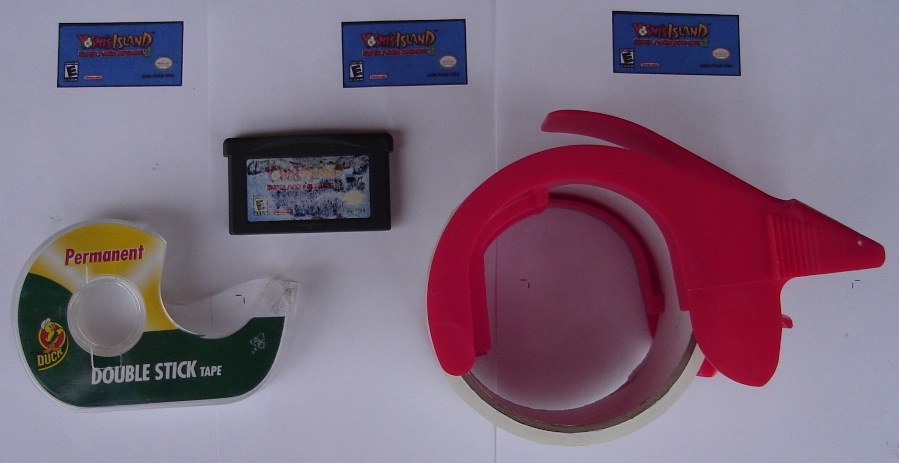
Multiple printouts to get the size correct. Double Sided Tape for the bottom and Packaging Tape for the top.
Before cutting the label out, the top and bottom needs to be prepped. To protect the label, Lamination would be to thick. Use clear glossy packaging tape on the top. For sticking the label, I use double sided tape. Some glues tend to soak into the paper label from underneath and at times leaves a stain. The tape is thin enough to not leave a "bubble" and is easy to apply. Be sure the tape is not temporary photo tape. For larger labels, smooth cord free Carpet Tape works well.
CRTGAMER wrote:For labels with issues of glue soak thru, try double sided tape. Not photo tape of foam tape, the plain clear double stick works well. Place oversized to back of cart label, trim to size then place on cart.
Apply all the tape BEFORE cutting out the new label. The tape applied is larger then the label so that any fingerprints stuck to the tape is clear of the printout. Apply the glossy top tape first, then the double sided tape last. After the tape is applied on the top and bottom, the label can then be cut out.

If the old cart label has deep tears it will need to be removed first. However the new label can sit right on top if the old label is smooth. The new label is thin enough to clear the console connector. I accidentally set my label a little low and had to trim off the excess with a razor blade. The label has to be below the indentation of the cart plastic as not to be caught by the console cart connector housing. There is slight bubbling at the bottom of the label from the dull razor blade, I should have used a new blade or XActo Knife.
I now have a correct sized GBA Label saved, it will be the size reference for future GBA Label printouts. Keep in mind a replacement printer might scale the images off slightly, always use the same printer when setting the image size.
The new label is not perfect due the picture source and the printout on plain paper. Photo paper would offer a cleaner printout, but the label would then be too thick. Still, a big improvement over the original damaged label, adequate for identifying a game cart.
serge85 wrote:I like to have my items in good condition, and sometimes I find in the wild some poor badly damaged games, and I enjoy restoring them to their former glory

This is a badly damaged Mega Man X3 I found:
I printed a new label, and of course, it will never be like the original, but it's way better than that damaged label. I printed this label using matte photo paper, and then I applied contact paper on top of it, I'm still looking for better ways to improve my printings.
I cleaned the marker with some detergent and water.


Preventing Disc Damage from the Case
There are certain Game Disc Cases and Movie Disc Cases that might damage the disc. This is caused by the fingers in the hub that grip the disc too tightly. A good practice to always press down the center hub while removing or replacing a disc to and from its case. However even doing this might still result in a disc to bend in certain designs. Here are two styles of cases and the solution I came up with for each. There are other designs that will need a different approach in either the technique to remove a disc or a mod to the holder.
Black Game or DVD Case
I show a Gamecube Case in the picture below, there are other cases with a similar center hub design problem. The hub really holds onto the disc even when pushed. There is no flexible release unless you can squeeze all the clips inwards, the game disc will bend upon removal. Just as bad is when replacing the disc, it has to clear the tight clips of the hub. This will eventually crack the center of the game disc.
The fix is very simple. Remove the game disc and use a pair of pliers to squeeze in the clips a little all the way around. The jaws of the pliers can also file in the clips by twisting back and forth around the hub. A file can also be utilized to smooth down the plastic clips.
After the repair the game disc should pop in and out with a very soft click.
Clear Movie Case
This is sometimes an issue for compilation movie volumes such as a TV season case. Even when the center is depressed the disc is still hooked by the clips. Upon close inspection, pressing the center only releases the top clip, the two lower clips stay spread out. This will easily break the disc even on the initial removal. Pulling slightly on the bottom edge of the disc freed it from the case disc sized ring inset, allowing the disc to slide down free of the lower hooks. Most consumers will not know this work around and may crack the center of the movie disc.
The pliers trick used earlier would only crack the clear brittle plastic holders. A more careful approach is needed. File down just a little off each lower clip, be sure to leave the top finger intact. The top clip flexes clear, the reason why it does not need to be filed down. Be careful how much plastic you remove. Just take enough material to allow for easy disc removal, but not too much that will not keep a disc secure.
CRTGAMER wrote:Solid and opaque plastic tend to be a more malleable flexible material such as a standard DVD case compared to clear brittle plastic such as a standard CD Jewel case. Use care in fixing the teeth, noting there are many designs which place the "Death Grip" hold on a disc. A disc should be easy to remove without any bending or flex, however the center holder should keep a disc secure when stored. There is really no need why discs are packaged so tight in a case disc holder, I don't plan on storing my games and movies in a Paint Shaker.
A cracked game disc
Repair A Cracked Disc Center
The game case repair stated above prevents a disc center from cracking. Here is a fix for CD and DVD discs that are already cracked. A decision must be made, do the repair first or make a backup before the repair. Adding tape might throw the disc out of balance, a very improbable risk but needs to be considered. On the other hand, there is a risk of the cracks getting worse and the disc shattering inside a fast disc burner. Even if a backup is done at a slow speed, when the disc is first inserted the drive will spool up rapidly on initializing a disc.
Right Click to see a larger view
Material
Decide of what type of Repair Tape to use. Paper Labels, Centers of "Disc Stomper" print labels, or different styles of tape. The idea is something not too thick or heavy, yet strong enough to help to keep a crack from spreading. My preference is Lamination Sheet Protectors, thicker then tape, not too heavy and stronger then paper labels. The Clear Lamination is also less obscuring in appearance compared to Paper Labels or Solid Tape.
Tools
¼" Drive ⅜" Socket - Aligns the Tape and Template
½" Hole Punch - Used for punching out the center
Steel Washer - Sized up to center hole, Used as a Template
Tweezers - To hold and place the tape
Scissors and Razor Blade or Small Trim Knife
Right Click to see a larger view
Note that a ¾" hole punch is closer to the center hole size of the CD. However a larger hole punched in the sticker makes it harder to align a correct sized steel washer as a template. In addition, there would be no room for error if the tape was placed slightly off center. Go with the ½" Hole Punch, the excess tape can be trimmed later.
CRTGAMER wrote:DO NOT DRILL small stop holes at the edge of the cracks in the disc. The strain on the plastic from drilling could just make the cracks worse or ruin the disc completely. Once the repair is done, immediately copy the disc and just use the backup.
Create The Repair Sticker
Place a piece of wood under the Repair Sticker, then punch out the hole. If the hole is punched at the center of a split backing underneath, the tape will be easier to peel. Punch a couple of extra holes in case of marking errors, leave enough edge around each Repair Tape hole.
Place the socket in the punched hole then drop the steel washer on top. Use a fine point marker, draw a circle around the steel washer. Remove the Washer and Socket then carefully cut out the circle with scissors. You can leave a tab to help peel the backing and hold the tape. The tab can be snipped off right before installing.
CRTGAMER wrote:Only the top of the CD will get a sticker. If a sticker was placed on the Read side, the disc would sit slightly further away from the disc reader laser eye.
Applying The Repair Sticker
Place the disc on a flat clean stable surface, a Gamestop Yellow Disc Envelope works well. Do not use the socket to align the tape to the disc, it is smaller then the disc hole. A larger socket cannot be used either since the Repair Tape hole is smaller then the CD hole. The Clear lamination is easier to see and align vs a solid paper label. If the tape has a tab carefully snip it off before setting the Repair Tape in place.
CRTGAMER wrote:Tweezers really help here to center the Repair Tape and keeps oils from your fingers from contaminating the tape.
After the tape is placed, press lightly all the way around to prevent wrinkles. Follow thru by pressing firmly with your fingernail to "laminate" the tape to the disc. Be careful not to scratch the disc label.
Use the Razor Blade or Small Trim Knife to cut away the excess tape. It is easier to hold the disc in one hand while cutting with the other. Angle the blade to prevent slipping and damaging the disc. The allows for a clean cut of the excess tape. Cut slowly in a slight sawing action. After the excess tape is trimmed, blow off any residue. In the pic below the Repair Tape is sized to just larger then the cracks on the disc. Small and light at the center to avoid any balance issues.
Right Click to see a larger view
Step back and look at the completed job, all done! Immediately backup the disc onto a CDR or DVDR; use the backup and put the original away.