Arcade Controller Mod Guide: Home System Adaption
Posted: Thu Aug 05, 2010 12:04 am
Arcade Controller Mod Guide: Home System Adaption
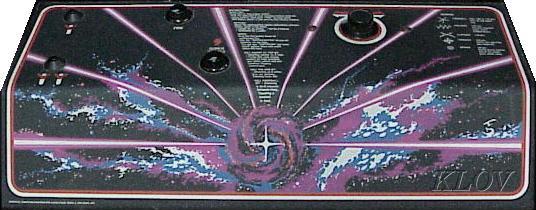
A Two Part Guide, a set of Gamepads then a Zaxxon Arcade Controller Mod in the second Reply.
My other controller mods:
Tatsunoko vs Capcom Fight Stick Mod Stage One - Dual Stick Select
Arcade Spinner Mod: Tempest Inexpensive Method
Twin Stick Mod Guide: Console Arcade Method
NES R.O.B Interactive Mod Guide
For a great FPS controller get a Spitfish EdgeFX.
Another PS1 and PS2 Mouse approach:
PS2 Smart Joy Frag Mouse and Keyboard Adaptor Review and Mod
MODIFY YOUR CONTROLLER TO THE PC, MAC AND HOME CONSOLES
I decided to do another article concerning a more elaborate mod, adapting an existing controller work as a PC Keyboard and to function on multiple systems. Here are two different controller Mod setups, each offering a unique capability. You can use these ideas on your own favorite controller or custom build assembly. The modded controller pics are at the bottom and in the second Reply.
PC and MAC computers:
Most emulators support USB controllers, but there are EMUs, Flash Games and Home Brews that only rely on the old standby keyboard. Luckily most use ARROW keys for movement and SPACE BAR, CTRL and ALT/OPTION Keys for fire.
TWO PLAYER GAME PAD KEYBOARD ENCODER FOR PC AND MAC
SIMPLE USB METHOD
The I-PAC USB Keyboard encoder is a great easy way to adapt any digital controller. A simple matter of attaching arcade controller to the appropriate labeled wires. The Encoder is then attached to the computer via USB as a spare keyboard. Unfortunately because of DOS incompatibility and driver issues, this is not an option for me.
http://www.ultimarc.com/ipac1.html

ALL OPERATING SYSTEM METHOD
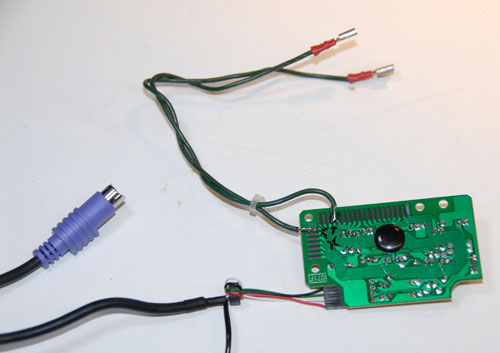
I use an older keyboard encoder with a PC PS/2 connector. This allows full compatibility with all operating systems and no drivers are needed.
PC PS/2 Cable plugs - Purple for Keyboard and Green for Mouse.

Add a PC PS/2 to USB Adaptor for the MAC

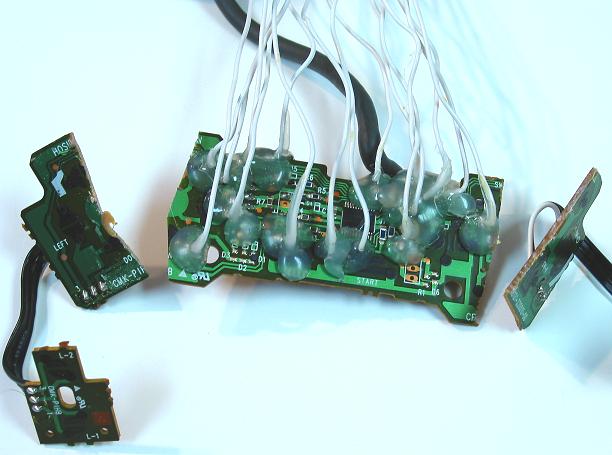
I removed the small encoder PCB out of an older keyboard and ignore the matrix layout. The matrix could be traced, but chance of not following the traces correctly. Best to remove the PCB and do an actual test method. I hook up the keyboard PCB to the PC and tested the contacts connecting two pins at a time with a wire while running a keyboard test program such as Checkit 3.0. A word processor could be used, but identifying the special keys won't work. A careful and patient jump of the wire to get the results, two contacts at a time. Decide what keys you would like to use. Identify each key say pin 3 and 6 for the letter X, and write it down on a sheet of paper. Eventually you will have a long list for all the buttons.
Encoder is small enough, I found easy to enclose it in its own plastic project box. Since there are LED lights on the encoder, easy matter of mounting to expose the NUM, CAPS and SCROLL LOCK Lights. A cosmetic bonus that also indicates power available. But wait, what if you are playing Mame and want to play another Arcade game rom? Throw an ESCAPE button in the box and solder that one up too. Menu ARROW Keys and RETURN Keys are part of player one controller.
MAME DEFAULT KEY
The goal is to get the desired default old DOS MAME control layout. This includes the ARROW Keys, CTRL, ALT, SPACE, LEFT SHIFT and RETURN keys which should cover most games. Note that current versions of Mame moved the coin and start buttons around. Having the RETURN and ARROW keys comes in handy to control the Mame menu from the Game Pad.
PLAYER ONE
R1 - Coin (RETURN)
L1 - Start (1)
Up - Up Arrow
Down - Down Arrow
Left - Left Arrow
Right - Right Arrow
Button D4 - Left Control
Button E5 - Left Alt
Button F6 - Spacebar
Button A1 - Left Shift
Button B2 - Z
Button C3 - X
PLAYER TWO
R1 - Coin (5)
L1 - Start (2)
Up - R
Down - F
Left - D
Right - G
Button D4 - A
Button E5 - S
Button F6 - Q
Button A1- W
Button B2 - C
Button C3- V
Keyboard ghosting not a problem as long as not too many buttons are pressed at one time. With two player controllers attached, could present problems, though I have had good results. I think because most of the two player games only uses the first two or three fire buttons as in METAL SLUG.
If your controller has no internal PCB such as a custom build, then just match up each pair of wires from the controller switches to the appropriate pins you wrote down. If you have a controller with a PCB, be sure the traces are isolated from each button. Again two wires per button needed so be sure to leave enough trace for a solder pad.
All the wires together are daunting nightmare to follow, so just go two at a time. Bear in mind you may have say four wires going to pin five of the keyboard encoder. Best to solder the four wires to a single lead first then to the pin on the keyboard encoder.
A great site, goes into detail of soldering wires to a gamepad:
http://www.slagcoin.com/joystick/pcb_wiring.html
You can go an extra measure and give the controllers each its own connector. This will be an advantage for future custom controllers. Idea is as not having to make up additional keyboard encoder boxes. Or in the case of TWO controllers if one fails, simply swap the connecters. Note that connectors won't work for a sound card game port, only this custom arrangement.
TWO PC PS2 KEYBOARDS WITH ONE COMPUTER
Okay here is how to get two PC PS2 keyboards to work. This also is fully compatible to DOS, WIN and MAC, no drivers needed.
Not just a cable splitter, but a full microprocessor inside, independent of drivers:
http://xkeys.com/index.php

There are also various KVM auto switch boxes. Another great option, be careful of driver compatibility. Could be an issue if USB powered especially for DOS Mame.

A PC Keyboard related note
If you play any games with the keyboard, the WINDOWS key between the CTRL and ALT keys can be frustrating. The Caps Lock Key too can be annoying sometimes. You can disable both Windows Keys or just maybe just the left key with a simple Registry fix.
Win XP - http://johnhaller.com/jh/useful_stuff/disable_windows_key/
Win 7 - http://www.howtogeek.com/howto/windows- ... d=noscript

On to the Zaxxon Multi System Mod, see the next Reply.
A Two Part Guide, a set of Gamepads then a Zaxxon Arcade Controller Mod in the second Reply.
My other controller mods:
Tatsunoko vs Capcom Fight Stick Mod Stage One - Dual Stick Select
Arcade Spinner Mod: Tempest Inexpensive Method
Twin Stick Mod Guide: Console Arcade Method
NES R.O.B Interactive Mod Guide
For a great FPS controller get a Spitfish EdgeFX.
Another PS1 and PS2 Mouse approach:
PS2 Smart Joy Frag Mouse and Keyboard Adaptor Review and Mod
MODIFY YOUR CONTROLLER TO THE PC, MAC AND HOME CONSOLES
I decided to do another article concerning a more elaborate mod, adapting an existing controller work as a PC Keyboard and to function on multiple systems. Here are two different controller Mod setups, each offering a unique capability. You can use these ideas on your own favorite controller or custom build assembly. The modded controller pics are at the bottom and in the second Reply.
PC and MAC computers:
Most emulators support USB controllers, but there are EMUs, Flash Games and Home Brews that only rely on the old standby keyboard. Luckily most use ARROW keys for movement and SPACE BAR, CTRL and ALT/OPTION Keys for fire.
TWO PLAYER GAME PAD KEYBOARD ENCODER FOR PC AND MAC
SIMPLE USB METHOD
The I-PAC USB Keyboard encoder is a great easy way to adapt any digital controller. A simple matter of attaching arcade controller to the appropriate labeled wires. The Encoder is then attached to the computer via USB as a spare keyboard. Unfortunately because of DOS incompatibility and driver issues, this is not an option for me.
http://www.ultimarc.com/ipac1.html
ALL OPERATING SYSTEM METHOD
I use an older keyboard encoder with a PC PS/2 connector. This allows full compatibility with all operating systems and no drivers are needed.
PC PS/2 Cable plugs - Purple for Keyboard and Green for Mouse.
Add a PC PS/2 to USB Adaptor for the MAC
I removed the small encoder PCB out of an older keyboard and ignore the matrix layout. The matrix could be traced, but chance of not following the traces correctly. Best to remove the PCB and do an actual test method. I hook up the keyboard PCB to the PC and tested the contacts connecting two pins at a time with a wire while running a keyboard test program such as Checkit 3.0. A word processor could be used, but identifying the special keys won't work. A careful and patient jump of the wire to get the results, two contacts at a time. Decide what keys you would like to use. Identify each key say pin 3 and 6 for the letter X, and write it down on a sheet of paper. Eventually you will have a long list for all the buttons.
Encoder is small enough, I found easy to enclose it in its own plastic project box. Since there are LED lights on the encoder, easy matter of mounting to expose the NUM, CAPS and SCROLL LOCK Lights. A cosmetic bonus that also indicates power available. But wait, what if you are playing Mame and want to play another Arcade game rom? Throw an ESCAPE button in the box and solder that one up too. Menu ARROW Keys and RETURN Keys are part of player one controller.
MAME DEFAULT KEY
The goal is to get the desired default old DOS MAME control layout. This includes the ARROW Keys, CTRL, ALT, SPACE, LEFT SHIFT and RETURN keys which should cover most games. Note that current versions of Mame moved the coin and start buttons around. Having the RETURN and ARROW keys comes in handy to control the Mame menu from the Game Pad.
PLAYER ONE
R1 - Coin (RETURN)
L1 - Start (1)
Up - Up Arrow
Down - Down Arrow
Left - Left Arrow
Right - Right Arrow
Button D4 - Left Control
Button E5 - Left Alt
Button F6 - Spacebar
Button A1 - Left Shift
Button B2 - Z
Button C3 - X
PLAYER TWO
R1 - Coin (5)
L1 - Start (2)
Up - R
Down - F
Left - D
Right - G
Button D4 - A
Button E5 - S
Button F6 - Q
Button A1- W
Button B2 - C
Button C3- V
Keyboard ghosting not a problem as long as not too many buttons are pressed at one time. With two player controllers attached, could present problems, though I have had good results. I think because most of the two player games only uses the first two or three fire buttons as in METAL SLUG.
If your controller has no internal PCB such as a custom build, then just match up each pair of wires from the controller switches to the appropriate pins you wrote down. If you have a controller with a PCB, be sure the traces are isolated from each button. Again two wires per button needed so be sure to leave enough trace for a solder pad.
All the wires together are daunting nightmare to follow, so just go two at a time. Bear in mind you may have say four wires going to pin five of the keyboard encoder. Best to solder the four wires to a single lead first then to the pin on the keyboard encoder.
A great site, goes into detail of soldering wires to a gamepad:
http://www.slagcoin.com/joystick/pcb_wiring.html
You can go an extra measure and give the controllers each its own connector. This will be an advantage for future custom controllers. Idea is as not having to make up additional keyboard encoder boxes. Or in the case of TWO controllers if one fails, simply swap the connecters. Note that connectors won't work for a sound card game port, only this custom arrangement.
TWO PC PS2 KEYBOARDS WITH ONE COMPUTER
Okay here is how to get two PC PS2 keyboards to work. This also is fully compatible to DOS, WIN and MAC, no drivers needed.
Not just a cable splitter, but a full microprocessor inside, independent of drivers:
www.xkeys.com wrote:Connect any two standard PS/2 type keyboards to a single keyboard port on your computer. An internal microprocessor transmits data from the active device to the port. Switching between the two devices is instantaneous.
http://xkeys.com/index.php
There are also various KVM auto switch boxes. Another great option, be careful of driver compatibility. Could be an issue if USB powered especially for DOS Mame.
A PC Keyboard related note
If you play any games with the keyboard, the WINDOWS key between the CTRL and ALT keys can be frustrating. The Caps Lock Key too can be annoying sometimes. You can disable both Windows Keys or just maybe just the left key with a simple Registry fix.
Win XP - http://johnhaller.com/jh/useful_stuff/disable_windows_key/
Win 7 - http://www.howtogeek.com/howto/windows- ... d=noscript
On to the Zaxxon Multi System Mod, see the next Reply.