
Use this thread to post about any cool little project you have done. Something that's not deserving of its own thread, but worth sharing nonetheless. This could be any kind of modification, hack, repair, art project, furniture making, et cetera.
If you have done or made something exceptionally cool, please make a dedicated thread for it!
The "Look What I Did / Made" Thread
Re: The "Look What I Did / Made" Thread
I'll start. 
I made a 3.5mm stereo to dual mono headphones adapter. This is often called "summing."
While at work, I like to use one earbud. So stereo music and videos really suck. This adapter condenses the stereo signal into mono, then splits the mono signal to both the tip and sleeve on the female jack so I can use either the left or right earbud with no difference.
I'm not sure if this adapter exists any where for purchase, but I would get annoyed whenever I searched for it. Mostly because the search terms for "stereo to dual mono" returns results for adapters like this one that split the stereo signal to two mono signals. Most other simple stereo/mono adapters will just give you the tip or sleeve on the mono output, which wouldn't help either.
Then I found this, specifically Figure 2, and decided to make my own. Three resistors are dirt cheap, and I decided to use some quality jacks so they were maybe $5 for both. I had some really good shielded wire on hand. The cable is a little stiff, which can be a bit annoying, but I wanted something that isn't going to break any time soon.
Above schematic shows mono output, but as I said above, I used a stereo female jack for dual mono output (just tie the mono output to both the tip and ring of a stereo jack).
edit: And no, you cannot just use a Y adapter to mash the stereo signal into mono. Doing so will mess up the impedance, it's all in the article I linked above.
edit: PCB here: https://oshpark.com/shared_projects/Q9xa2c8A
- 20160713_094914.jpg (216.97 KiB) Viewed 29165 times
I made a 3.5mm stereo to dual mono headphones adapter. This is often called "summing."
While at work, I like to use one earbud. So stereo music and videos really suck. This adapter condenses the stereo signal into mono, then splits the mono signal to both the tip and sleeve on the female jack so I can use either the left or right earbud with no difference.
I'm not sure if this adapter exists any where for purchase, but I would get annoyed whenever I searched for it. Mostly because the search terms for "stereo to dual mono" returns results for adapters like this one that split the stereo signal to two mono signals. Most other simple stereo/mono adapters will just give you the tip or sleeve on the mono output, which wouldn't help either.
Then I found this, specifically Figure 2, and decided to make my own. Three resistors are dirt cheap, and I decided to use some quality jacks so they were maybe $5 for both. I had some really good shielded wire on hand. The cable is a little stiff, which can be a bit annoying, but I wanted something that isn't going to break any time soon.
Above schematic shows mono output, but as I said above, I used a stereo female jack for dual mono output (just tie the mono output to both the tip and ring of a stereo jack).
edit: And no, you cannot just use a Y adapter to mash the stereo signal into mono. Doing so will mess up the impedance, it's all in the article I linked above.
edit: PCB here: https://oshpark.com/shared_projects/Q9xa2c8A
Last edited by Ziggy on Sat Jul 21, 2018 8:01 pm, edited 5 times in total.

Re: The "Look What I Did / Made" Thread
hi Ziggy great thread you started...............
below is a 360 i did that differs from the other 3 ive done. It is a RGH 1.2 ( Reset Glitch Hack ) it means fast boots of RGH 1 and compatibility of RGH 2. It also has a Talismoon 12V Fan that replaces the stock Fan and clear Shroud , i installed a extra Fan on top that runs at 12V too. ......... I get temps around 39 degrees Celsius for the CPU and 42 for the GPU.

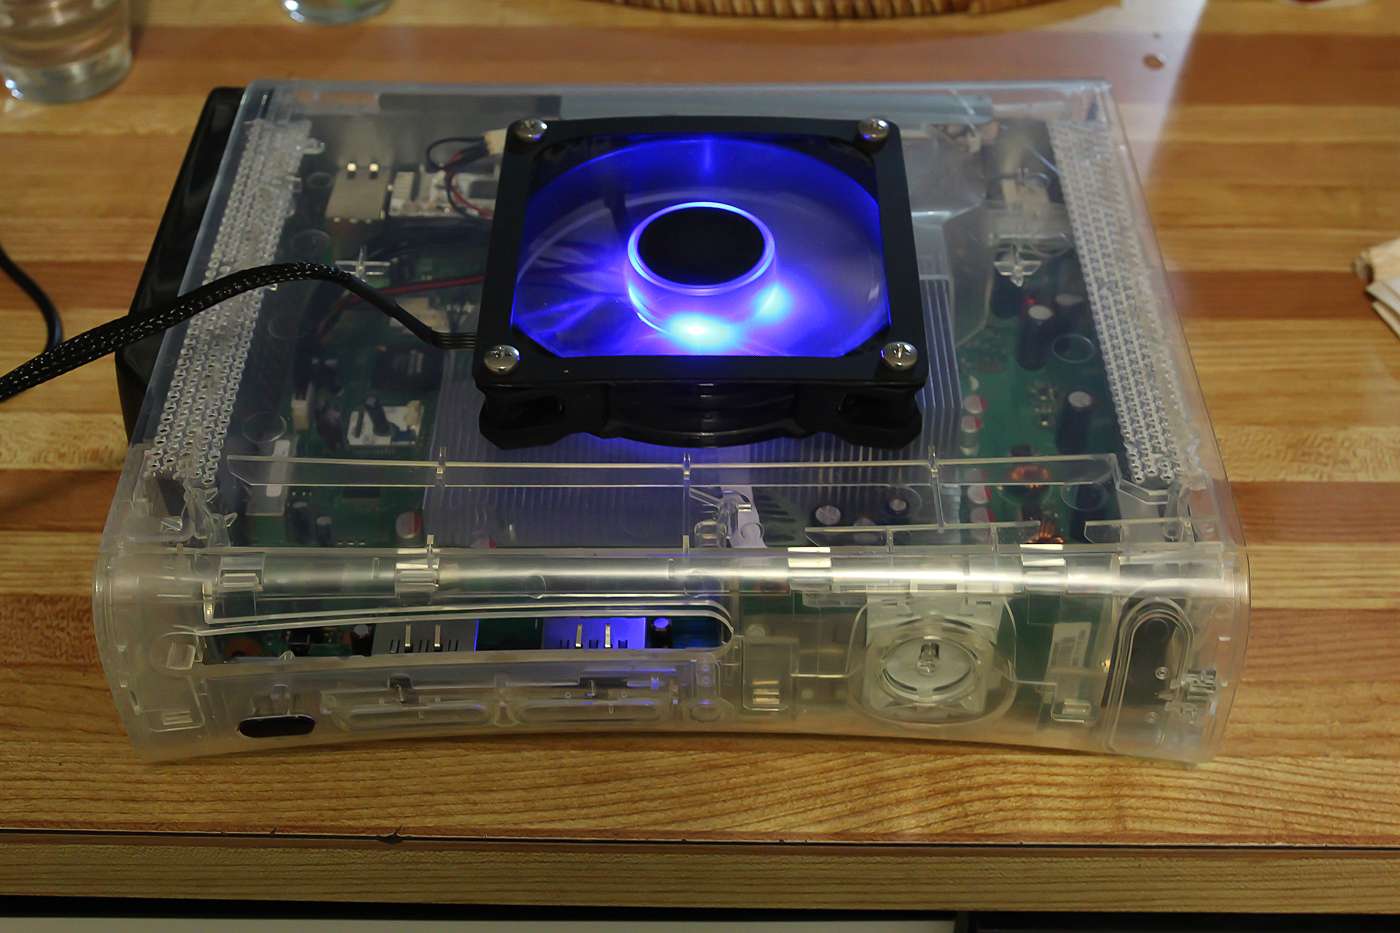
below is a 360 i did that differs from the other 3 ive done. It is a RGH 1.2 ( Reset Glitch Hack ) it means fast boots of RGH 1 and compatibility of RGH 2. It also has a Talismoon 12V Fan that replaces the stock Fan and clear Shroud , i installed a extra Fan on top that runs at 12V too. ......... I get temps around 39 degrees Celsius for the CPU and 42 for the GPU.
Re: The "Look What I Did / Made" Thread
TV cabinet. Made it myself from scratch, 20mm thick MDF, painted and varnished it, supports a TV, etc. In the case are many DVD's and also my Project Unity 2 system (to date).

Photo isn't a good one but gives the idea.
Smoky glass shelves - adds quality to the appearance.
Photo isn't a good one but gives the idea.
Smoky glass shelves - adds quality to the appearance.
I am the Bacman
Re: The "Look What I Did / Made" Thread
I bought this drum sander set from Harbor Freight to use on my drill press. It comes with a stupid little key to change the sand paper, as well as two shaft adapters. I wanted a neat way to store everything so I wouldn't lose the key or the adapters. So I decided to build a little stand / organizer for them.

I find it kind of funny that the very first thing I used these drum sanders for was a stand for them.
edit: And for those that don't know, workshop stuff isn't made to look nice. The idea is to make something that's fully functional for your needs, but to not waste time on making sure it's perfect. That extra time is better spent on beautifying the projects that will be in your home, not in your workshop or garage.
Re: The "Look What I Did / Made" Thread
I've been meaning to make a thread for this, but I'll just post this here for now...


It's a SNES cart PCB! This is the first PCB that I've ever designed and had produced, so I'm a little proud of it.
It's a LoROM board that uses mostly surface mounted components. It uses flash memory (still in production) for ROM data. It can be used as a standard LoROM board with a max ROM size of 8Mib. Or, if you install a 74'161, it can be used as a multi cart! The games are switched by resetting the SNES (hit the SNES reset button and the cart switches to the next game).
Anyway, that's the gist of it. I still want to tweak it a little more, and better prepare the files for sharing. I'll eventually create a thread for this thing so I can have a parts list, how-to, etc.
I was thinking about making a through hole version since a lot of people seem to have trouble with surface mounted stuff. And I was also working on a Genesis version with the same features.
-
fastbilly1
- Site Admin
- Posts: 13775
- Joined: Tue Apr 17, 2007 7:08 pm
Re: The "Look What I Did / Made" Thread
So does this mean youll be making carts again?

Re: The "Look What I Did / Made" Thread
I think Ziggy is Krang... that's amazing dude.

Re: The "Look What I Did / Made" Thread
fastbilly1 wrote:So does this mean youll be making carts again?
Yes and no.
This particular project was something I wanted to do for the charity auction (I came up with a REALLY good idea for a cart!) but last year's auction didn't occur as it had in past years.
Outside of that, I'm mainly doing this for myself. I wouldn't be opposed if a RB regular wanted me to do something for them, but I'm not about to "open shop" or anything. I just don't have the time. I do have some other carts in the works, but I plan to fully share everything online.
Xeogred wrote:I think Ziggy is Krang... that's amazing dude.
I think the maker community is truly amazing right now. Honestly, I know just enough to be able to get this cart made and have it be functional (I even cheated a little). The amazing part, when you think about it, is that I was able to gather all the info I needed for free because others have shared it on the Internet. I was able to use free software to design it. What I couldn't figure out, total strangers were willing to answer my questions on forums, and I got those answers in hours. All the components were super cheap from an online supplier. The PCB manufacturing cost was very affordable, and was delivered to my mailbox 2 weeks after I ordered it!
If I could travel back in time and tell myself while I was in high school that I would make my own SNES cart with relative ease, I wouldn't have believed it. It's really amazing, when you think about it.
Re: The "Look What I Did / Made" Thread
I made another Stereo-To-Mono adapter, but this time I needed RCA instead of 3.5mm. I grabbed a female to male RCA cable off Amazon for $3.50 and used that to have stereo female input and male mono output. Now I can plug stereo sources into my little 13" Trinitron, which only has a mono input.
Although the 3.5mm version was easy enough to make with through hole resistors, I'd actually rather solder three 0805 chip resistors than fiddle around floating in-line through hole resistors. So I made a little PCB that's only a half inch by half inch. Three of them are $1.20 from OSH Park.
https://oshpark.com/shared_projects/Q9xa2c8A
PS - Don't make fun of my soldering. I slapped this little thing together in about 30 seconds flat.
Although the 3.5mm version was easy enough to make with through hole resistors, I'd actually rather solder three 0805 chip resistors than fiddle around floating in-line through hole resistors. So I made a little PCB that's only a half inch by half inch. Three of them are $1.20 from OSH Park.
https://oshpark.com/shared_projects/Q9xa2c8A
- Stereo - Mono Adapter.jpg (73.84 KiB) Viewed 27324 times
PS - Don't make fun of my soldering. I slapped this little thing together in about 30 seconds flat.